-
Notifications
You must be signed in to change notification settings - Fork 101
Data Exploration
Congrats! If you've made it this far, you should be all set up. The last — and by far the most interesting — thing left to do, is to start exploring the data you've ingested. This activity is supported by awspx's web interface — which can be accessed on http://localhost by default.
This section provides an overview of its components, usage examples and advanced options, as well as an explanation on what each node and relationship mean.

The search bar — located bottom-most of the screen — lets you to find ingested resources and add them to the graph. Once something has been added to graph, you can interact with it.
The graph is the main drawing area in which nodes and edges are displayed. It serves as the primary component for visualizing resources, relationships, and effective access.
| Description | Action |
|---|---|
| Select node or edge / show properties | left-click |
| Open node context menu | right-click |
| Expand/Collapse | double-click |
| Select all | Ctrl + a |
| Box select | Ctrl + mouse-drag |
| Remove selected nodes | Delete |
| Pan or move selected node | mouse-drag |
| Zoom in or out | mouse-scroll |
| Rerun layout | Alt + Enter |
| Toggle selection | Ctrl + left-click |
| Close properties | Escape |
| Open search bar | Ctrl + s |
See schema for additional information on how these nodes and edges are displayed and what they represent.
The properties pane — located left-most of the screen — displays selected node and edge information. Nodes and edges can be selected by clicking on them, and deselected by clicking on the graph.
The context menu — activated by right-clicking on a node — provides search capabilities for answering questions pertaining to access control.
The side bar — located right-most of the screen — provides a number of additional options:
-
Layout:
Change between auto, concentric, dagre, and grid, graph layout schemes.
-
Clear:
Remove all graph elements from the screen.
-
Screenshot:
Take a screenshot of the current graph (properties, search, and other components will be excluded).
-
Redact:
Hides or displays node labels (search and properties will disabled, or enabled, respectively).
-
Load saved query:
Opens a list of predefined cypher queries to choose from and run.
-
Help:
Redirects to this page
The advanced search button — located right-most of the search bar — lets you enabled advanced search options.
See Advanced options for further information.
So how do you use this thing anyway? To answer this question, we're going to explore some of awspx's fundamental capabilities, specifically by looking at how we can use it to start answering the following two questions:
To do this, we're going to load the sample dataset distributed with awspx. If you have awspx [set up](Quick start) you can load this dataset yourself by running these two commands:
awspx db --load-zip sample.zip
awspx attacks
One of awspx's primary inspirations was BloodHound — a tool that popularized graph-theory for application in offensive security and one that has continued to demonstrate its value when approaching Active Directory (AD) security.
Like Bloodhound, one of awspx's core functions is to show paths from positions of limited control and access to positions of total control and access. In AD, this would be synonymous to something like Domain Admin. In AWS, this would be anything that grants all actions to all resources. In awspx, total control and access is represented by the pseudo-policy, Effective Admin — getting here implies being able do to get anywhere else.
The obvious question is then what can get to Effective Admin? We can find these paths by typing "Effective Admin" into the search bar and adding this pseduo-policy to the graph.
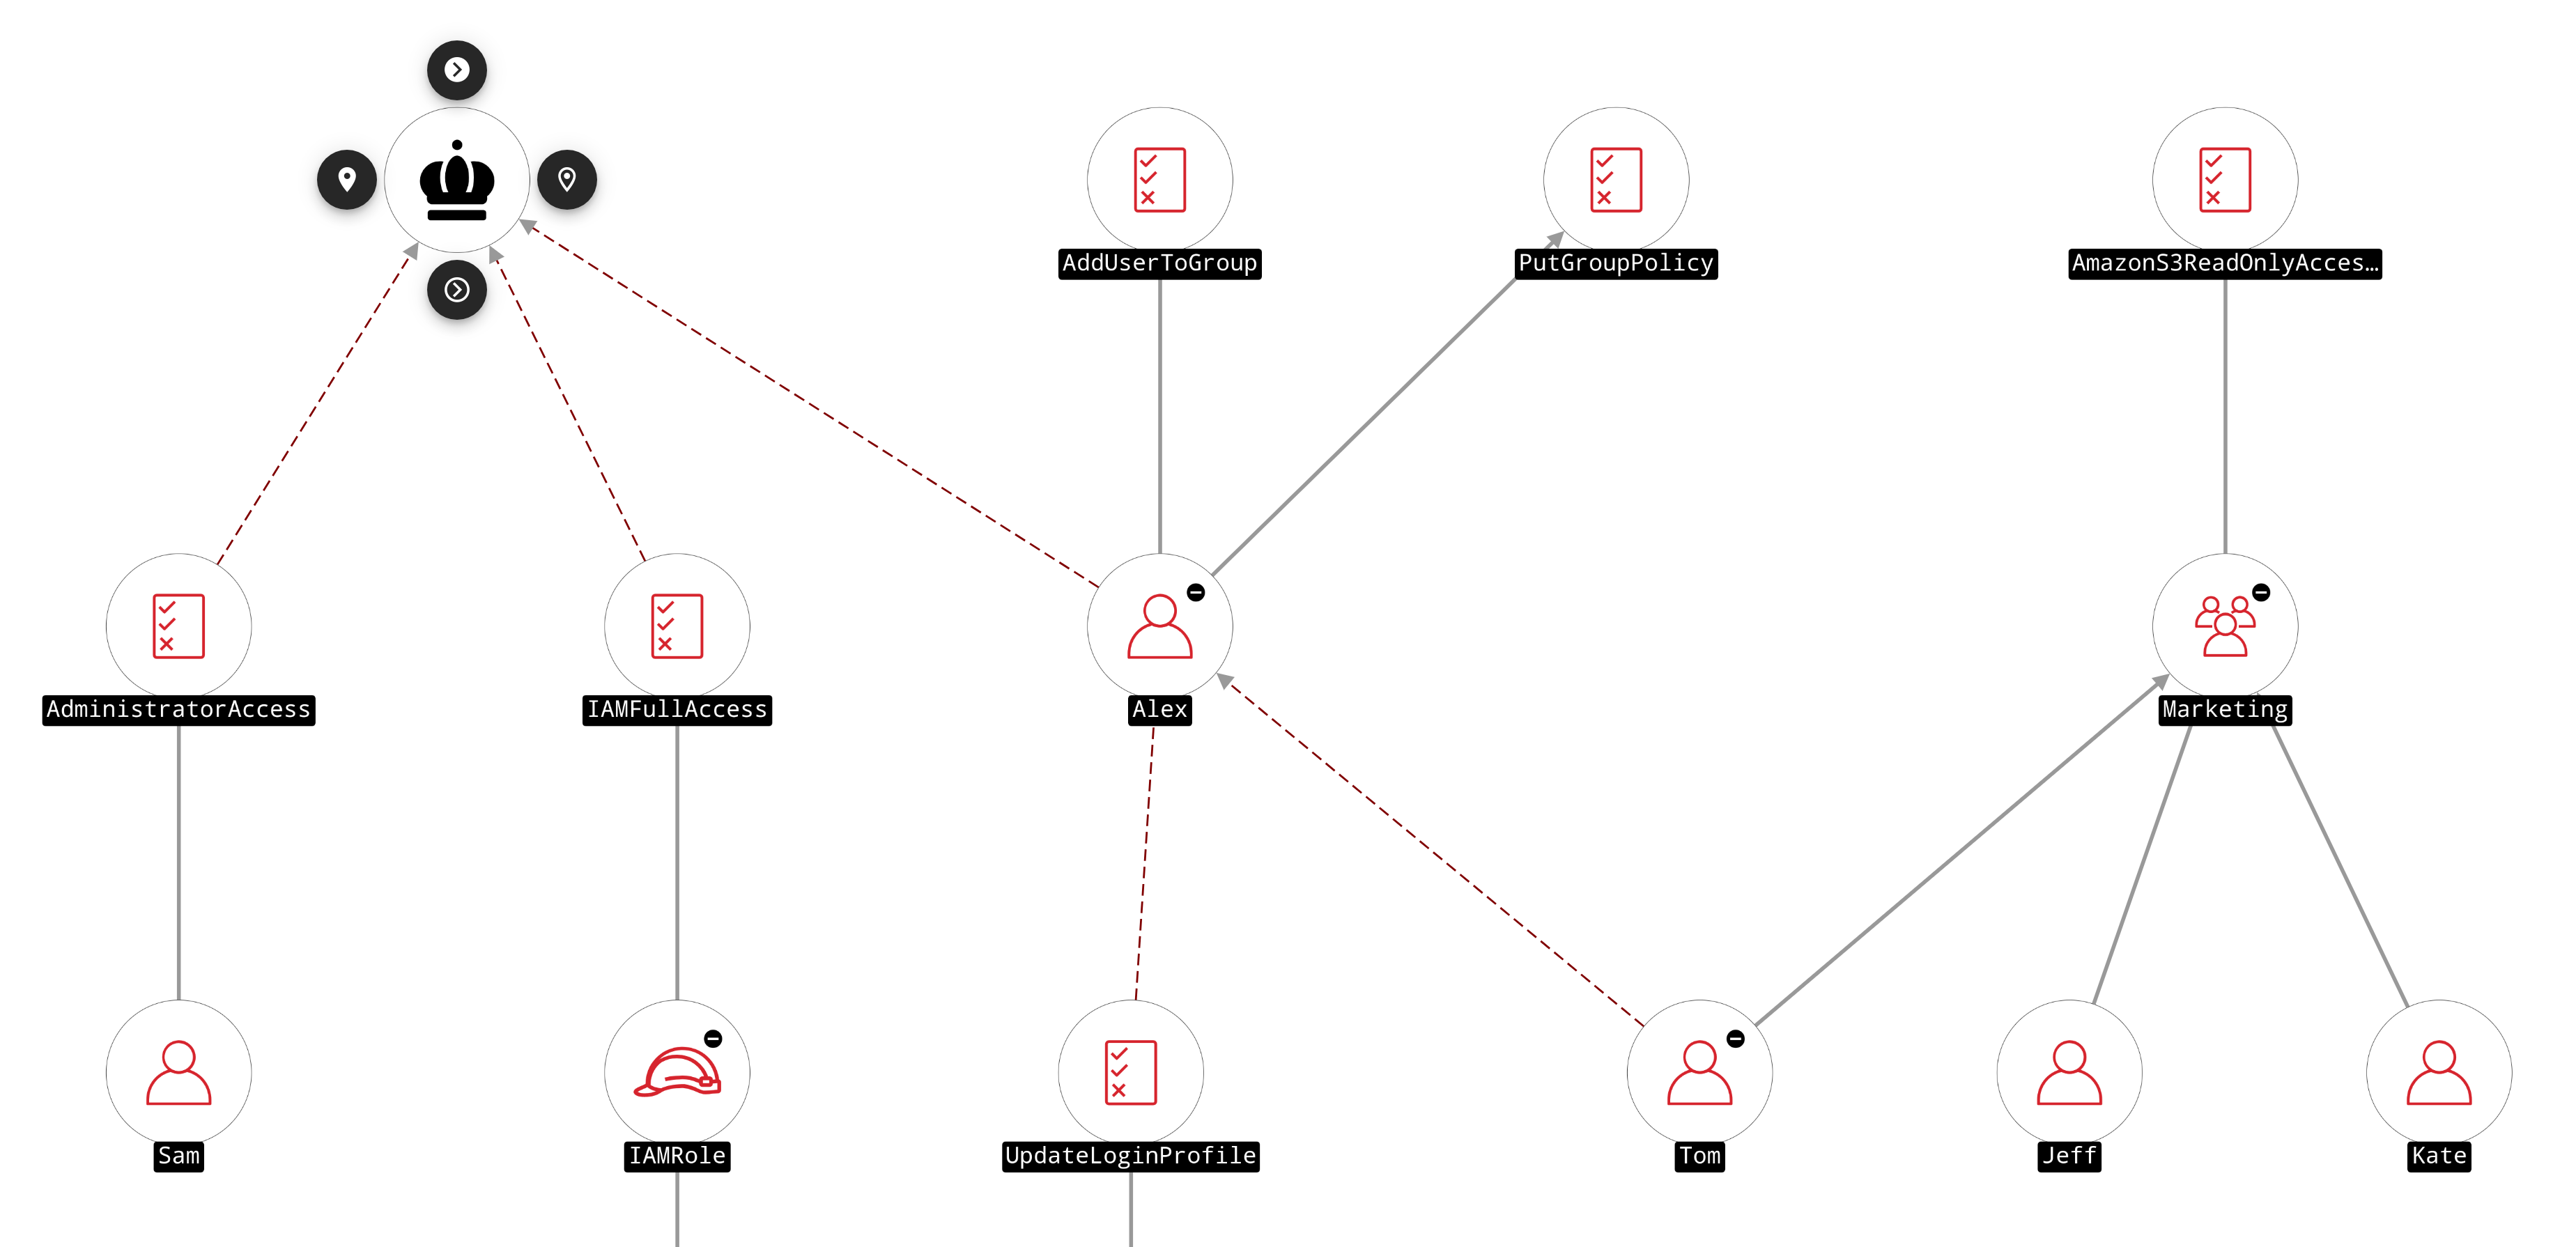
You can bring up this node's context menu by right clicking on it. Selecting Inbound Paths will produce a graph that looks similar to this:

Many of the resources in this picture are administrators in this account, some intentionally, others not. Let's take a closer look at Sam and Alex.
The policy AdministratorAccess is attached to Sam. Sam is an administrator. This is not particularly interesting and it's probably safe to assume this is intentional.
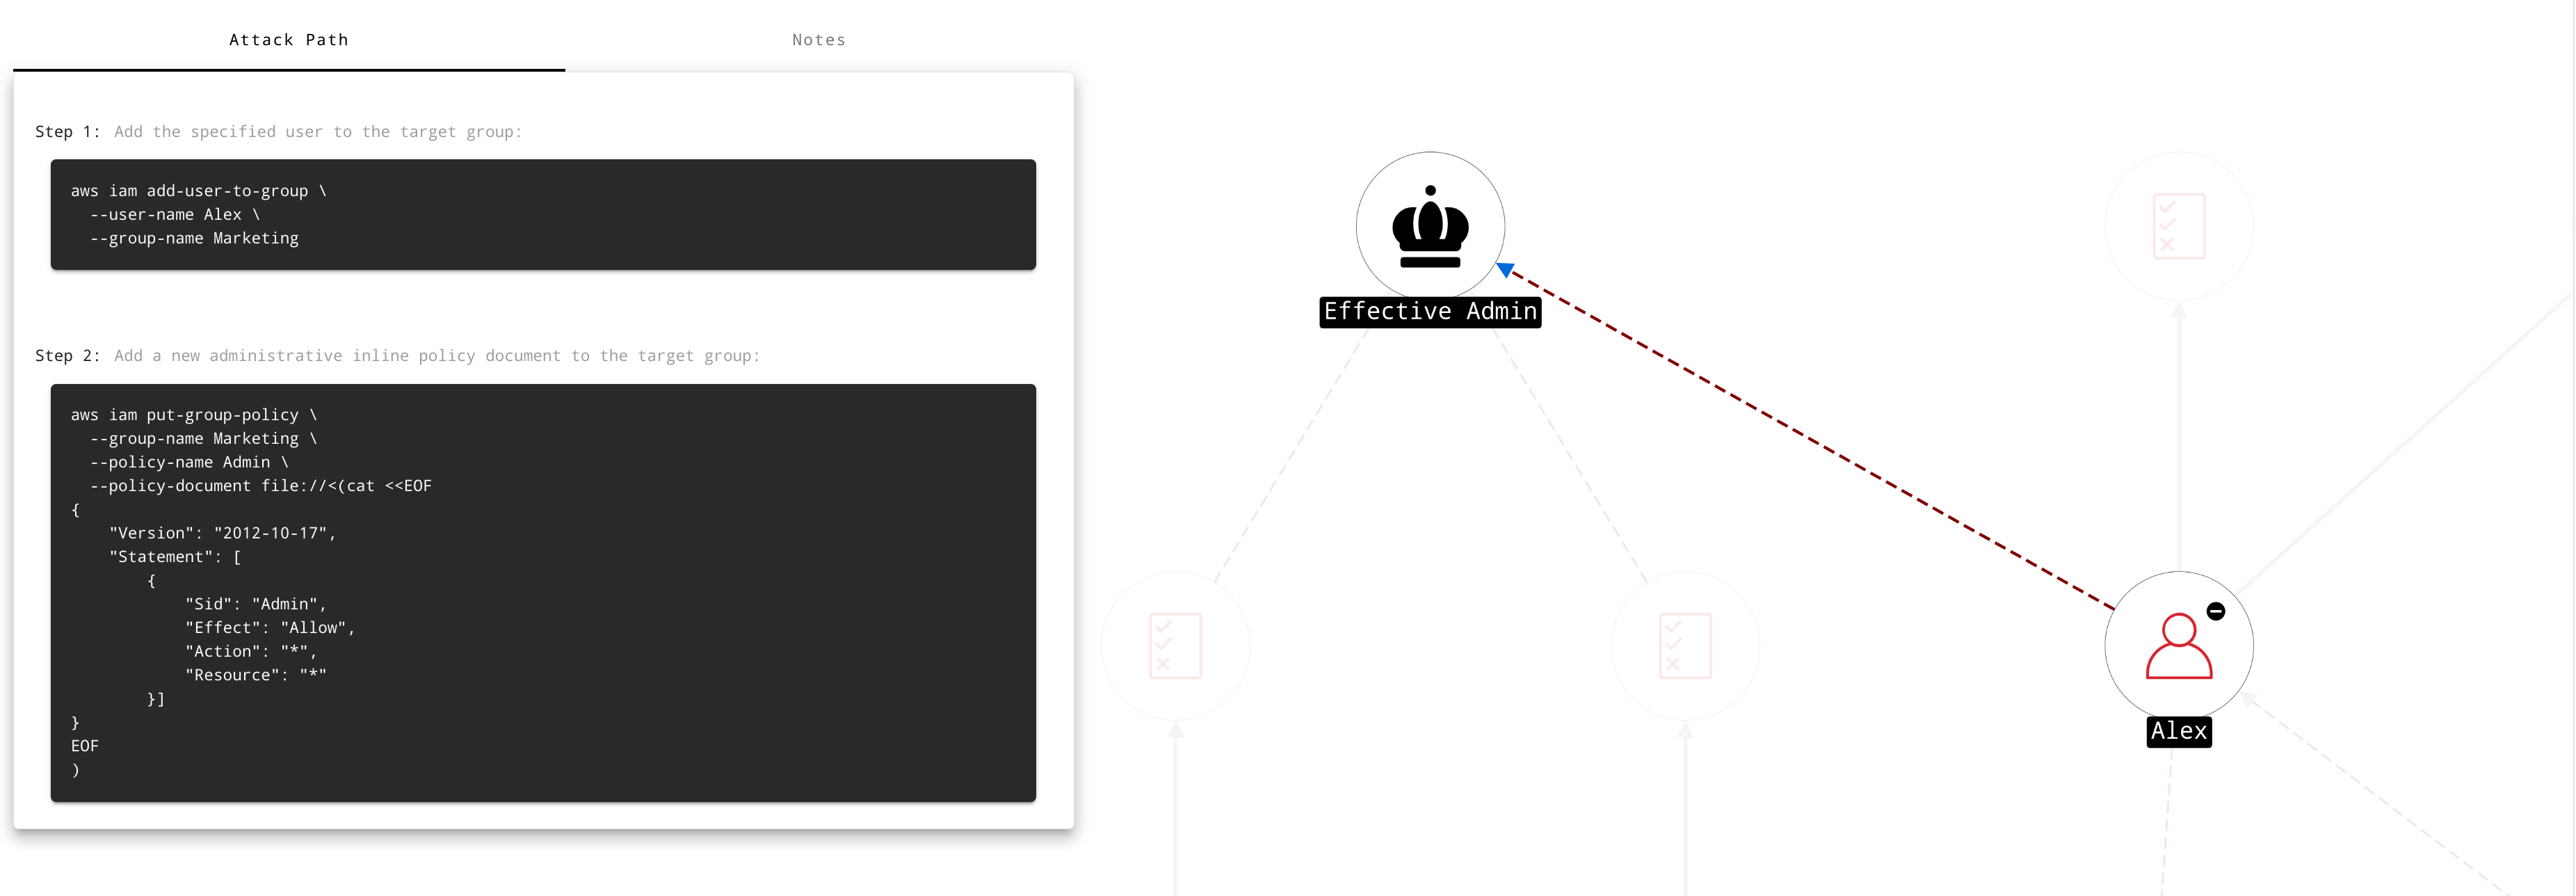
On the other hand, if we look at Alex, things are more interesting. If we click on the dotted red line that connects Alex to Effective Admin, we can see that there are a number of steps could be followed: successfully executing the commands that correspond to these steps would enable Alex to gain unfettered access to the environment — this is probably not intentional.

We can work out where these actions are granted by inspecting each related policy. Double-clicking on Alex (as was done here), or any other node, will show directly attached groups and policies. This is useful not only for inspecting policy information, but also for understanding what the resource's role in an environment is.
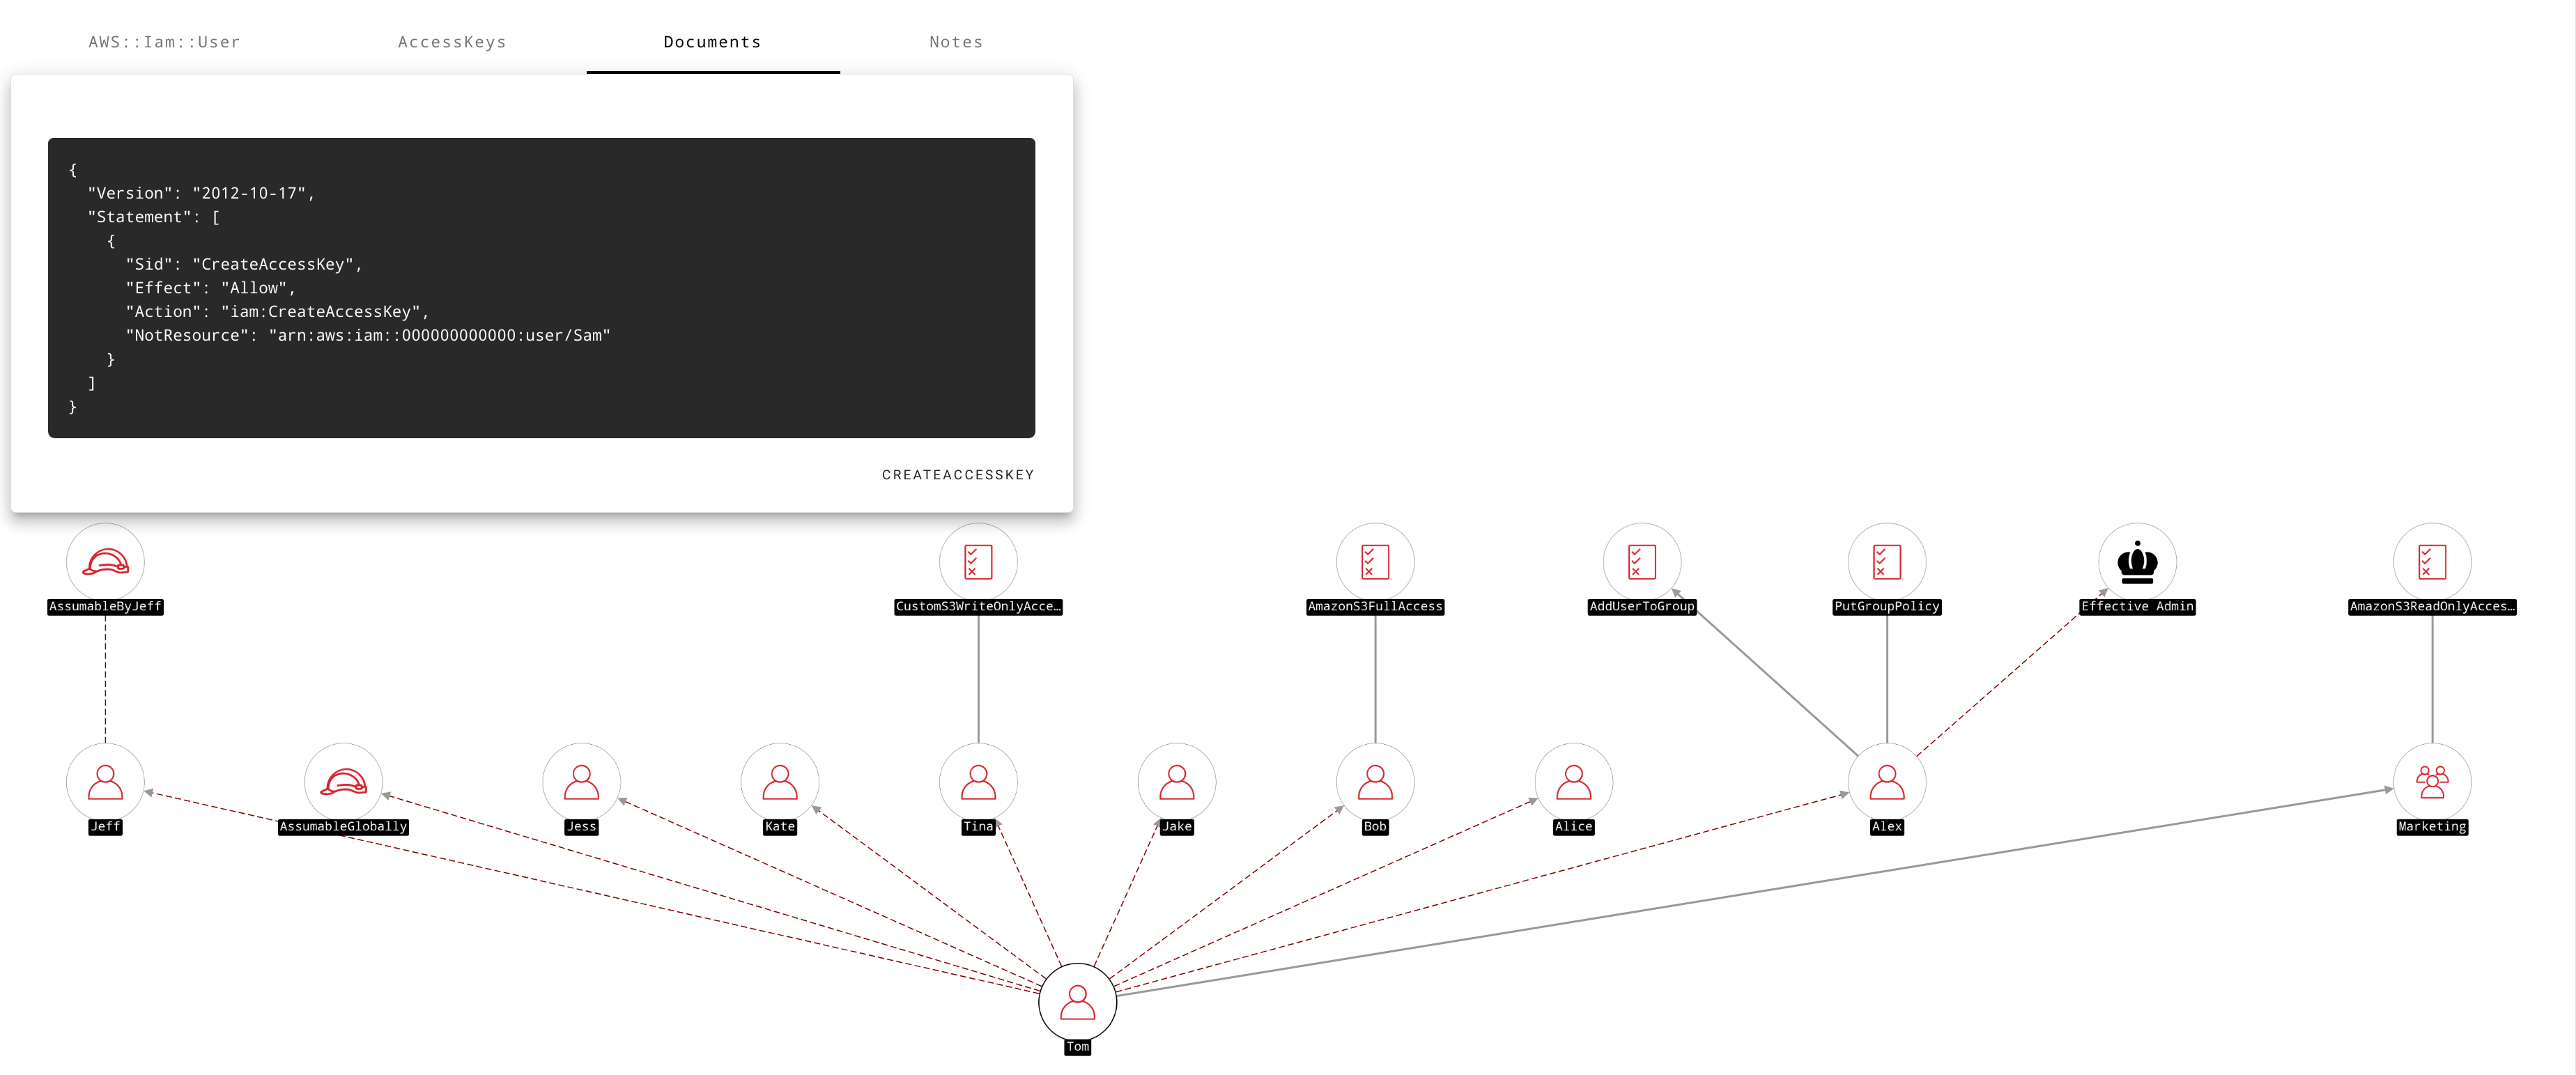
One question can often lead to another — as you may have noticed the user Tom was also an Admin, since Tom could get to Alex — who as we have just established is effectively admin. We might ask ourselves why is that and what else can Tom do? We can start answering that question by exploring Tom's outbound paths:

It turns out Tom is allowed to create access keys for all users in the environment, except Sam — our Admin, providing a number of opportunities for privilege escalation in addition to being able to get to Effective Admin.
Once such opportunity would be for Tom to create an access key for the user Bob — who has AmazonFullS3Access. This would allow Tom to extend the legitimate S3 access he already has (AmazonReadOnlyAccess) to the full scope of S3 actions. Similarly Tom could create an access key for Tina to get to CustomS3WriteOnlyAcesss — which is an interesting policy but for other reasons.
Another interesting path is the one that leads to the role AssumableGlobally. If we explore a little further, we'll see that Tom can assume this role, not because of any identity-based policies he has, but rather because of a misconfigured trust policy document on the role itself. If we were to select inbound paths on this role, we'd see that any AWS account in the world could assume this role. This is probably something that would be worth exploring a little further.
While paths may not be an unfamiliar concept if you've used tools like Bloodhound before, actions may be. You can think of them as discrete, granular permissions or just things that you can do in AWS. In a nutshell, they underpin AWS access control, defining what can and can't be done in an environment.
They have names like s3:GetObject and ec2:CreateInstance, and understanding whether an action is dangerous or not will often require an understanding of the context surrounding it: the same action could be benign or risky depending on the nature of the resource it affects. There are presently thousands of different actions, with more being added all the time.
When we're talking about actions, there are two really obvious questions that come to mind:
These two questions are facilitated by inbound and outbound action searches, respectively — available from each node's context menu.
Suppose we had some top secret asset, say an S3 object representing our crown jewels, which quite unimaginatively was called top-secret.txt. Naturally, we would like to know what has access to this resource. In our case, what we're trying to avoid at all costs is unauthorized read access: i.e. s3:GetObject; however, if the scenario differed, our primary concern could just as well be something like write access, if this asset was, say, our website — context is important.
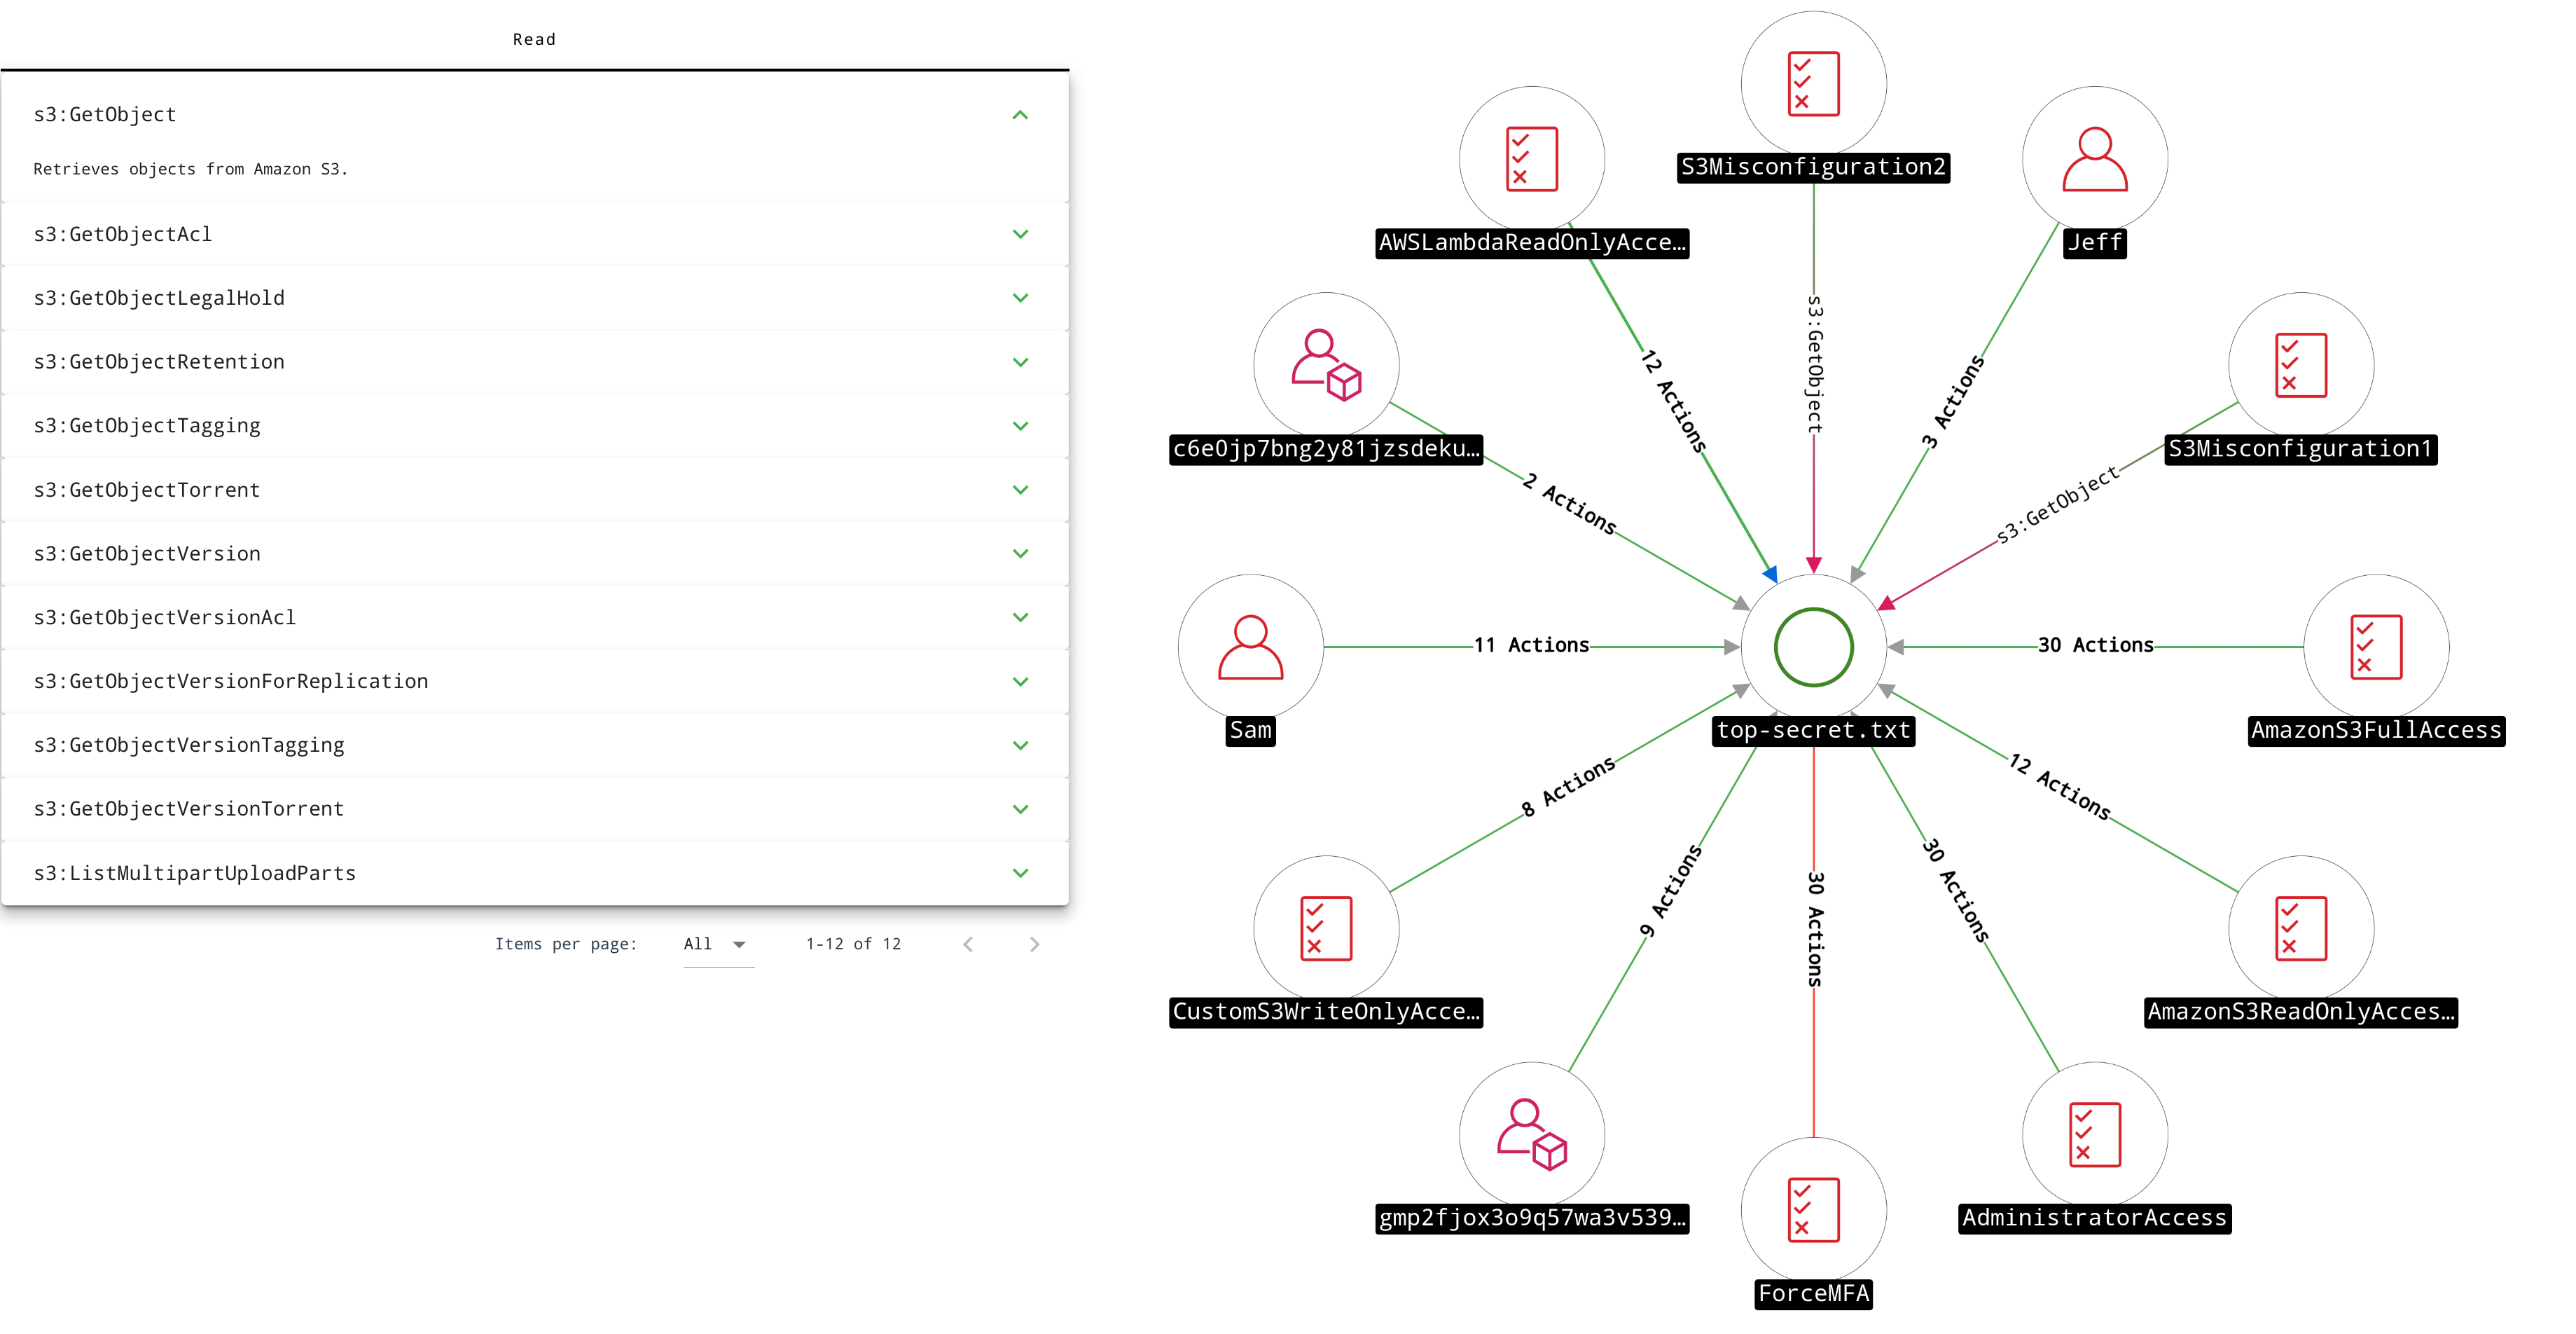
We can quickly identify who or what can read top-secret.txt, or do anything else to it by: searching for it, right-clicking on it, and selecting [Inbound Actions][(#inbound-actions-button):

There's quite a bit to unpack here. For starters we have Actions — which are accompanied by a number — and individual Action(s) — which are named. For readability, actions are automatically bundled when there is more than one of them: they can be unbundled, or bundled again, by double clicking.
Both Actions and individual Actions will incorporate green or red, indicating their effect: allow or deny, respectively. For Actions, these colors represent the effects of their actions. For individual Actions this color is combined with a color representing their Access Type (i.e. Read, Write, Permissions Management, etc). For example, the two instances of s3:GetObject are represented graphically using an edge that starts off green (indicating the action is allowed) and ends off red (representing Read access); we can interpret this as: allowed to read. If we look at ForceMFA, all 29 of its actions are deny actions, represented by a red edge.
There are quite few items in this graph that we will not get into here. Remember, what we're really interested in is figuring out what can read top-secret.txt. To that end, the built-in managed policy AWSLambdaReadOnlyAccess looks quite interesting. If you assumed this policy granted only lambda access, you'd be wrong. In addition to granting S3 read access, it also grants access to a multitude of other services. This means, amongst other things, this policy will allow anything attached to it to read top-secret.txt, as well as all other objects in an account.
To really understand just how much of a problem this policy actually poses, we would need to understand what can get to it ( i.e. what's the attack surface here). To do this see we could explore its inbound paths.
A devastating misconfiguration that can arise in various AWS services relates to All AWS Accounts or more specifically: Principal: *; or an ACL equivalent. This means allow this action from any AWS account", which essentially just means public access — since creating an AWS account is hardly a boundary. Most organisations have no use-case for this configuration, and it is sometimes mistakenly assumed to apply only to users within a given AWS account.
We can easily discover what access is available to any AWS account by searching for All AWS Accounts and selecting its outbound actions:

Note: if no ACLs or Policies granting public access are discovered, "All AWS Accounts" will not appear in the search bar.
As the scale and complexity of environments increase, the usefulness of asking broad and general questions often diminishes: identifying what it is we're looking for can become increasingly difficult.
Advanced search aims to facilitate questions requiring a greater degree of specificity by building upon Neo4j's own editor to provide a flexible, graphical interface for leveraging awspx's versatile database schema, in tandem with its other capabilities.
You can write your own cypher queries, use the graphical interface to generate these queries dynamically, or choose from a list of predefined saved queries.

Allows you to specify zero, one, or more source and/or target values. These values will default to Any and can be swapped around by clicking the button .
Allows you to specify the type of search you plan on performing:
| Search | Description |
|---|---|
|
|
Paths to the target OR paths to actions affecting the target. |
|
|
Determines whether or not paths should incorporate attacks. |
Allows you to add one or more filters to further refine your search.

-
A. Selection
Node or Action to filter: e.g. Action, Source, Target, Either Source or Target, or Both Source and Target.
Options are subject to the selected search mode.
-
B. Property
Property or arbitrary key to filter on, if any: e.g. Name, Arn, Effect, etc.
-
C. Operation
Operator or function specifying the logical condition that must be satisfied: e.g. =, >, =~, etc.
Options will vary based on the selected Property.*
-
D. Value
The value associated with the truthy statement. Values are validated against the expected type based other field values.
-
+. Ancillary Actions
Action Description ⋂ / ⋃ Switch between logical ANDandOR/
ExpandorCollapsefilter contentDeletefilter
Limits the number of results.
Defaults to 500.
Sets the upperbound for number of hops. Paths exceeding this threshold will not be matched.
Note: each attack comprises of 2 hops, where transitive relationships are 1.
Displays the current value of the raw cypher query that will be executed when run. This value is updated whenever a change is made to any of the components described above.

If you are already familiar with the cypher query language, you can enable editing by clicking the button, or expand the window using the
option on the top right.

A list of built-in cypher query examples catering to various scenarios. Selecting a query will result in the editor being updated. You can edit this query or run it as is.
| Action | Description |
|---|---|
|
|
Executes the query displayed in the cypher query editor. |
|
|
Displays a table of searchable, textual query results. |
|
|
Return to basic search. |
awspx's database has been structured to enable the queries it exposes through its web interface. Whether you're interacting with the database directly, or interpreting visual information, it is useful to understand what its nodes and relationships mean.
With the exception of Attacks, all visual relationships correspond to a database relationship type exactly. Each type is discussed independently:
A relationship representing transitivity: for example, if a user is attached to a group, and that group can perform various actions, then so too can that user. Transitive relationships usually exist between IAM and other related entities.
()-[:TRANSTIVE]->()
Represents a series of actions that could be executed to transition from one point to another. An attack can be thought of us something that implies transitivity although they are not necessarily transitive themselves.
()-[:ATTACK]->(:Pattern)-[:ATTACK]->()
Represents access at its most granular level, describing a single discrete activity that is allowed or denied, and under what conditions. Actions are the implications of the Policies and ACLs that describe them.
()-[:ACTION]->()
Each action is depicted using a directed edge comprising of two colors: its effect (leftmost above) and its access type (rightmost above). Conditional relationships will be dashed.
-
Allow -
Deny
-
List -
Read -
Write -
Tagging -
Permissions Management
Purely visual relationship comprising of one or more Actions.
Represented using either or both of the colors corresponding to each action's effect and includes a counter
The weakest form of relationship depicted by awspx. Associative relationships say little more than two nodes are related to one another. Direction is immaterial.
()-[:ASSOCIATIVE]-()
Unlike relationships, nodes can comprise of more than one type, or rather label. All nodes will include one of the following mutually exclusive labels in addition to a label specifying their AWS resource type.
Represents AWS resources that exist in your account. Resources are the things affected by actions and usually include Name and Arn (amazon resource name) fields, although there are some exceptions.
(:Resource)
Represents AWS "resources" that doesn't actually exist. Generics are used to convey the possibility of resource creation: for example, an action like iam:CreateUser does not apply to existing users (i.e. Resources), since you can't create something that already exists. Generics allow us to represent these actions, while maintaining veracity.
(:Generic)
Represents resources or accounts that are referenced from this account but exist outside of it. These nodes will affect other resources but will appear unaffected themselves since we do not have access to this information.
(:Generic)
Refers to nodes that exist as part of an attack in the database. These nodes, in conjunction with ATTACK and OPTION relationship types, are abstracted by the front-end to produce what is visually represented as an attack path.
(:Pattern)
The label designated to Effective Admin. This node is produced as part of the attack computation process and represents full access within the environment.
(:Admin)
Represents various, different resource types. Since many actions don't support resource-level permissions, their affected resource types remain undocumented. In these cases we fall back to the catch-all node, which can be intepreted as 'some resource'.
(:CatchAll)
With the exception of Patterns, these nodes will always include an additional label describing their AWS resource type, e.g.:
(:Resource:`AWS::Iam::User`)
By default, the Neo4j database is available at http://localhost:7474.
- Username:
neo4j - Password:
neo4j