Currently, Apollo supports Ubuntu 18.04, Ubuntu 20.04, and Ubuntu 22.04. For installation steps, please refer to the official installation guide.
Update relevant software after installation:
sudo apt-get update
sudo apt-get upgrade
Attention: To complete the update, it is necessary to ensure a network connection.
Apollo relies on Docker 19.03+. To install the Docker engine, you can follow the official documentation for installation:
- See Install Docker Engine on Ubuntu。
- You can also install it directly through the installation script provided by Apollo:
wget http://apollo-pkg-beta.bj.bcebos.com/docker_install.sh
bash docker_install.sh
This process may run multiple scripts, just follow the script prompts to execute.
Some modules of Apollo require GPU support to compile and run (such as perception modules). If you need to use such modules, you need to install Nvidia graphics card drivers and Nvidia Container toolkit to obtain GPU support.
Note: This tutorial is only applicable to Ubuntu system. Virtual machines cannot install graphics card drivers. Please search online for WSL by yourself Note: If you have previously installed Nvidia graphics card drivers and can output Nvidia smi normally when inputting it to the terminal, you can skip the section 1. Installing graphics card drivers
You can refer to the official website method to install the official website driver.
Compatibility between graphics card drivers and CUDA versions. Due to Nvidia's fast hardware updates, we may encounter situations where graphics card drivers and CUDA versions are incompatible. The following are the smooth links we tested.
TODO: CUDA has been updated and is no longer applicable here. The recommended version should be installed instead
| Graphics card series | Tested graphics card | Driver version | Minimum supported driver version | CUDA version |
|---|---|---|---|---|
| GeForce 10 Series | GeForce GTX 1080 | nvidia-driver-470.160.03 | nvidia-driver-391.35 | CUDA Version :11.4 |
| GeForce RTX 20 Series | GeForce RTX 2070 SUPER | nvidia-driver-470.63.01 | nvidia-driver-456.38 | CUDA Version :11.4 |
| GeForce RTX 30 Series | GeForce RTX 3090 | nvidia-driver-515.86.01 | nvidia-driver-460.89 | CUDA Version :11.6 |
| GeForce RTX 30 Series | GeForce RTX 3060 | nvidia-driver-470.63.01 | nvidia-driver-460.89 | CUDA Version :11.4 |
| Tesla V-Series | Tesla V100 | nvidia-driver-418.67 | nvidia-driver-410.129 | CUDA Version :10.1 |
| AMD | MI100 dGPU | ROCm™ 3.10 driver |
The recommended driver for the 10, 20 and 30 series graphics cards is version 470.63.01. You can download the driver from the Nvidia official website.
After downloading, find the corresponding folder and open the terminal to enter the installation instructions:
sudo chmod 777 NVIDIA-Linux-x86_64-470.63.01.run
sudo ./NVIDIA-Linux-x86_64-470.63.01.run
After installation, you can use the nvidia smi command to check if the driver has been successfully installed. If everything is normal, you can see a prompt similar to the following:
Tue Jan  3 12:04:21 2023
+-----------------------------------------------------------------------------+
| NVIDIA-SMI 460.91.03    Driver Version: 470.63.01    CUDA Version: 11.4     |
|-------------------------------+----------------------+----------------------+
| GPU  Name        Persistence-M| Bus-Id        Disp.A | Volatile Uncorr. ECC |
| Fan  Temp  Perf  Pwr:Usage/Cap|         Memory-Usage | GPU-Util  Compute M. |
|                               |                      |               MIG M. |
|===============================+======================+======================|
|   0  GeForce GTX 1080    Off  | 00000000:01:00.0 Off |                  N/A |
|  0%   38C    P8     7W / 198W |    239MiB /  8118MiB |      0%      Default |
|                               |                      |                  N/A |
+-------------------------------+----------------------+----------------------+

+-----------------------------------------------------------------------------+
| Processes:                                                                  |
|  GPU   GI   CI        PID   Type   Process name                  GPU Memory |
|        ID   ID                                                   Usage      |
|=============================================================================|
|    0   N/A  N/A      2566      G   /usr/lib/xorg/Xorg                 18MiB |
|    0   N/A  N/A      2657      G   /usr/bin/gnome-shell               67MiB |
|    0   N/A  N/A      6104      G   /usr/lib/xorg/Xorg                132MiB |
|    0   N/A  N/A      6234      G   /usr/bin/gnome-shell               13MiB |
|    0   N/A  N/A      7440      G   gnome-control-center                1MiB |
+-----------------------------------------------------------------------------+In order to obtain GPU support within the container, NVIDIA Container Toolkit needs to be installed after installing Docker. You can refer to the official installation documentation or follow the following instructions to install NVIDIA Container Toolkit:
curl -fsSL https://nvidia.github.io/libnvidia-container/gpgkey | sudo gpg --dearmor -o /usr/share/keyrings/nvidia-container-toolkit-keyring.gpg \
  && curl -s -L https://nvidia.github.io/libnvidia-container/stable/deb/nvidia-container-toolkit.list | \
    sed 's#deb https://#deb [signed-by=/usr/share/keyrings/nvidia-container-toolkit-keyring.gpg] https://#g' | \
    sudo tee /etc/apt/sources.list.d/nvidia-container-toolkit.list
sudo apt-get -y update
sudo apt-get install -y nvidia-container-toolkit
After installation, configure NVIDIA Container Toolkit
sudo nvidia-ctk runtime configure --runtime=dockerRestart Docker after configuration is complete
sudo systemctl restart dockerApollo Environment Management Tool is a command-line tool that helps manage and launch Apollo environment containers.
sudo apt-get update
sudo apt-get install ca-certificates curl gnupg
2. Add the gpg key for the Apollo software source on the host computer, and set up the source and update settings
# add gpg key
sudo install -m 0755 -d /etc/apt/keyrings
curl -fsSL https://apollo-pkg-beta.cdn.bcebos.com/neo/beta/key/deb.gpg.key | sudo gpg --dearmor -o /etc/apt/keyrings/apolloauto.gpg
sudo chmod a+r /etc/apt/keyrings/apolloauto.gpg

# set apt source and update
echo \
    "deb [arch="$(dpkg --print-architecture)" signed-by=/etc/apt/keyrings/apolloauto.gpg] https://apollo-pkg-beta.cdn.bcebos.com/apollo/core"\
    $(. /etc/os-release && echo "$VERSION_CODENAME") "main" | \
    sudo tee /etc/apt/sources.list.d/apolloauto.list
sudo apt-get update
注:如果之前已经安装过8.0版本的apollo的话,在宿主机上的/etc/apt/sources.list文件中会有形如
deb https://apollo-pkg-beta.cdn.bcebos.com/neo/beta bionic main的配置,可以直接删除,宿主机上的apollo源配置仅用于安装aem工具
TODO: 新版本的 aem 暂时未发布到源上,所以不能通过这个方式安装,请直接使用代码中的 aem 脚本
./aem/aem -h使用代码中的aem脚本需要手动安装一下依赖的软件包sudo apt install rsync tree sudo python3-dev python3-pip python3-venv python3-apt
sudo apt install apollo-neo-env-manager-dev --reinstallAfter successful installation, it can be used
aem -hApollo currently offers 3 sample projects, you can choose one according to your needs
- application-core , which includes all open source software packages of Apollo, allows you to build your own applications based on this project
- application-pnc , only includes software packages related to planning and control, suitable for users who only focus on planning and control direction
- application-perception, only includes perception related software packages, suitable for users who only focus on perception direction
Additionally, Apollo's full source code project apollo can also be used
Taking x86 architecture application core as an example
git clone https://github.com/ApolloAuto/application-core.git application-core# enter the project directory
cd application-core
# start and enter into the apollo environment
aem startuse aem start -b hostto start an env in host instead of docker
The example project includes a directory called core, where the core/cyberfile.xml file describes the software packages that the project depends on, which can be installed using the buildtool tool tool
buildtool build -p coreThe true meaning of this operation is to compile the core package in the project, but the
coreitself does not have any code that needs to be compiled, so this operation will only install dependencies package declared incore/cyberfile.xml
The profiles/samples directory in the example project is an official vehicle configuration based on one radar and two cameras. You can refer to the samples in the profiles directory to write your own vehicle configuration. The effective method for configuring the vehicle is as follows:
# Taking sample as an example
aem profile use samplewget https://apollo-system.cdn.bcebos.com/dataset/6.0_edu/demo_3.5.record -P $HOME/.apollo/resources/records/Obtain the map corresponding to the data record
buildtool map get sunnyvaleStarting from version 9.0.0-rc-r10, map data has been separated and needs to be downloaded separately, and will no longer be released with the map package; You can view all available maps through the buildtool map listcommand
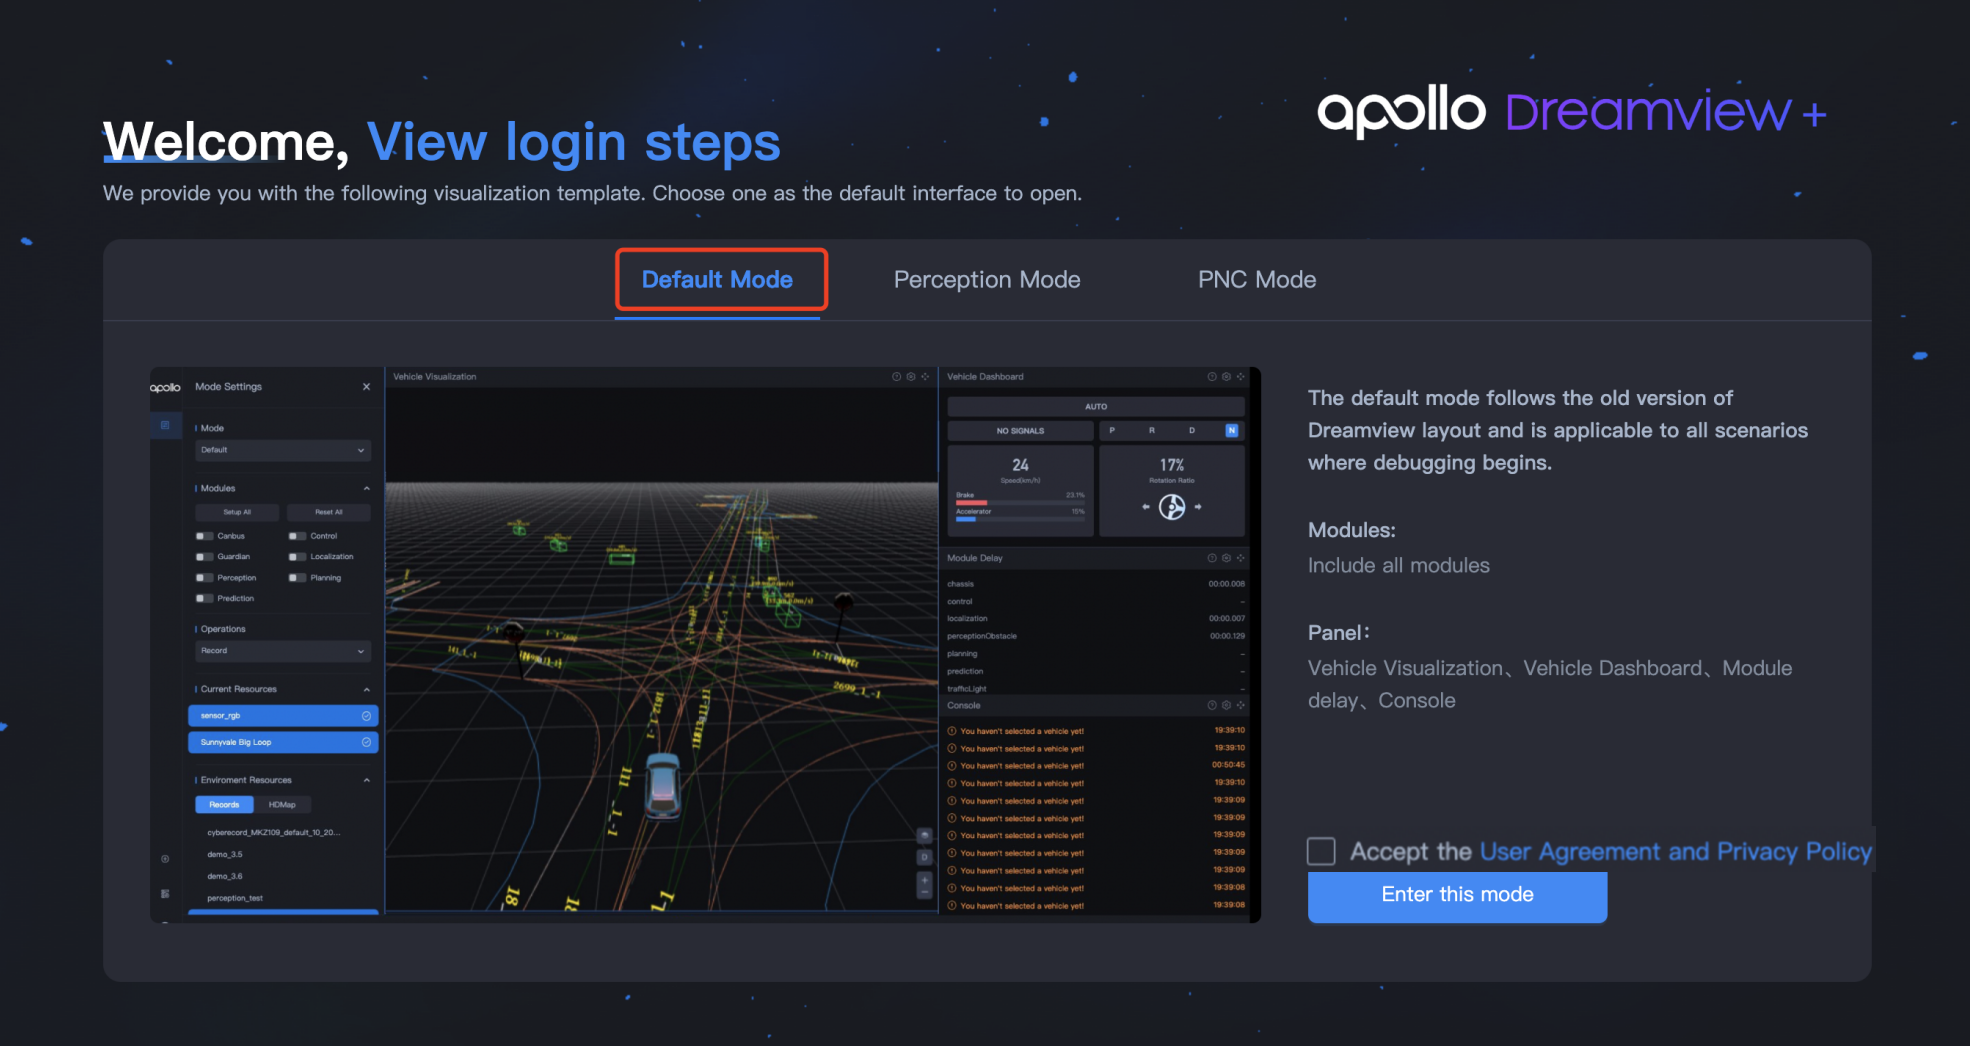
aem bootstrap start --plusAfter starting Dreamview+, enter localhost: 8888 in the browser to enter the Dreamview+interface. You can choose the default mode or other modes to play data packets. This section takes the default mode as an example.
-
Select Default Mode 。
-
Check Accept the User Agreement and Privacy Policy/接受用户协议和隐私政策 to enter the Mode Settings/模式设置 page.
-
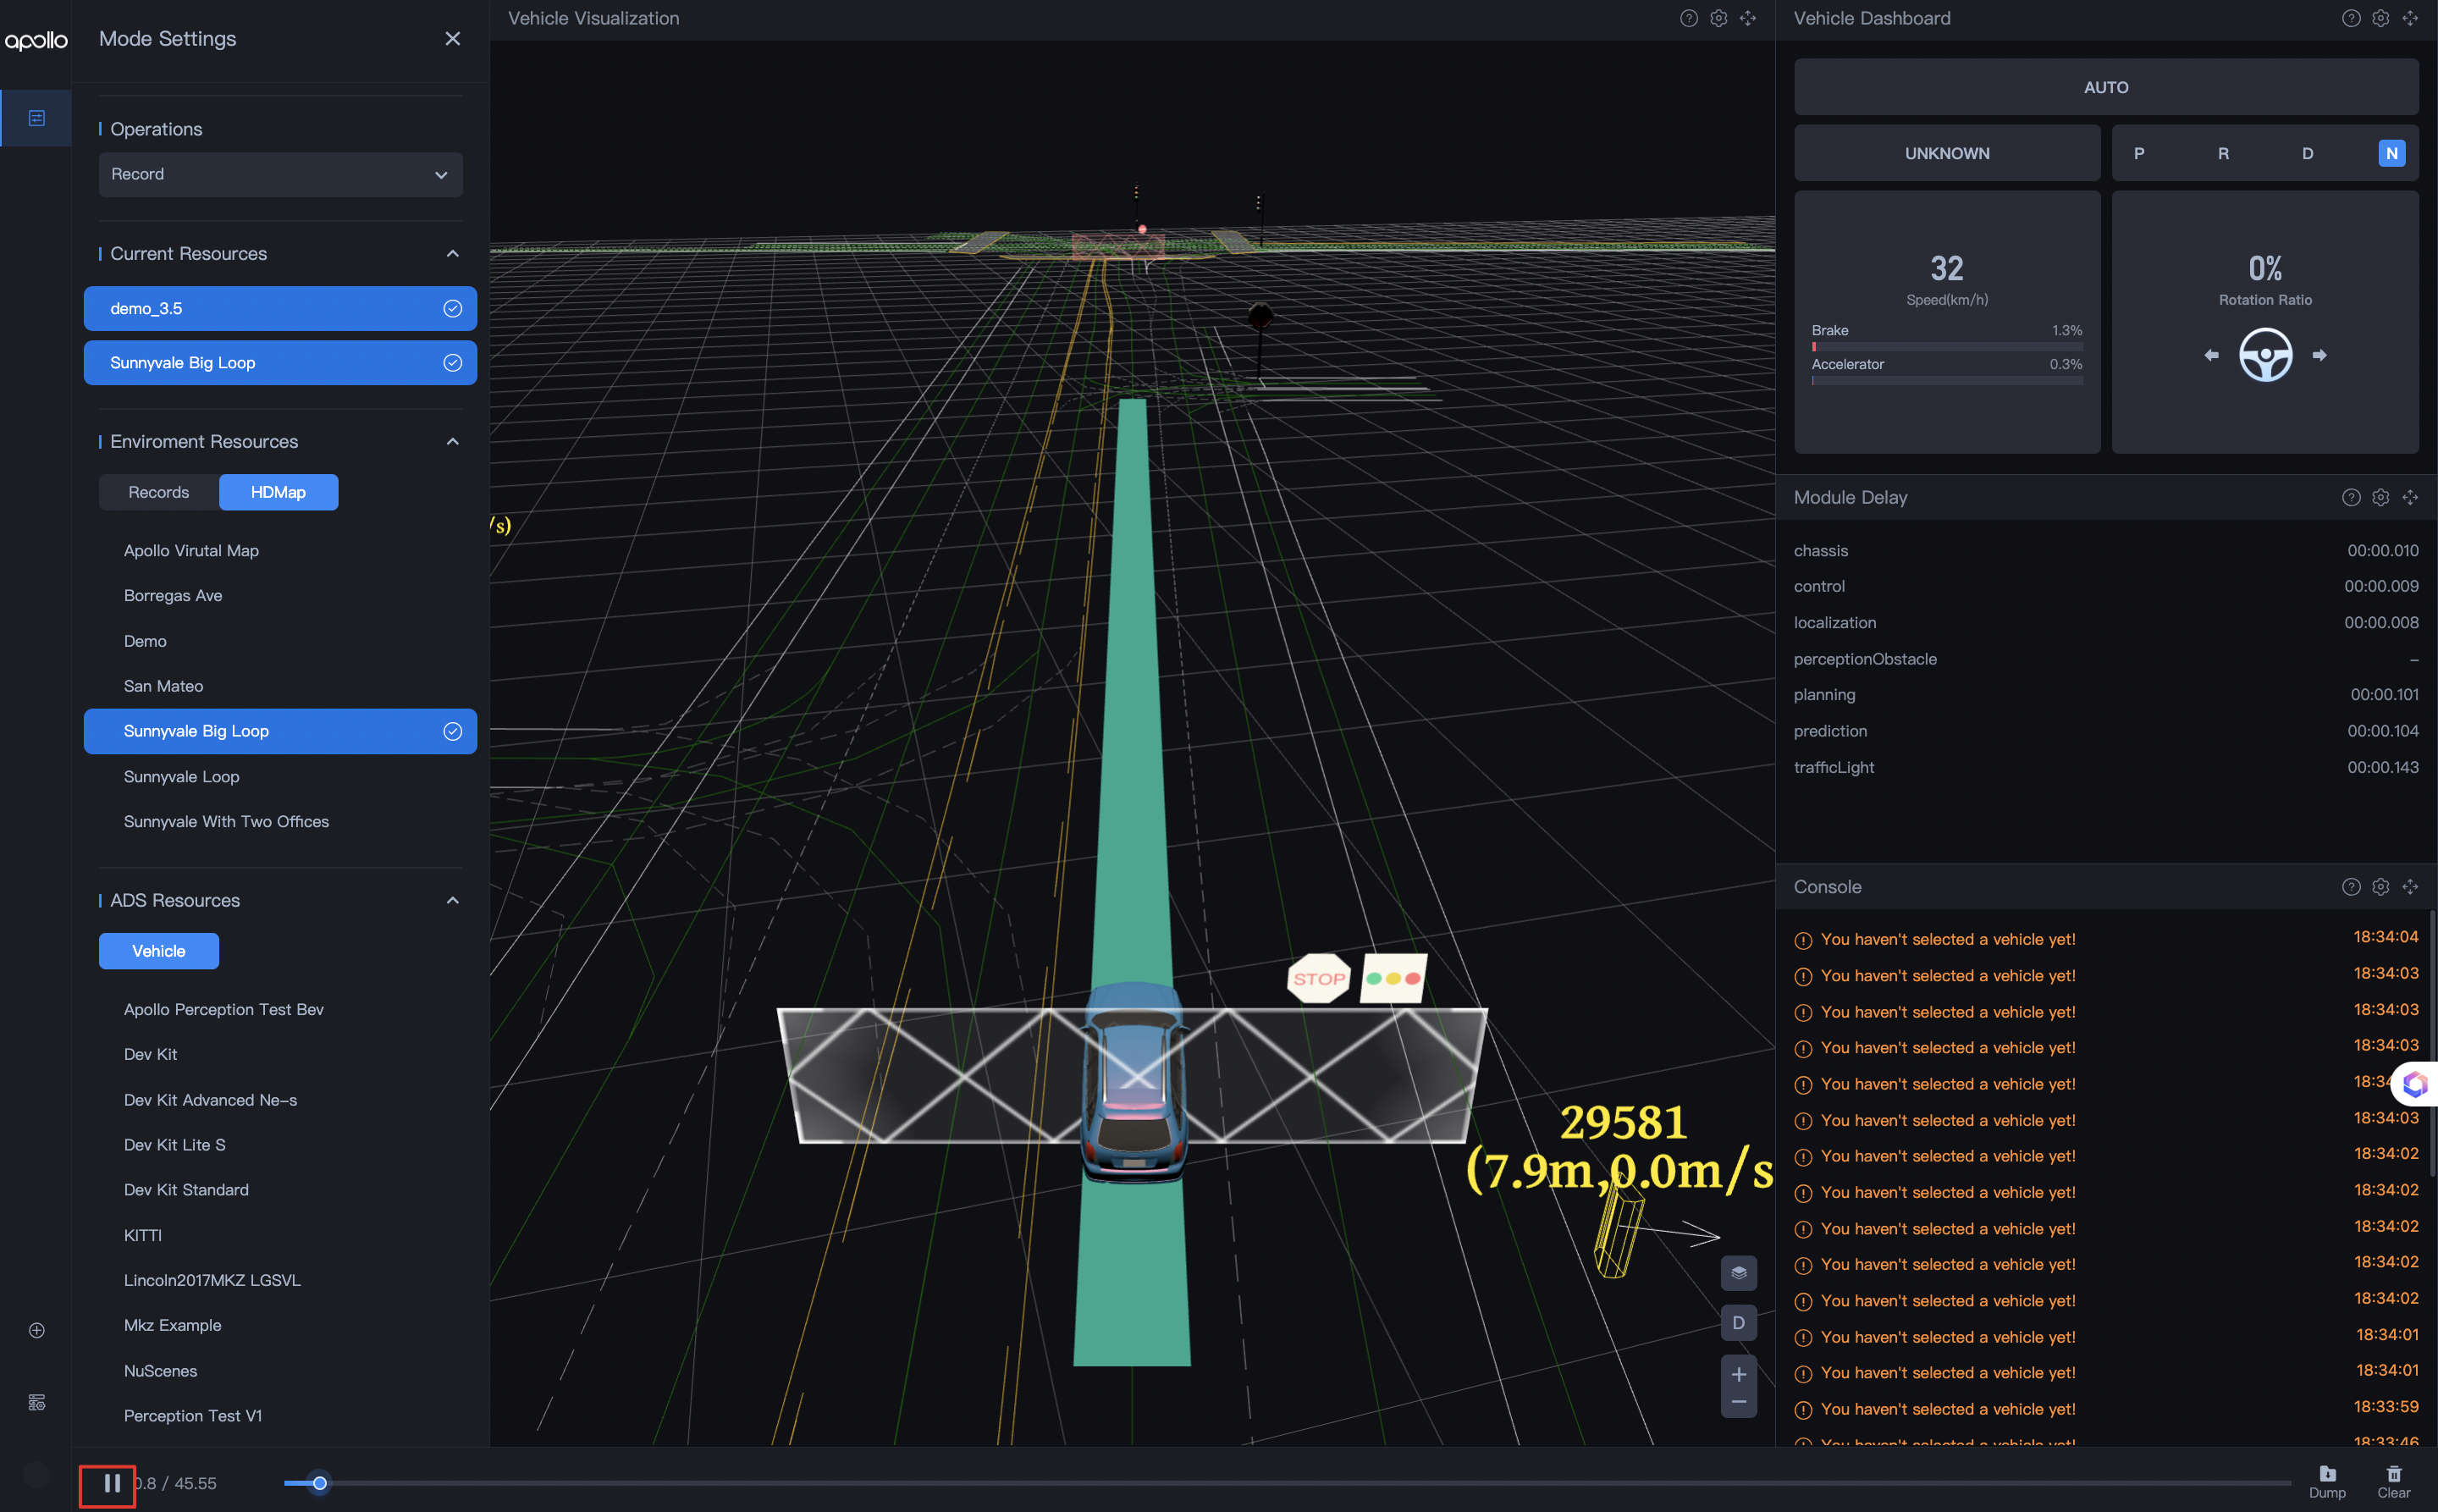
On the Mode Settings/模式设置 page, set the broadcast parameters.
- Select Record in Operations/操作 .
- In Environment Resources/环境资源 , click on Records/数据包 and select the specific package you want to play.
- In Environment Resources/环境资源 , click on HDMap/高精地图 and select Sunnyvale Big Loop.
- Click the play button in the bottom area.
You can see the playback of data packets in Vehicle Visualization/车辆可视化 .
-
Enter the Docker environment,
-
Download the required data package first from Resource Manager/资源管理 > Records/数据包 in Dreamview+. Enter the following command to play the data packet:
cyber_recorder play -f ~/.apollo/resources/records/<packet name> -lNote: If you want to loop the data packet, add - l; if you don't loop the data packet, you don't need to add -l.
At this point, Apollo installation has been completed
The directory structure of the entire project is as follows
application-core
├── .aem
│   └── envroot
│       ├── apollo          # will be mounted to the/Apollo directory inside the container
│       └── opt             # will be mounted to the/opt/directory inside the container, and Apollo's software packages will be installed by default to/opt/, so this directory can serve as a cache
├── core                    # Project Dependency Package
│   ├── BUILD
│   └── cyberfile.xml       # Package description file, describing all dependencies of the entire project
├── CPPLINT.cfg
├── data                    # Data directory, will be mounted to/album/data
│   ├── calibration_data    # Calibration configuration directory, will be mounted to/add-on/modules/calibration/data
│   ├── kv_db.sqlite
│   ├── log                 # log directory, will be mounted to/opt/aollo/neo/data/log
│   └── map_data            # Map directory, will be mounted to/pollo/modules/map/data
├── profiles                # New configuration directory
│   ├── current -> sample   # Currently enabled configuration directory
│   └── sample              # Official single lidar and two camera sample vehicle configuration provided
├── third_party
├── tools -> /opt/apollo/neo/packages/bazel-extend-tools/latest/src
├── .vscode                 # default vscode configuration
│   ├── c_cpp_properties.json
│   └── settings.json
├── WORKSPACE               # Bazel Configuration
└── .workspace.json         # Apollo project configuration, where you can specify the software package version
Next, you can learn more about how to use Apollo through practical tutorials
This step explains how to delete an installed project
Taking application-core as an example
# enter the project directory
cd application-core
# delete environment
aem remove# Return to the previous directory
cd ..
# Delete project directory
rm -r application-core
