Refer to Installation to install Bootloader + CFW on your respective camera.
If everything goes good so far you must be having camera dashboard accessible at https://CAMERA_IP.
Default User name : root
Default Password : ismart12
You need a MQTT Broker running in your network to make the plugin interact with camera's interval drivers.
If you dont already have a MQTT Broker in your network, the plugin can host the broker itself. Refer to Hosting MQTT
If you already have a running MQTT Broker, plugin can connect to it. Refer to Connecting to MQTT Broker
Only do this if you dont have a working MQTT Broker in your network. This should be the case for many people.
- Install MongoDB or Get Free Instance from mlab.com
- Plugin Configuration
 "mqtt": {
                "hostBroker": true,
                "debug": true,
                "mongoUrl": "mongodb://localhost:27017/mqtt"
            }
Your MQTT broker will run locally at port 1883
Your MQTT broker should run with your homebridge instance. No need for Connecting to MQTT Broker
- Note your Homebridge running device local IP Address. This IP Address will be your MQTT Broker address. Refer to
ifconfigto get local ip address.
If you dont plan to run mongoDB instance, you can get a free mongodb instance url from mlab.com. Your mongoUrl will be something like mongodb://<dbuser>:<dbpassword>@xxxx.mlab.com:xxxx/mqtt
Its always better if you have static IP of your homebridge running instance.
If you already have a MQTT Broker, you can connect to the broker to exchange messages. You must be having MQTT Broker address and running port number.
- Plugin Configuration
 "mqtt": {
                "hostBroker": false,
                "port": 1883,
                "host": "192.168.0.187", // MQTT Broker address
                "debug": true,
}You can either SSH to your camera or connect camera's SD card to your computer.
Config Location :
Via SSH : /system/sdcard/config
Via SD Card : config
- Rename
config/mqtt.conf.dist=>config/mqtt.conf - Edit
mqtt.conf
############################################################
# edit this file and move it to /system/sdcard/config/mqtt.conf #
############################################################

export LD_LIBRARY_PATH='/thirdlib:/system/lib:/system/sdcard/lib'

# Options for mosquitto_sub & mosquitto_pub
USER=mqtt-user
PASS=mqtt-password
# Your MQTT Broker IP
# Your Homebridge running instance local IP if the plugin is hosting it noted from step 3 of `Hosting MQTT`
HOST=192.168.0.187
PORT=1883

# Define a location
LOCATION="myhome"

# Define device name
DEVICE_NAME="dafang"

TOPIC="$LOCATION/$DEVICE_NAME"
MOSQUITTOOPTS=""
MOSQUITTOPUBOPTS=""
CURLOPTS=""
STATUSINTERVAL=30
If the plugin is hosting MQTT Broker then set USER to default mqtt-user & PASS to mqtt-password
Each camera must have a unique topic.
Change LOCATION & DEVICE_NAME to something unique.
e.g.
    LOCATION="myhome"
    DEVICE_NAME="dafang"
Your camera topic will be myhome/dafang/#.
- Edit Homebridge config.json to update plugin configuration to point each camera to its unique topic.
{
            "platform": "Dafang",
            "mqtt": {
                ...
            },
            "cameras": [{
                "cameraName": "My Dafang",
                "cameraRTSPStreamUrl": "rtsp://YOUR_DAFANG_IP:8554/unicast",
                "mqttTopic": "myhome/dafang/#",
...Open Your Camera's Dashboard by opening https://CAMERA_IP.
Login with username root and password ismart12

Go to Manage -> Services
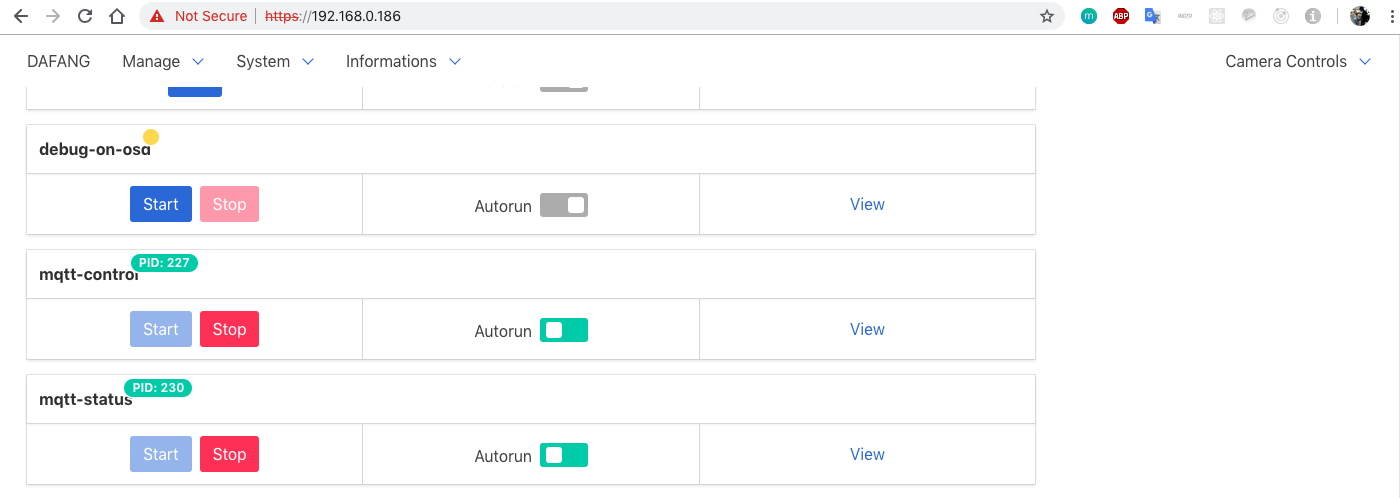
Scroll to mqtt-control service.
Start mqtt-control and set autorun to on
Start mqtt-status and set autorun to on
Run configureMotion and set autorun to on
Set Motion - MQTT Message to true from Camera Controls on right top side of the dashboard.
You can change motion detection settings from Motion Detection under Manage Tab.
Contributions always welcome. If you have any question/advice/suggestion kindly create Github Issue