Watch a video to explain what we are going to do in part 2:
Before we begin to configure Github & Jenkins, let's look at our lab environment.
NOTE: Make sure Jenkins, Anchore, and Sonarqube installation has been completed as per final step of Part 1.
-
Ensure you are on your local workstation/machine Terminal where we have our git repo cloned.
-
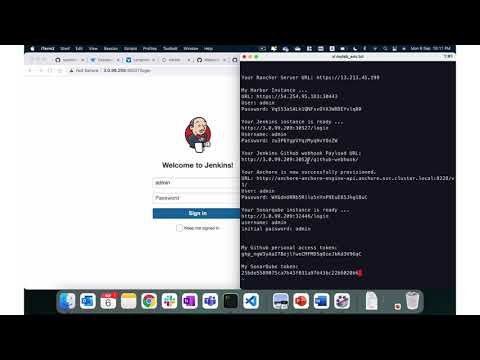
Run the command below to show your current lab environment. This shows you all information you need to configure your Jenkins in this section.
./show-mylab-env.sh
Sample output below.
Your Rancher Server URL: https://rancher.13.232.154.67.sslip.io
Bootstrap Password: 4rfkljvwb6ldbplfgfjg6tppwggbsq56mgl9npntltn4qpc6dhv9nf

My Harbor Instance ...
URL: https://65.0.177.135:30443
User: admin
Password: pRRIDUb0R8peM81cEQ3UAkMwm16BaB

Your Jenkins instance is ready ...
http://3.109.200.216:31897/login
Username: admin
Password: JiKNwNpB840adU19HeAzZW

Your Jenkins Github webhook Payload URL:
http://3.109.200.216:31897/github-webhook/

Your Anchore is now successfully provisioned.
URL: http://anchore-anchore-engine-api.anchore.svc.cluster.local:8228/v1/
User: admin
Password: zgWwwAtvyWSUaZ3OhrEqzvkh8mh0NdY7

Your Sonarqube instance is ready ...
http://3.109.200.216:32143/login
username: admin
initial password: admin

My Github personal access token:

My SonarQube token:
A file mylab_env.txt should also have created for you.
- Use text editor to open this file to record GitHub and SonarQube tokens.
- Open a new Browser & past the below link
https://github.com/dsohk/spring-petclinic
- Click on
ForkIcon on top right hand window pane & select your own account name.
Sample Output below.

-
In GitHub, navigate to your forked repoistory
Spring-Petclinic. -
Edit the Jenkinsfile
The only change to our Jenkins file is in Line 11 to adapt to our worksop requirement.
In line 11, replace your_name with your github account name
Sample Output for reference.

Once the changes are made, scroll down to the bottom of the page & hit Commit changes

- Review your changes and see if it's applied successfully.

- Open a new Browser & paste the below link
https://github.com/dsohk/spring-petclinic-helmchart
- Click on Fork Icon on top right hand window pane & select your own account where the repo will be forked.
In order to integrate Jenkins with your github account, you have to generate your personal access token for this.
a) Login to your github account
b) Under your avatar icon, pull down the menu and choose Settings menu item.
c) Choose Developer Settings menu on the left, choose Personal Access Tokens
d) Click Generate new token button.
e) Enter workshop (or whatever you like) in the name field.
f) Choose repo and user:email in the privieged for this token.


g) Save and record down the generated token in the mylab_env.txt file for configuring CI Pipeline in Jenkins later.
Setup git webhook for spring-petclinic repo to your Jenkins server
a) Click Settings in your spring-petclinic github repo.
b) Choose Webhooks from the left menu.
c) Click Add Webhook button
d) Enter Your Jenkins Github webhook Payload URL: http://<YOUR_JENKINS_IPADDRESS>:<YOUR_JENKINS_PORT>/github-webhook/
e) Choose Send me everything for events to trigger this webhook.
f) Click Add Webhook button.

-
Login to your Sonarqube instance using the Sonarqube URL & Credentials. Upon successful login, you will be prompted to change your initial password.
-
Choose
Add a Project.

-
Select
Manuallyto continue -
Enter
spring-petclinicin Project Key and Display Name input field and hitSet up -
In the Provide a token input field, enter
spring-petclinicand clickGenerate Tokenbutton. -
Record the generated token in your
mylab_env.txtfile for configuring Jenkins later.
At this point, we are done with Sonarqube setting. You can logout from Sonarqube or close the browser window to exit.
Configuring Jenkins will be in two parts
-
Configure Credential for GitHub and Sonarqube
-
Configure Jenkins Systems for global environment varaiables.
a) Open Jenkins URL in your browser and login.
b) Choose Manage Jenkins on the left menu. You may see a message It appears that your reverse proxy setup is broken ignore the message.
c) Under Security Section, Choose Manage Credentials
d) Under Stores scoped to Jenkins, click the (global) dropdown menu. Choose Add credentials.
e) In the Add Credentials form, choose Secret text in Kind field.
f) Enter your Github's personal access token in the Secret field. Token is available in the mylab_env.txt
g) Enter my-github in the ID field.
IMPORTANT - If you change the name your jenkins pipeline will break. Also please ensure there is no whitespace before and after the ID..
h) Click OK button to continue
Sample Screenshot below.

a) Again click Add Credentials on Left Hand side of the Page.
b) In the Add Credentials form, choose Secret text in Kind field.Token is available in the mylab_env.txt
c) Enter sonarqube-spring-petclinic in the ID field.
d) Click OK button to continue
Sample Screenshot below

We are done with the credential for Github and Sonarqube.
Now navigate back to the Jenkins Dashboard.
-
Navigate to
Managing Jenkins>Configure System -
Scroll down to
Global Propertiessection.
a) Select Environment Variables checkbox
b) Under List of Variables, click Add button to continue.
c) Under NAME, key in
- Key:
HARBOR_URL - Value:
IP:Port(This should be your Harbor IP and Port Number. No whitespaces before and after. Also No http:// or https://)
Sample screenshot below

-
Scroll down to Section
SonarQube Servers -
Select
Environment variablescheckbox -
Under
Sonarqube installationsclick onAdd SonarQubesection, enter the following.
a) Name: My SonarQube Please note that Name must be spelled excatly as mentioned here. No whitespaces before and after the ID
b)Server URL: (Your SonarQube URL)
c) Under Server authentication token use the drop down option and you should see sonarqube-spring-petclinic. Select it.
Sample Screenshot below

-
Scroll down to Git Plugin Section.
-
Specify the github username and email account in this section. It can be any arbitrary account. It will be showing up the commits to your forked helm chart repository later.
a) Global Config user.name : jenkins
b) Global Config user.email: jenkins@example.com
c) Leave the rest as default
Sample Screenshot below.

-
Scroll further down to Achore Container Image Scanner Section.
-
Provide Anchore URL & Credentials.
a) Engine URL: (Your Anchore URL)
b) Engine Username: (Your Anchore username)
c) Engine Password: (Your Anchore password)

Finally click Save button to save all the Jenkins configuration settings.
With this, we are ready to move to the Step 3 - Build Your Jenkins Pipelines to deploy Spring-Petclinic App