-
Notifications
You must be signed in to change notification settings - Fork 3
/
04-git.Rmd
332 lines (193 loc) · 24.7 KB
/
04-git.Rmd
1
2
3
4
5
6
7
8
9
10
11
12
13
14
15
16
17
18
19
20
21
22
23
24
25
26
27
28
29
30
31
32
33
34
35
36
37
38
39
40
41
42
43
44
45
46
47
48
49
50
51
52
53
54
55
56
57
58
59
60
61
62
63
64
65
66
67
68
69
70
71
72
73
74
75
76
77
78
79
80
81
82
83
84
85
86
87
88
89
90
91
92
93
94
95
96
97
98
99
100
101
102
103
104
105
106
107
108
109
110
111
112
113
114
115
116
117
118
119
120
121
122
123
124
125
126
127
128
129
130
131
132
133
134
135
136
137
138
139
140
141
142
143
144
145
146
147
148
149
150
151
152
153
154
155
156
157
158
159
160
161
162
163
164
165
166
167
168
169
170
171
172
173
174
175
176
177
178
179
180
181
182
183
184
185
186
187
188
189
190
191
192
193
194
195
196
197
198
199
200
201
202
203
204
205
206
207
208
209
210
211
212
213
214
215
216
217
218
219
220
221
222
223
224
225
226
227
228
229
230
231
232
233
234
235
236
237
238
239
240
241
242
243
244
245
246
247
248
249
250
251
252
253
254
255
256
257
258
259
260
261
262
263
264
265
266
267
268
269
270
271
272
273
274
275
276
277
278
279
280
281
282
283
284
285
286
287
288
289
290
291
292
293
294
295
296
297
298
299
300
301
302
303
304
305
306
307
308
309
310
311
312
313
314
315
316
317
318
319
320
321
322
323
324
325
326
327
328
329
330
331
332
# Code version control with git
*Author: Koen Hufkens, Benjamin Stocker*
## Introduction
### The origins of the software - a short history
Git is a revision or version control system. In many ways you are already familiar with a similar setup. For example, **track changes in Microsoft Word is a revision control system** as well (although not based on git). In general this class of software is designed to consistently track changes to documents (code) over time.
Git was original designed to track software changes to the linux kernel by Linus Torvalds in 2005, replacing commercial tools previously used. As with other version control systems the goal is to **let programmers work collaboratively in parallel in a fast and consistent way**, while avoiding some of the trappings of older systems. The goal was also to make this explicitly distributed in nature.
Unlike other systems, git differs in how it thinks about files. Instead of storing the changes to files (as for most of git's alternatives), **git saves snapshots of the state of all files**, treating a project as a file system. Changes are therefore not stored as the differences between lines in files, rather as differences in files as a whole. Over time if a files does not change, they are not stored again, only a link to a previous exact copy is provided. When a file does change, a new copy is created, generating a stream of snapshots.
This setup has some consequences, mainly **all operations are local in nature** - while retaining the capability to be distributed. While in the case of a Word document, track changes is strictly local, so when you share the document the changes made can not be integrated automatically into your original document.
In contrast, git, despite operations being local, is a distributed version control systems. Git will fully mirror the project (repository), including its full history (i.e. files and their temporal linkages) and let users update these changes easily - both locally but more importantly, also remotely (if so desired).
### The (scientific) use case
Git, and version control systems like it, have an important role to play in (academic) research. Not only does it appear in familiar settings such as document track changes when writing essays, manuscripts or reports, the 'git' use case is specifically aimed at making code and code changes easier to track in collaborative projects.
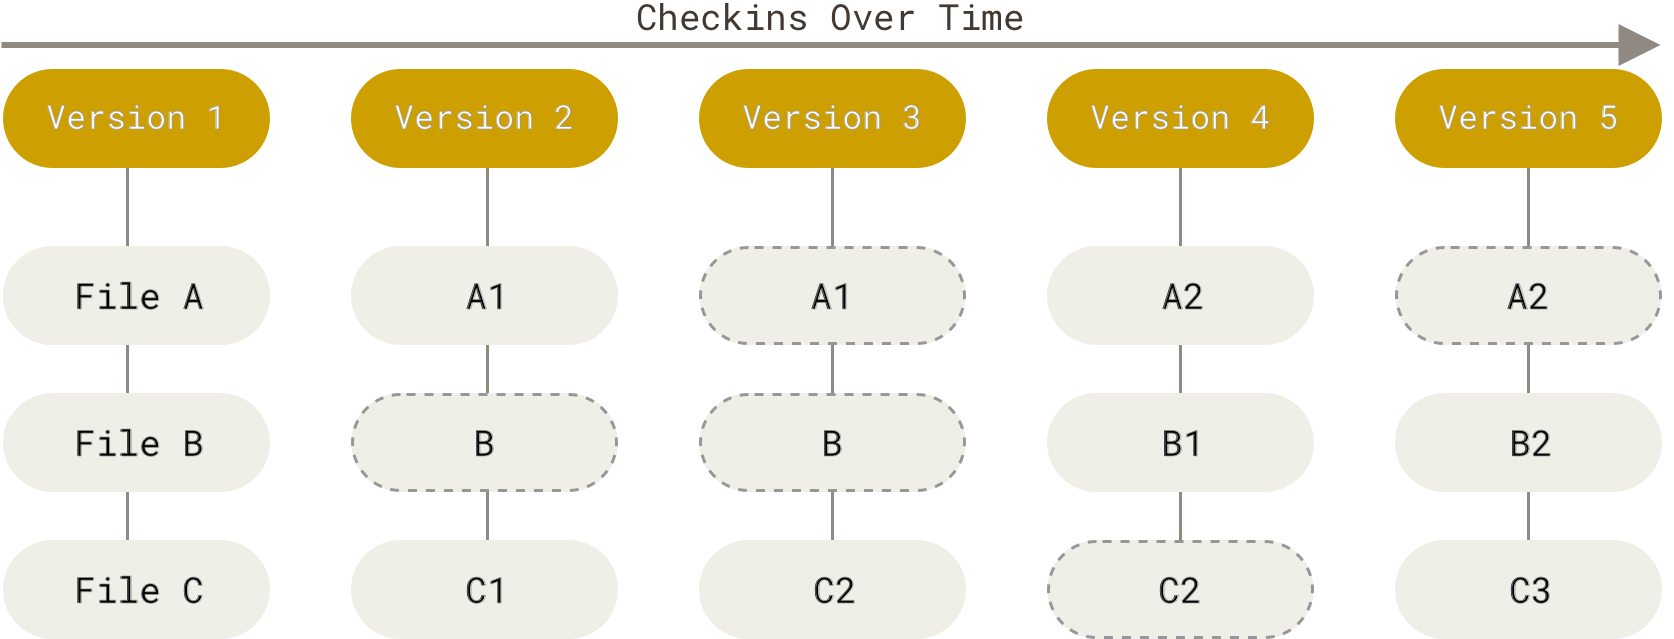
Although there are ways to mess up a git project, it is generally true that **once something has been properly stored in a git repository it will be very hard to lose this code (or data)** or not being able to recover a previous version. The benefits of such a system to a research project are obvious. Not only does **a git repository serve as a lab notebook, it also contains all code and data changes within it.** In the diagram below, the various states of the project over time (versions) are shown as a file system, with linkages between versions for static files as indicated by dashed icons.
### Conflict free collaboration - a tree-like project structure
During technical research projects, which require software of any sorts, conflict-free collaboration is key. Conflict-free collaboration on software (code) ensures that changes by various collaborators are neatly integrated in the main body of work with the project or "repository" resembling a tree structur. The 'main body of work' is also referred to as "trunk" or "master" in git parlance. (Note that the term "master" is to be avoided (and is progressively being avoided) in view of its historic reference).
From this main trunk, various "side projects" or branches by collaborators can sprout. These branches contain code addressing issues in the main trunk, or adding new code, and help in the house-keeping of a software project by allowing for curated integration of these branches into the main trunk. More on how to use this construction in the sections below.
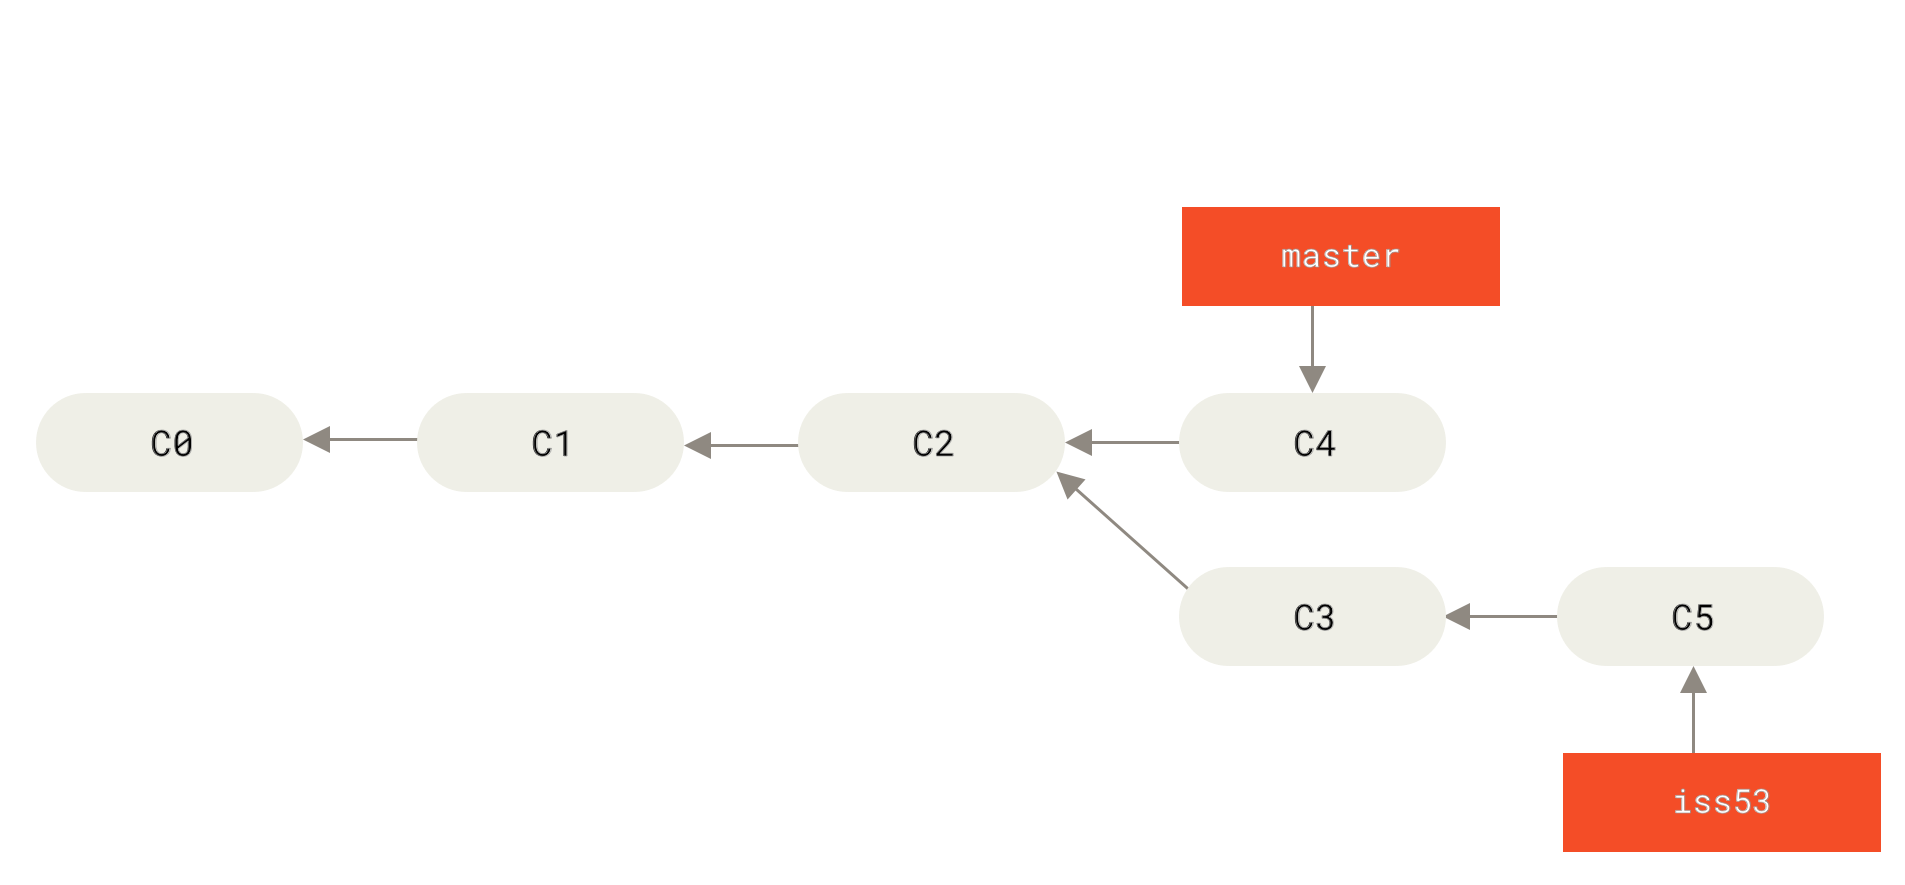
XXX: add figure caption (explain arrows, explain 'C', explain what the branch is here)
## Git - a research workflow
We now know that git is a versioning software which tracks the state of files of a project. It also allows for different iterations of a project to be "branched" from a main "trunk" in order to facilitate experimentation or resolving file changes without interfering with the original files. Below, we'll see how to implement these concepts into a workflow.
The described workflow will not touch upon all aspects of git, as this is an overly broad topic which easily covers a book. For an in-depth discussion on the use of git and all its features we refer to the free "pro" git [e-book / website](https://git-scm.com/book/en/v2).
### Creating a local repository
A software project and all the files belonging to it are "bundled" into a *repository*. Each repository has its own history of file changes. Files belonging to a repository are organised in the main directory and sub-directories thereof. Git tracks file changes of locally stored files and manages "synchronization" with the same repository stored on a remote server, e.g., through [github](github.com) or [gitlab](gitlab.com) (see also below).
You can create a local git repository using the following commands. You initiate a new git repository in the current working directory (containing your project files) using
``` bash
cd /path/to/your/project/
git init
```
This creates a .git directory which tracks all the files you decide to add to this project, and which should reside within the working directory containing this `.git` folder.
Next you can *stage* files to your git repository by using the command `git add`. The `git add` command flags the files which should be tracked by git. In this case, we add all existing `R` code files with a \* wildcard, and a README.md file. However, this does not mean that the files are already integrated, this is just a "promise" that you will do so in the future.
``` bash
git add *.R
git add README.md
```
Integrating changes, and any subsequent changes to these files, is done using the `git commit` command. It is often wise to provide your commit command with a message (-m 'message') in order to easily find changes should you decide to undo them.
``` bash
git commit -m 'Initial project version'
```
With this, the added files are integrated into the local git repository. The diagram below outlines this workflow visually.

### Creating a repository from a remote (github) repository
You can populate a new project using existing remote data using the following command
``` bash
git clone https://github.com/libgit2/libgit2
```
In this example, you will copy (clone) the git library 'libgit2' to your local computer.
### Updating a repository (locally)
Once files are tracked by git, they will require a `commit` command to update their state and create a new snapshot. For example, after editing the file `README.md` locally, stage updates made to that file (`git add -u`) and commit changes to be integrated into your local git project using the following commands:
``` bash
git add -u
git commit -m 'adding project references'
```
When committing changes, **include a succinct description of the changes**. Note that by default, changes to multiple files will be combined in one commit. For example, if additional changes were made to \*.R files in the directory these would be committed as well.
If you want to commit changes to a specific file using a description limited to this particular file append the filename as such
``` bash
git commit -m 'adding project references' README.md
```
### Branches & structuring (local) repository changes
In the figure above, you see the main project *trunk*, starting at C0 (commit 0) running up to C4. Note that at C3, we branch off the trunk into a branch called `iss53`, which tracks commits C3 and C5. Note that depending on how things are organized, branches can sprout branches of their own. These advanced branching structures are out of the scope of this introduction, and generally too complex within standard research workflows. In the figure below, the grey arrows are the file relationships within each `git` state. In short, unchanged files in C1 point to those in C0, etc.
Remember from the discussion above that the
- switching branches, changes the files in your project (remember that git tracks everything as a file)
- conversely, commits (file histories) change with the changed files!
- BUT, nothing is lost, only a selection of the tracked states is shown (locally)!
We can create a branch using the following command
``` bash
git branch my_experimental_branch
```
Although this creates a new branch, this does not switch us to this branch. To move between branches use the `git checkout` command.
``` bash
git checkout my_experimental_branch
```
The checkout option also permits an additional parameter '-b' which allows you to create a new branch and switch to it in one command.
``` bash
git checkout -b my_experimental_branch_2
```
### Integrating branches
When making changes to files in a branch, no changes will be made to the main project trunk. Obviously, if we are happy with the changes to our branched project, we might want to integrate our changes into the main project. In short, we want to *merge* our changes with the main project trunk. Intuitively, the command to do so is called (you guessed it) `git merge`. To merge a branch into our main (master) project we must switch back to our master trunk. We use the `checkout` command for this.
``` bash
git checkout master
```
We then use `git merge` to include the changes of a particular branch into our master/main project.
``` bash
git merge my_experimental_branch
```
At times, this process will not go smoothly. With git tracking files, if one changes the same file (in the same location) across the main project and a branch git will not know which file snapshot to retain in the main project trunk (is it the changed file in the main project or the same -but altered- file in a branch). We now have a *merge conflict*.
After executing `git merge`, merge conflicts will be flagged by `<<<<`, `====`, and `>>>>` signs, such as:
``` bash
# <<<<<<< HEAD:README.md
# the original main text
# =======
# the original main text - altered in branch 'my_experimental_branch'
# >>>>>>> my_experimental_branch:README.md
```
Here, the changes to the same file in the main project and the branch are listed side by side, with the top showing the state of the main project and the bottom the state of the branch. You will need to manually edit the conflicted file (selecting which code chunks to retain and removing the `<<<<`, `====`, and `>>>>` signs). Then, run `git commit` to create a new snapshot of the files.
Generally, merge conflicts should be avoided. They increase the complexity of project management. Avoiding merge conflicts can be achieved through a consistent project workflow. Some tips on this are provided in the following sections.
### A git(hub) workflow
#### Remote repositories
In the examples above, you work with a *local* git repository. This tracks changes to your code locally, on your computer. This is is helpful, but isn't sufficient for collaborating on code development.
For this, you need to be able to share your git repository easily. Although self-hosting a service is an option, it is best to rely on common free services as provided by [github](github.com) or [gitlab](gitlab.com). These services allow you to host code projects online, share code, and provide the necessary tools to easily curate projects using git. Basic services are free. More advanced use benefits from a paid account. Overall, github is a good choice for hosting your git repositories, considering the scope of what it can do for your work (see side benefits below). For the sake of simplicity, we'll focus on github as a default (workflow) environment. However, gitlab and other services work in similar ways.
Much of the git logic applies directly to actions on github or gitlab. However a few differences are noted, in particular with respect to effectively managing a project workflow. But, to get started, we need to create a github project.
#### Creating a github project
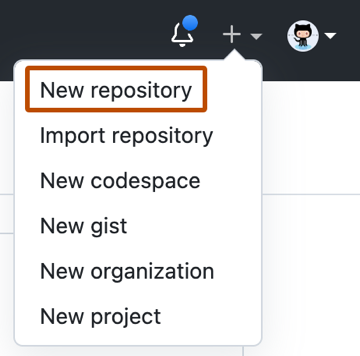
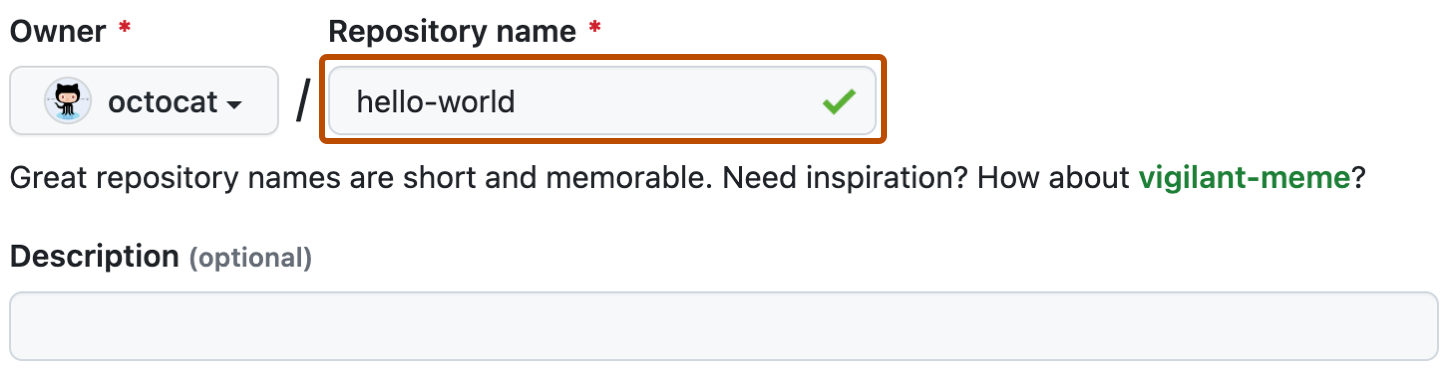
When logged into github (or gitlab), you can easily create a new project using the "new repository" button.
Naming the project and adding a README / LICENSE file will populate the project with a few basic files.


Now, you can `clone` the project to your local system:
``` bash
git clone https://github.com/octocat/hello-world
```
This creates a local copy of the git project 'hello-world'.
#### Updating a github project
With a local copy of your project, you can now add files (`git add`) and create new snapshots of changes (`git commit`). However, at this point, these changes are only stored locally. If you've cloned your repository from a remote location such as github, your local repository is (by default) linked to the remote one, and allows for synchronization of both.
Once you've made changes to your repository, you can update the snapshot on the github servers using the `git push` command. The additional parameters denote where you want to inject the changes (in this case at the head of the trunk).
``` bash
git push # --set-upstream origin HEAD
```
A similar logic applies to updating a local repository from the server. For example, you've made changes on your home computer and pushed these to the github server. You now access a supercomputer to run this code with these novel changes. However, the state of the local repository on the supercomputer will be behind the state of the code on the server. To update your main repository (or branch) to the current state you can run:
``` bash
git pull
```
This will incorporate changes from a remote repository (on github) into the current branch. By default, it will *fast-forward* the current branch to match the remote github changed files. Always **pull changes from the server before starting to code**. Failing to do so may lead to merge conflicts, and wasted time.
### Managing git(hub) projects
On github, and within open research projects, which are generally not too large, the workflow will mostly resemble an *integration-manager* workflow. Here, all developers work on local copies (either public or private) of a main repository (a clone or fork of the "blessed repository") and ask the main project's developer (the integration manager) to integrate these changes by pulling the changes into the main project (i.e. a *pull request* on github, see below).
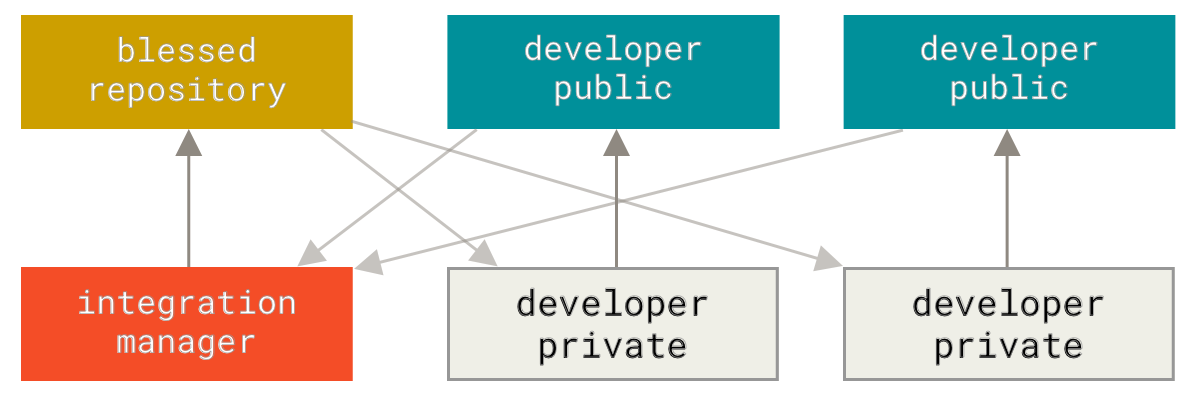
This workflow **balances integration control with collaboration** (assuming that the integration manager is committed to the project). Within the context of a scientific project, it is wise to **assign a project lead beforehand**, who will manage the project. All other contributions will be done indirectly, through cloning/forking the project and pulling changes. Generally speaking, having multiple integration managers on the trunk of a project could result in disaster if there is no consensus on the direction of the project.
#### Fork & pull request model
With owning a project on github (meaning that the repository is under your github account), you can now track your progress online (as a backup), and work distributed across various systems by pushing or pulling code via git. In short, you can develop code on both your local home computer and a supercomputer at your institute at the same time while keeping track of the state of the project.
However, this model assumes that you are the owner of the github repository and will make all these changes yourself. This stands in the way of collaboration. Here, github tools come into play to fix this issue, in particular through forking and cloning projects.
A *fork* is a copy of a repository (a clone) of a project you don't own. A fork clones an existing project into your github account so you can track changes on this project (locally) as you would with any of your own projects (all the same logic applies).
To make things collaborative, github made it possible to push back changes you make on your local fork to the original repository (with permission of the original owner). This action is called a *pull request*, as an analogy to the updating of the local state of a repository you own yourself.
In the top-most menu of a github project, you will find a `Pull request` tab or button. Clicking this button will link your changes back to the original project.

Since you are contributing as an outsider to an existing project, you must justify and explain your contributions. Therefore, a text window is available to explain the details of your contributions.

If you submit the pull request, a notification is sent to the original owner/project manager. The manager will then check the quality of the code and accept integration into the original github project.
If there are concerns, the project manager can ask you to address these further changes on your end before integration. Note that further commits to your forked project will be added to the current pull request with no further action required.
The example as described here adheres to the integration manager workflow, and is rather foolproof as it requires review at every step. Alternatively you can give other people permission to change the original project. However, this comes with potential dangerous consequences if different project goals are not well communicated internally and people develop in parallel. The latter can lead to complex merge conflicts, which should be avoided.
XXX Add sections for tags and (github-) releases.
### Best git workflow practice in science
Volumes have been written on best practice software development, but these are mostly focused on commercial and large projects. Small research projects can **relax some of these rules in order to cut back on the undue overhead** it creates on a project lead and members. It is best to balance software development practices with real life expectations and requirements. However, we can make some strong recommendations in this context to simplify some of these decisions and avoid conflicts.
##### Shallow branching patterns & high frequency integration
In the interest of ease of use of smaller projects, one should prefer shallow branching and rapid integration. Overall, this means that you frequently *commit and push, or* do *pull requests* on a cloned or forked main repository while limiting complicated branching structures, i.e. only simple branches from the main trunk.
Deviating from this pattern may result in merge conflicts in low-frequency integration as project members will inadvertedly start to work in parallel on the same files. This will generate difficulties propagating new mainline features up branches on top of merge conflicts. For a more in depth discussion I suggest [git branching patterns by Martin Fowler](https://martinfowler.com/articles/branching-patterns.html).
In general, there is little need for long-lived branches in science workflows. Long lived branches often cover various "hypotheses". However, it is better to include these in the main project in a transparent way rather than a separate branch. Should the underlying data structure on which the analysis is built, change (in the main project), a statistical test in a branch might fail. These issues will only surface when working on this branch. The longer a branch lives, the more likely it will become to accumulate such operational mismatches.
##### Use unit checks where possible
Unit checks are a way to test code using small (fast) examples. Using unit tests is helpful to verify if the code changes you make do not break either individual functions or other parts of a larger body of code. This of lesser importance when considering a small statistical analysis, but does apply to larger code sections (which might be re-used) such as (internal) packages.
##### Use issue tracking
Github provides a feature which allows you to create a ticketed *issue*. Use issues to state your intentions, even if you develop a new branch. This avoids duplicating work and merge conflicts due to working on items in parallel.
##### Collaboration issues
Most common issues within a github workflow relate to merge conflicts. Most of these can be avoided using clear communication using github issues or short-lived forks and branches. This is especially true when a project moves quickly.
##### Operational safety
Although poor practice, it remains common, due to convenience, to store login credentials in the directory of a project. This creates the potential to leak login credentials to public repositories on github. Do not dismiss this warning, [malicious bots actively scan github repositories for potential login credentials](https://edition.cnn.com/2021/02/26/politics/solarwinds123-password-intern/index.html). The latter combined with frequent (partial) password re-use opens you to hackers, fast (mostly within 24h). As such it is unwise to use wildcards (\*) while adding files to a github repository.
##### Ignore files
Creating a strong `.gitignore` file is advised. The `.gitignore` file specifies which kind of files to ignore, even if a wildcard (e.g., `git add *`) would apply to them. This file is a plain text file with the filename `.gitignore` which uses regular expressions to black-list certain files from inclusion into the git repository.
When creating an `R` package the default files which are ignored are listed as
``` bash
.Rproj.user
.Rhistory
.RData
.Ruserdata
inst/doc
```
Please not the inclusion of the `.Rhistory` file! Similar to the leaked credentials issue a history of all commands typed into an (R) terminal might give away login information. For this reason, all command logs (R or otherwise) should not be included in any git project.
### Binary files
Git allows for the storage of binary files without a space penalty. It will detect these files as such and generally will not track changes to these files. However, to ensure that projects don't grow in size due to binary files in the project you can specify additional parameters in the `.gitattributes` file. Similar to the `.gitignore` file this is a plain text file with parameters, in this case, file types to ignore logging state differences for.
Flagging files explicitly as "binary" is often wise when dealing with files which are text but are not human-readable. An example would be postscript files, as a precursor to a rendered PDF. Or, when including large sized CSV files with data. The below `.gitattributes` file would ignore creating verbose differences between two files. These settings force the file types to be treated as if binary.
``` bash
*.ps -diff
*.csv -diff
```
## R & RStudio git integration
In the above workflow, we relied on command line tools. Although it is valuable to know these commands in many work environments you will be able to rely on an Integrated Development Environment (IDE) such as [RStudio]() or [VSCode](). Both these interfaces provide a unified place in which you write code, visualize analysis (if applicable) and manage your git repository.
RStudio, the IDE for the R statistical package, provides a good set of git features which will help you manage local projects. Below, we'll show how to quickly create an R project which is git enabled. We'll show how to link this local repository to a remote github location, to finally upload the project to github in order to facilitate collaboration.
### creating a git enabled R project
TODO
#### adding your first files
TODO
#### commiting changes
TODO
#### linking a remote repository
TODO
## Github side benefits
There is a whole set of not well advertized side benefits to owning and paying for a github account.
- Website hosting (free) + easy domain integration (https)
- Hosting of various web data integrated in websites
- Automation of various tasks (github actions) mostly unit checks and continuous integration
- Automatically building website updates
- Generous and easily accessed data storage (if the data is open free)
## References
- Figures pertaining to the git workflow are licensed as CC-SA-NC 3.0 from the Pro Git book by Scott Chacon and Ben Straub and is [available online](https://git-scm.com/book/en/v2).
- Figures on the use of github sourced from [Github Docs](https://docs.github.com/en).