''在 spring mvc 之 springmvc demo 与 @EnableWebMvc 注解一文中,我们提供了一个示例 demo,该 demo 会先启动 servlet 容器,然后通过 servlet3.0 规范将 DispatcherServlet 注册到 servlet 容器中,然后在 DispatcherServlet#init 方法中启动 spring 容器,整个流程就像这样:
这没什么问题,能正常启动也运行良好,只不过我们在 spring 容器中无法获取 DispatcherServlet,像这样:
@Component
public class Test {
    // 在前面提供的示例(tomcat里启动spring容器)是注入不了的
    @Autowired
    public DispatcherServlet dispatcherServlet;

    ...

}
启动时,spring 肯定会报错,因为找不到 DispatcherServlet 对应的 bean。
最近在看 springboot 源码时,发现 spring 容器并不是由 tomcat 容器启动的,相反,springboot 是先启动 spring 容器,然后由 spring 容器启动 tomcat 启动,这是如何做到的呢?这里本人提供一个 demo 模拟下。
@Component
@EnableWebMvc
public class MvcConfig implements WebMvcConfigurer {

    @Override
    public void configureViewResolvers(ViewResolverRegistry registry) {
        InternalResourceViewResolver viewResolver = new InternalResourceViewResolver();
        viewResolver.setPrefix("/WEB-INF/views/");
        viewResolver.setSuffix(".html");
        registry.viewResolver(viewResolver);
    }

    /**
     * dispatcherServlet
     * @param webApplicationContext
     * @return
     */
    @Bean
    public DispatcherServlet dispatcherServlet(WebApplicationContext webApplicationContext) {
        return new DispatcherServlet(webApplicationContext);
    }

}
对该类说明如下:
MvcConfig类被@EnableWebMvc注解标记,表示需要启动用web mvc功能MvcConfig实现了WebMvcConfigurer,可以通过重写WebMvcConfigurer的方法来实现自定义web mvc的配置MvcConfig中会生成DispatcherServletbean,该 bean 会保存到 spring 容器中
@Component
public class MyWebApplicationInitializer implements WebApplicationInitializer {

    private static BeanFactory beanFactory;

    private static AbstractRefreshableWebApplicationContext applicationContext;

    @Override
    public void onStartup(ServletContext servletContext) {
        // 从 beanFactory 中获取 DispatcherServlet 并注册到servlet容器
        DispatcherServlet servlet = beanFactory.getBean(DispatcherServlet.class);
        ServletRegistration.Dynamic registration = servletContext.addServlet("app", servlet);
        // loadOnStartup 设置成 -1 时,只有在第一次请求时,才会调用 init 方法
        registration.setLoadOnStartup(-1);
        registration.addMapping("/*");

        // 为 applicationContext 设置 servletContext
        applicationContext.setServletContext(servletContext);
    }

    /**
     * 设置 beanFactory
     * 为什么要设置 beanFactory的值?因为 DispatcherServlet 要从 beanFactory 中获取
     * @param beanFactory
     * @throws BeansException
     */
    public static void setBeanFactory(BeanFactory beanFactory) throws BeansException {
        MyWebApplicationInitializer.beanFactory = beanFactory;
    }

    /**
     * 设置 applicationContext
     * 为什么要设置 applicationContext 的值?因为 servletContext 要设置到 applicationContext
     * @param applicationContext
     */
    public static void setApplicationContext(
                AbstractRefreshableWebApplicationContext applicationContext) {
        MyWebApplicationInitializer.applicationContext = applicationContext;
    }
}
WebApplicationInitializer 是 spring 对 servlet 3.0 规范的实现,在 spring mvc 之 springmvc demo 与 @EnableWebMvc 注解一文也详细分析过,tomcat 在启动时,会执行 WebApplicationInitializer#onStartup 方法。
对 MyWebApplicationInitializer 说明如下:
MyWebApplicationInitializer中有两个静态成员变量:beanFactory与applicationContext,对应地提供了两个静态set方法,需要注意的是,这两个静态set方法要在onStartup()方法前调用,也就是 tomcat 启动前调用调用;- 在
MyWebApplicationInitializer#onStartup方法中,我们先是从beanFactory中获取了DispatcherServlet,然后将其注册到servlet容器中,然后将onStartup(...)方法的参数servletContext设置到applicationContext中
public class MyServletContextAwareProcessor extends ServletContextAwareProcessor {

	AbstractRefreshableWebApplicationContext webApplicationContext;

	/**
	 * 传入 webApplicationContext
	 * @param webApplicationContext
	 */
	public MyServletContextAwareProcessor(
                AbstractRefreshableWebApplicationContext webApplicationContext) {
		this.webApplicationContext = webApplicationContext;
	}

	/**
	 * 返回 ServletContext
	 * 先从 webApplicationContext 中获取,如果获取不到,再从父类方法中获取
	 * @return
	 */
	@Override
	protected ServletContext getServletContext() {
		ServletContext servletContext = this.webApplicationContext.getServletContext();
		return (servletContext != null) ? servletContext : super.getServletContext();
	}

	@Override
	protected ServletConfig getServletConfig() {
		ServletConfig servletConfig = this.webApplicationContext.getServletConfig();
		return (servletConfig != null) ? servletConfig : super.getServletConfig();
	}
}
在 MyWebApplicationInitializer#onStartup 方法中对 applicationContext 设置的 servletContext 就是在这里使用的,MyServletContextAwareProcessor 的构造方法传入了 webApplicationContext,然后重写了 getServletContext() 方法,获取 servletContext 时,先从 webApplicationContext 中获取,如果获取不到,再从父类方法中获取。
ApplicationContext 至关重要,这里我们选择直接扩展 AnnotationConfigWebApplicationContext:
public class MyWebApplicationContext extends AnnotationConfigWebApplicationContext {

    private Tomcat tomcat;

    /**
     * 重写 postProcessBeanFactory 方法
     * 在这个方法里添加我们自定义的 MyServletContextAwareProcessor
     * @param beanFactory
     */
    @Override
    protected void postProcessBeanFactory(ConfigurableListableBeanFactory beanFactory) {
        beanFactory.addBeanPostProcessor(new MyServletContextAwareProcessor(this));
        beanFactory.ignoreDependencyInterface(ServletContextAware.class);
        WebApplicationContextUtils.registerWebApplicationScopes(getBeanFactory());
    }

    /**
     * 在这个方法里启动 tomcat
     */
    @Override
    protected void onRefresh() {
        // 先调用父类的方法
        super.onRefresh();
        // 设置 MyWebApplicationInitializer 的 beanFactory 与 applicationContext
        MyWebApplicationInitializer.setBeanFactory(getBeanFactory());
        MyWebApplicationInitializer.setApplicationContext(this);

        // tomcat的创建及启动
        tomcat = new Tomcat();
        Connector connector = new Connector();
        connector.setPort(8080);
        connector.setURIEncoding("UTF-8");
        tomcat.getService().addConnector(connector);

        Context context = tomcat.addContext("", System.getProperty("java.io.tmpdir"));
        LifecycleListener lifecycleListener = null;
        try {
            lifecycleListener = (LifecycleListener)
                    Class.forName(tomcat.getHost().getConfigClass())
                    .getDeclaredConstructor().newInstance();
            context.addLifecycleListener(lifecycleListener);
            // 启动tomcat
            tomcat.start();
        } catch (Exception e) {
            System.out.println("启动异常:");
            e.printStackTrace();
        }
    }

}
这个类扩展了 spring 的启动流程,这里一共重写了两个方法,这里一一介绍下:
postProcessBeanFactory():这个方法主要是为了注册MyServletContextAwareProcessor,前面我们准备的MyServletContextAwareProcessor就是在这里注册的,之所以重写,还是为了使用tomcat提供的ServletContext;onRefresh():在这个方法里,先是设置MyWebApplicationInitializer的beanFactory与applicationContext属性值,然后启动tomcat;
准备一个 Controller,主要是帮助我们验证项目是否启动正常:
@RestController
@RequestMapping("/test")
public class TestController {

    @RequestMapping("/hello")
    public String hello() {
        System.out.println("hello!!!");
        return "hello world!";
    }

}
最后就是主类了,主要是处理 spring 的启动操作,也是相当简单:
@ComponentScan
public class MvcDemo03Main {

    public static void main(String[] args) throws Exception {
        MyWebApplicationContext webApplicationContext = new MyWebApplicationContext();
        webApplicationContext.register(MvcDemo03Main.class);
        webApplicationContext.refresh();
    }
}
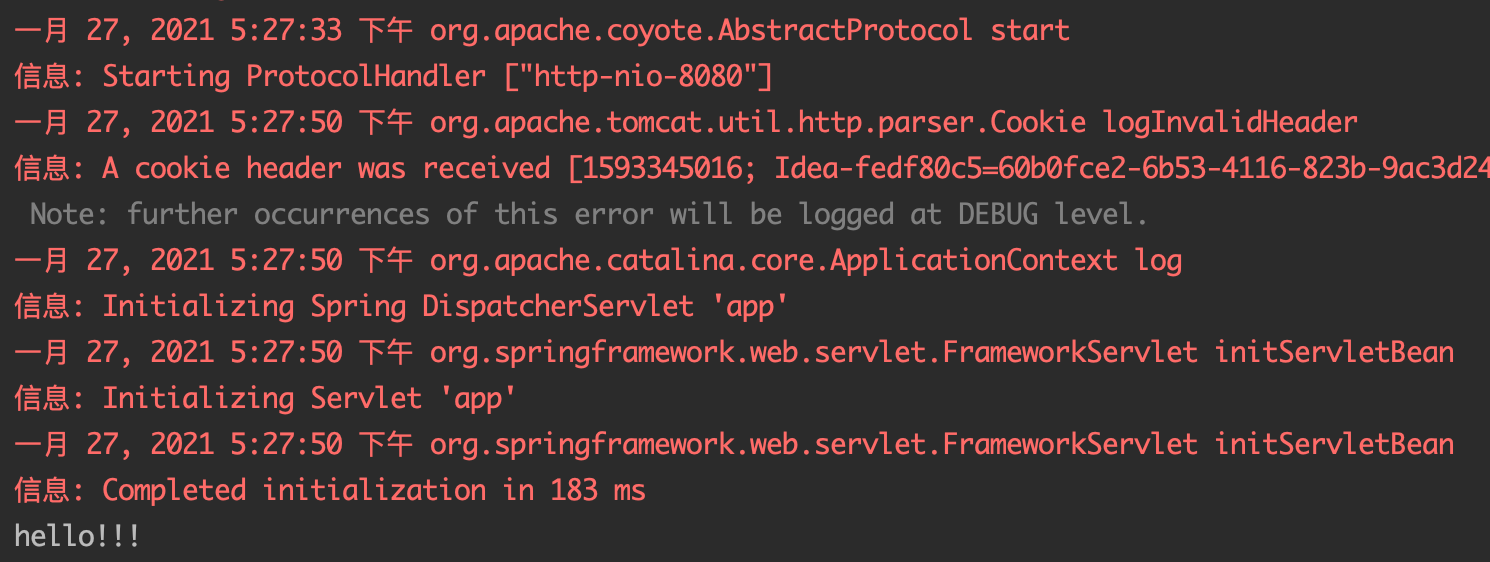
运行,访问 http://localhost:8080/test/hello,结果如下:
页面:
控制台:
前面我们分析到,使用 tomcat 启动 spring 容器的方式时,spring 容器是在 DispatcherServlet#init 方法中启动的,在我们使用 spring 容器启动 tomcat 的启动方式时,tomcat 执行 DispatcherServlet#init 方法时,会再次启动 spring 容器吗?
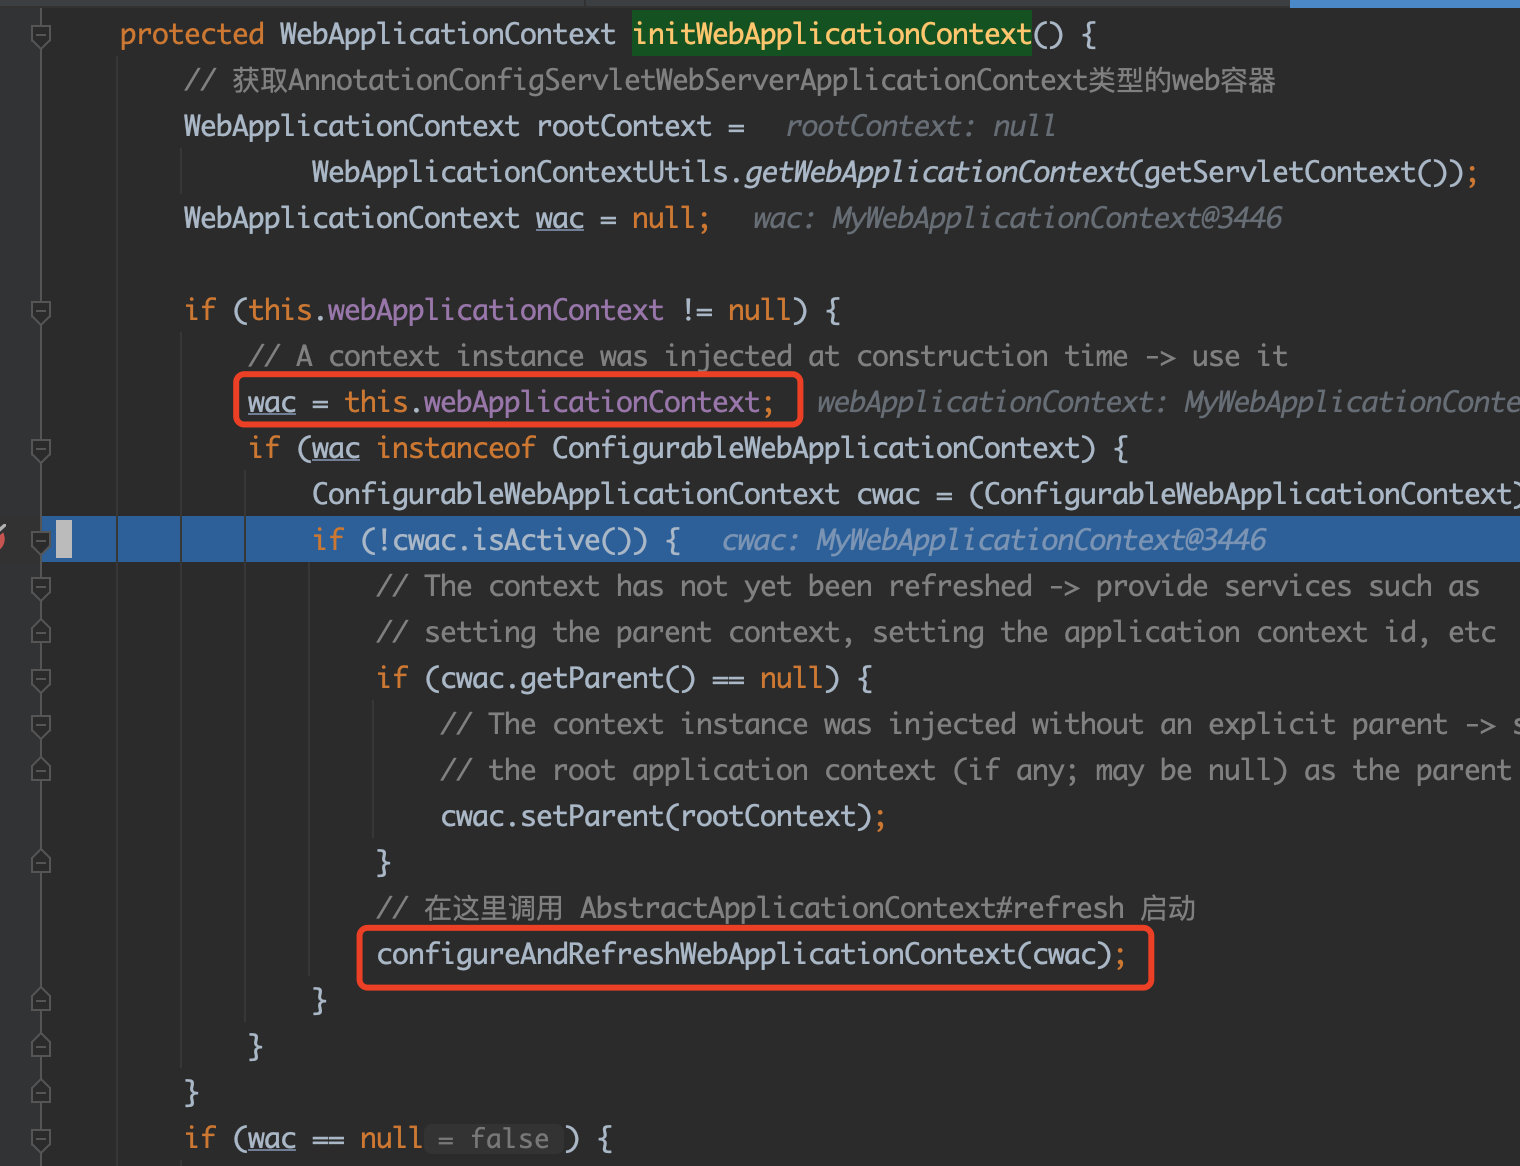
这里我们直接进入 FrameworkServlet#initWebApplicationContext 方法,打上断点:
这里的 wac 与 this.webApplicationContext 就是 MyWebApplicationContext 的实例,在创建 DispatcherServlet 时传入的:
@Bean
public DispatcherServlet dispatcherServlet(WebApplicationContext webApplicationContext) {
    // 在构造方法的参数中传入了 webApplicationContext
    return new DispatcherServlet(webApplicationContext);
}
到于为什么打到这个方法,那是因为 DispatcherServlet#init 经过层层调用后,最终是在这个方法里处理 spring 容器的启动的,当断点运行到 if (!cwac.isActive()) {... 时,!cwac.isActive() 返回结果为 false,因此 if 块里的启动 spring 容器就不会执行到了。
综上所述,通过 spring 容器启动 tomcat 后,在 DispatcherServlet#init 里不会再次启动 spring 容器。这样启动后,DispatcherServlet 就是一个 spring bean,我们就可以在代码里使用 @Autowired 注解将其注入到其他类中了:
@Component
public class Test {
    // 本文的示例(在 spring 容器中启动 tomcat)是可以注入成功的
    @Autowired
    public DispatcherServlet dispatcherServlet;

    ...

}
关于 spring 启动 tomcat 的分析就到这里,其中的难点在于如何将 tomcat 提供的 ServletContext 设置到 ServletContextAwareProcessor 中,其中的解决方式注意体会。
本文原文链接:https://my.oschina.net/funcy/blog/4928222 ,限于作者个人水平,文中难免有错误之处,欢迎指正!原创不易,商业转载请联系作者获得授权,非商业转载请注明出处。


