This is a Proof of Concept application I maintain to fine tune a develop+test+deployment work-flow for IoT use cases.
I used a really basic setup of 'things' that I want to control over the Internet.
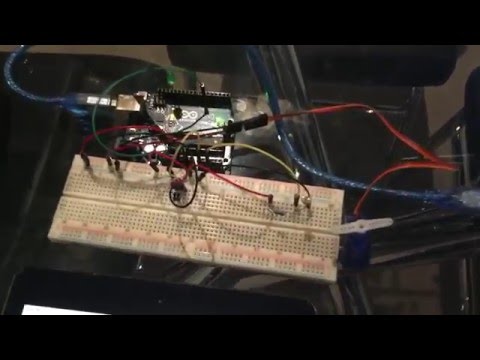
The breadboard brings together the following ...
- An Arduino Uno
- A Servo
- An LM35 temperature sensor
- An LED
- A Photoresistor

A web UI controls the Servo and the on/off frequency of the LED. The UI also displays readings from the LM35 temperture sensor continuously. The progress bar displays readings from the photoresistor. Higher percentage indicates more light, vise versa.

I have hosted this UI in Firebase at https://servo-controller.firebaseapp.com/
In May 2016, Google announced major upgrades to Firebase during their Google I/0 conference. Now I love it even more.

- Complete breadboard connections as illustrated.
- Plug Arduino to the host computer via USB.
- Install the Arduino IDE and load Standard Firmata.
- Install Node.js
- clone git repository to your local machine.
- npm install
- npm start
- Load index.html either directly in the web browser to test that everything communicates with each other. Once verified, host it on the Internet.
- Install Docker on your raspberry pi. I have documented my work flow at https://gist.github.com/tyrell/2963c6b121f79096ee0008f5a47cf347 .
docker run -dti --privileged tyrell/control-things-from-the-internet:rpi-latest
TIP: Head over to https://hub.docker.com/r/tyrell/control-things-from-the-internet to find the Docker repository for my images. I usually TAG my images as rpi-latest and x86-latest, the two main platforms I run containers in.
sudo crontab -e- Add the following line to the file and save
@reboot /bin/bash /<where-you-cloned-the-git-repo>/scripts/control-things-from-the-internet.sh 2> /<where-you-cloned-the-git-repo>/cron_errors.log
- Install Node-RED on your Raspberry Pi.
- Setup the circuit and attach your Arduino to the Pi.
- Go to http://[your-pi-ip-address]:1880 in a browser to view the Node-RED flow designer.
- Copy and paste the flow definition from node-red/flows_raspberrypi.json file and deploy to Node-RED
I have a Node-RED docker image, with Johnny Five and Pubnub packaged in at https://hub.docker.com/r/tyrell/node-red-docker/

- http://www.instructables.com/id/Javascript-robotics-and-browser-based-Arduino-cont/ - This tutorial was the starting point for my experiment. I replaced the dependency on Socket.io with Pubnub. Instead of having to run a node server to host HTML, I hosted the UI in Firebase. This decouples my UI from the device drivers.
- Pubnub - https://www.pubnub.com
- Firebase - https://www.firebase.com
- Resin.io - https://resin.io/ They have operationalised deployments in a way I find really interesting.
- Node-RED - http://nodered.org/
- Johnny Five and Node-RED HowTo - https://github.com/rwaldron/johnny-five/wiki/Getting-started-with-Raspberry-Pi-node-red-and-IoT
Copyright (c) 2016 Tyrell Perera tyrell.perera@gmail.com Licensed under the MIT license.