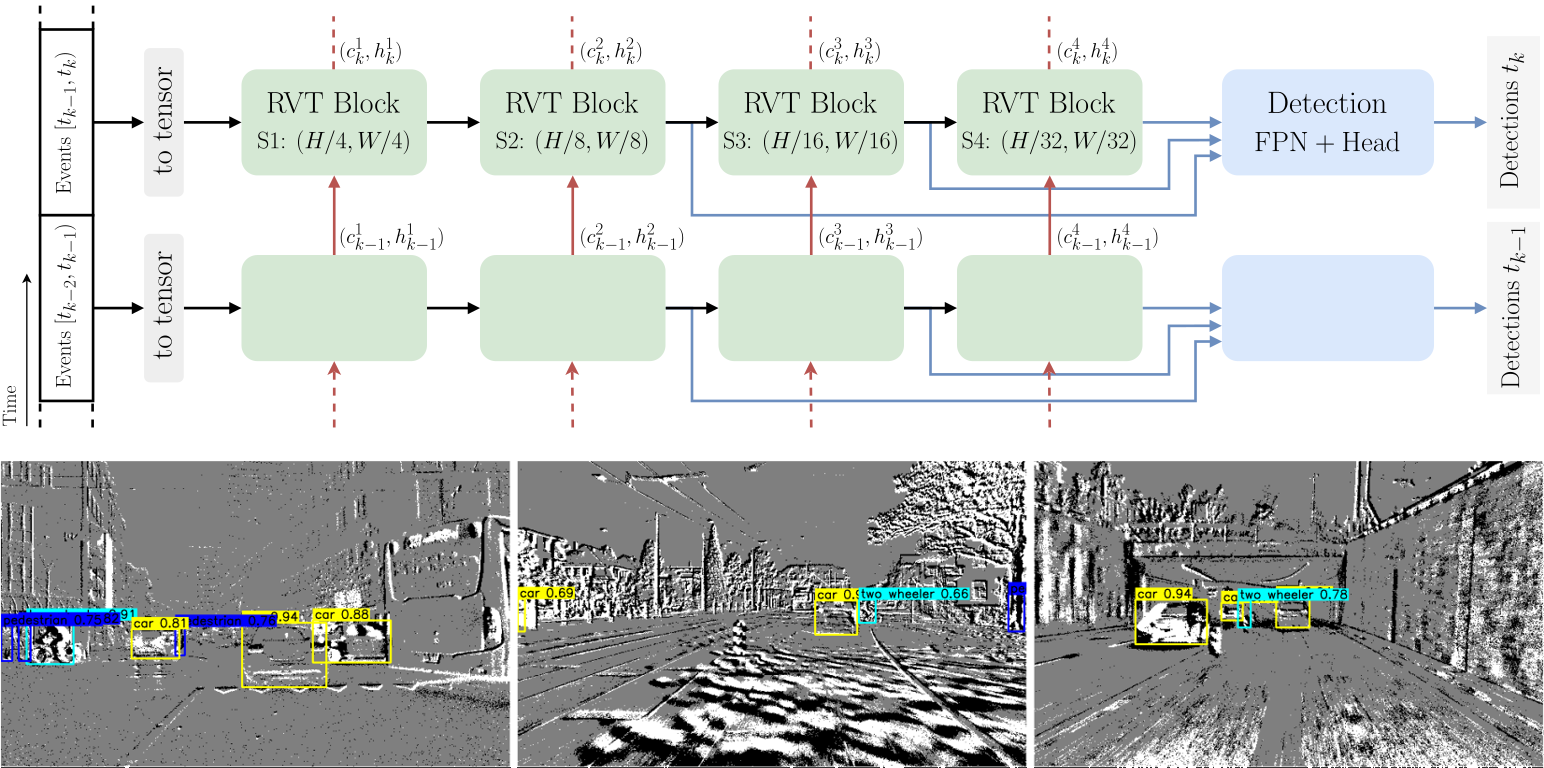
This is the official Pytorch implementation of the CVPR 2023 paper Recurrent Vision Transformers for Object Detection with Event Cameras.
Watch the video for a quick overview.
@InProceedings{Gehrig_2023_CVPR,
  author  = {Mathias Gehrig and Davide Scaramuzza},
  title   = {Recurrent Vision Transformers for Object Detection with Event Cameras},
  booktitle = {Proceedings of the IEEE/CVF Conference on Computer Vision and Pattern Recognition (CVPR)},
  year    = {2023},
}We highly recommend to use Mambaforge to reduce the installation time.
conda create -y -n rvt python=3.9 pip
conda activate rvt
conda config --set channel_priority flexible

CUDA_VERSION=11.8

conda install -y h5py=3.8.0 blosc-hdf5-plugin=1.0.0 \
hydra-core=1.3.2 einops=0.6.0 torchdata=0.6.0 tqdm numba \
pytorch=2.0.0 torchvision=0.15.0 pytorch-cuda=$CUDA_VERSION \
-c pytorch -c nvidia -c conda-forge

python -m pip install pytorch-lightning==1.8.6 wandb==0.14.0 \
pandas==1.5.3 plotly==5.13.1 opencv-python==4.6.0.66 tabulate==0.9.0 \
pycocotools==2.0.6 bbox-visualizer==0.1.0 StrEnum==0.4.10
python -m pip install 'git+https://github.com/facebookresearch/detectron2.git'
Detectron2 is not strictly required but speeds up the evaluation.
Alternative to the conda installation.
python -m venv rvt
source rvt/bin/activate
python -m pip install -r torch-req.txt --index-url https://download.pytorch.org/whl/cu118
python -m pip install -r requirements.txt
Optionally, install Detectron2 within the activated venv
python -m pip install 'git+https://github.com/facebookresearch/detectron2.git'To evaluate or train RVT you will need to download the required preprocessed datasets:
| 1 Mpx | Gen1 | |
|---|---|---|
| pre-processed dataset | download | download |
| crc32 | c5ec7c38 | 5acab6f3 |
You may also pre-process the dataset yourself by following the instructions.
| RVT-Base | RVT-Small | RVT-Tiny | |
|---|---|---|---|
| pre-trained checkpoint | download | download | download |
| md5 | 72923a | a94207 | 5a3c78 |
| RVT-Base | RVT-Small | RVT-Tiny | |
|---|---|---|---|
| pre-trained checkpoint | download | download | download |
| md5 | 839317 | 840f2b | a770b9 |
-
Set
DATA_DIRas the path to either the 1 Mpx or Gen1 dataset directory -
Set
CKPT_PATHto the path of the correct checkpoint matching the choice of the model and dataset. -
Set
MDL_CFG=base, orMDL_CFG=small, orMDL_CFG=tiny
to load either the base, small, or tiny model configuration
-
Set
USE_TEST=1to evaluate on the test set, orUSE_TEST=0to evaluate on the validation set
-
Set
GPU_IDto the PCI BUS ID of the GPU that you want to use. e.g.GPU_ID=0. Only a single GPU is supported for evaluation
python validation.py dataset=gen4 dataset.path=${DATA_DIR} checkpoint=${CKPT_PATH} \
use_test_set=${USE_TEST} hardware.gpus=${GPU_ID} +experiment/gen4="${MDL_CFG}.yaml" \
batch_size.eval=8 model.postprocess.confidence_threshold=0.001python validation.py dataset=gen1 dataset.path=${DATA_DIR} checkpoint=${CKPT_PATH} \
use_test_set=${USE_TEST} hardware.gpus=${GPU_ID} +experiment/gen1="${MDL_CFG}.yaml" \
batch_size.eval=8 model.postprocess.confidence_threshold=0.001-
Set
DATA_DIRas the path to either the 1 Mpx or Gen1 dataset directory -
Set
MDL_CFG=base, orMDL_CFG=small, orMDL_CFG=tiny
to load either the base, small, or tiny model configuration
-
Set
GPU_IDSto the PCI BUS IDs of the GPUs that you want to use. e.g.GPU_IDS=[0,1]for using GPU 0 and 1. Using a list of IDS will enable single-node multi-GPU training. Pay attention to the batch size which is defined per GPU: -
Set
BATCH_SIZE_PER_GPUsuch that the effective batch size is matching the parameters below. The effective batch size is (batch size per gpu)*(number of GPUs). -
If you would like to change the effective batch size, we found the following learning rate scaling to work well for all models on both datasets:
lr = 2e-4 * sqrt(effective_batch_size/8). -
The training code uses W&B for logging during the training. Hence, we assume that you have a W&B account.
- The training script below will create a new project called
RVT. Adapt the project name and group name if necessary.
- The training script below will create a new project called
- The effective batch size for the 1 Mpx training is 24.
- To train on 2 GPUs using 6 workers per GPU for training and 2 workers per GPU for evaluation:
GPU_IDS=[0,1]
BATCH_SIZE_PER_GPU=12
TRAIN_WORKERS_PER_GPU=6
EVAL_WORKERS_PER_GPU=2
python train.py model=rnndet dataset=gen4 dataset.path=${DATA_DIR} wandb.project_name=RVT \
wandb.group_name=1mpx +experiment/gen4="${MDL_CFG}.yaml" hardware.gpus=${GPU_IDS} \
batch_size.train=${BATCH_SIZE_PER_GPU} batch_size.eval=${BATCH_SIZE_PER_GPU} \
hardware.num_workers.train=${TRAIN_WORKERS_PER_GPU} hardware.num_workers.eval=${EVAL_WORKERS_PER_GPU}
If you instead want to execute the training on 4 GPUs simply adapt GPU_IDS and BATCH_SIZE_PER_GPU accordingly:
GPU_IDS=[0,1,2,3]
BATCH_SIZE_PER_GPU=6- The effective batch size for the Gen1 training is 8.
- To train on 1 GPU using 6 workers for training and 2 workers for evaluation:
GPU_IDS=0
BATCH_SIZE_PER_GPU=8
TRAIN_WORKERS_PER_GPU=6
EVAL_WORKERS_PER_GPU=2
python train.py model=rnndet dataset=gen1 dataset.path=${DATA_DIR} wandb.project_name=RVT \
wandb.group_name=gen1 +experiment/gen1="${MDL_CFG}.yaml" hardware.gpus=${GPU_IDS} \
batch_size.train=${BATCH_SIZE_PER_GPU} batch_size.eval=${BATCH_SIZE_PER_GPU} \
hardware.num_workers.train=${TRAIN_WORKERS_PER_GPU} hardware.num_workers.eval=${EVAL_WORKERS_PER_GPU}- LEOD: Label-Efficient Object Detection for Event Cameras. CVPR 2024
- State Space Models for Event Cameras. CVPR 2024
Open a pull request if you would like to add your project here.
This project has used code from the following projects:
