-
Notifications
You must be signed in to change notification settings - Fork 7
Create A YouTube style Recommendation Engine With Node & Vue
One of the best ways to hook the users of your app is to show them personalized content. A good example is YouTube’s video suggestions based on previously watched videos. Another popular one is Amazon’s suggestion to view similar items based on previously viewed products. Another example is Instagram’s method of choosing which images and videos to show when you search or explore.
In this article, we'll walk you through the steps of building a simple application that suggests personalized videos to a user based on videos the user has recently uploaded: the user uploads videos and in return gets a feed of related videos. To do this, we are going to take advantage of Cloudinary’s video player and their Automatic Video Tagging Add-on, powered by Google.
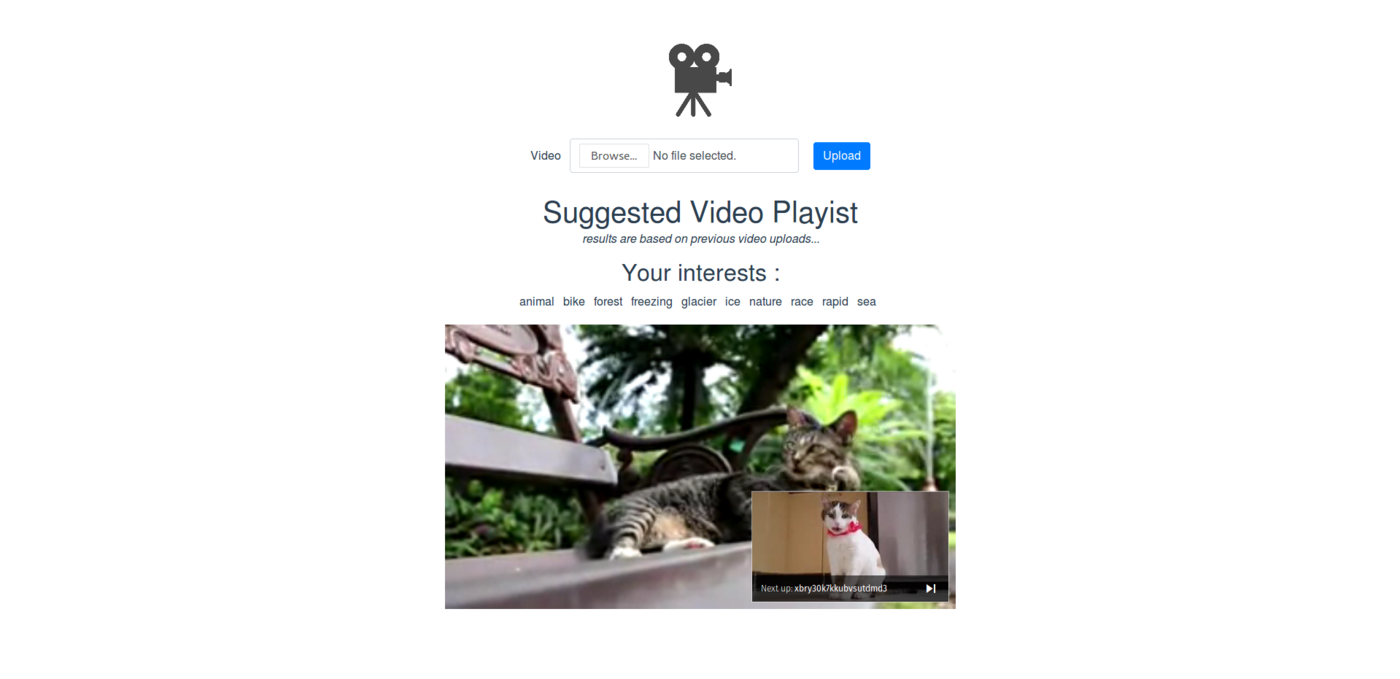
Your finished app will look something like this:
Note: this article was originally posted here on the Vue.js Developers blog on 2018/04/16
To build this app, we are going to use a Node server for the backend and Vue for our front-end. To perform this tutorial yourself, verify that:
- Node is installed on your machine
- Node Package Manager (npm) is installed on your machine.
To verify your installation, run these commands in your terminal:
    node --version
    npm --version
If you get version numbers as results then you can follow along with this tutorial. Otherwise, go ahead and install these, or just read along to see how we've done it.
Cloudinary is a one-stop-shop for image and video management, including manipulation, optimization, and delivery. With Cloudinary, you save yourself extra hours that you would have spent developing all kinds of functionality related to manipulating and delivering the videos in your app.
Creating a Cloudinary Account: Follow this link to sign up.
Once you’re successfully signed up to Cloudinary, you’ll be redirected to your dashboard, where you can see your
CLOUD_NAME, API_KEY, API_SECRET. You will need these values later in this tutorial.
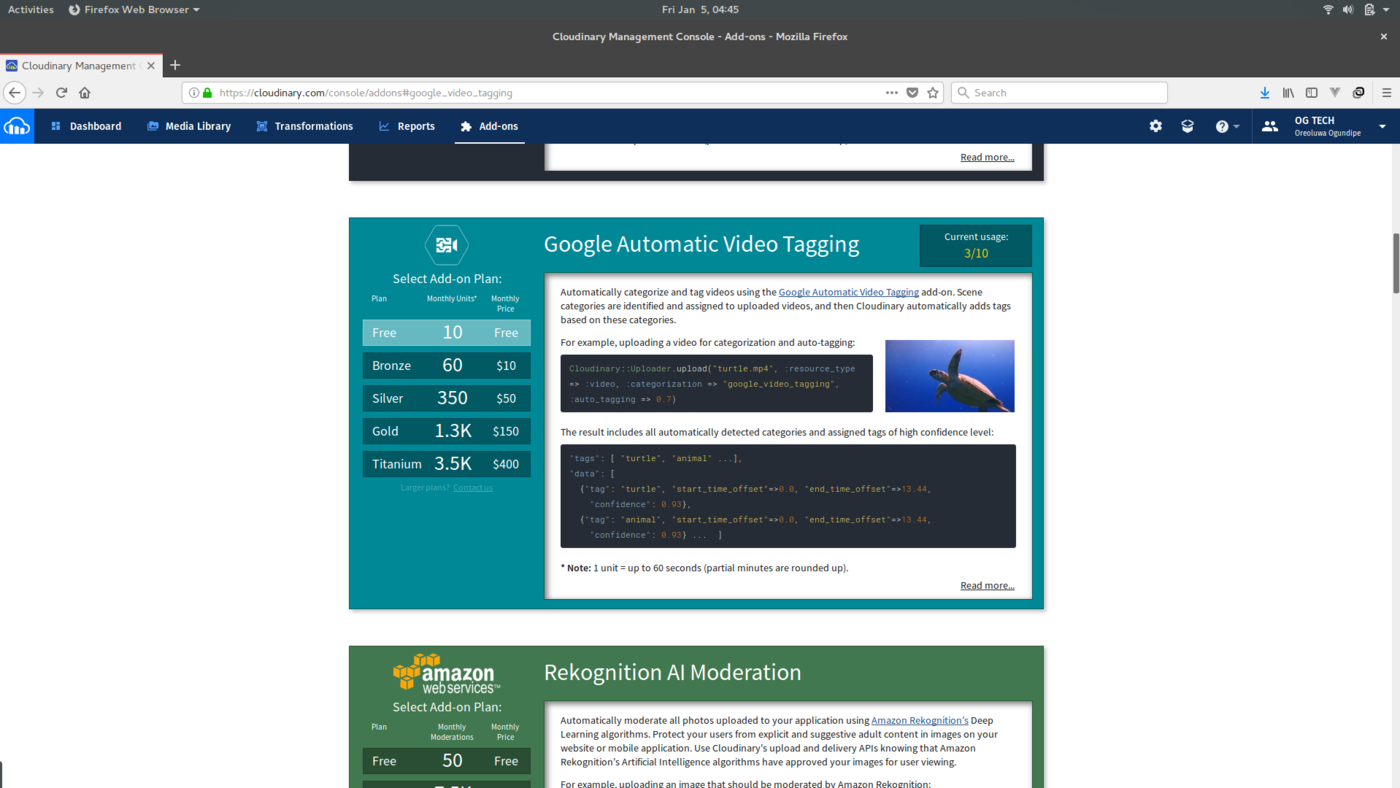
Enable the Automatic Video Tagging Add-on
Now, you can add the Automatic Video Tagging Add-on to your account. Go ahead and register for the free tier. This allows you to use the add-on as we are going to do in a few steps..
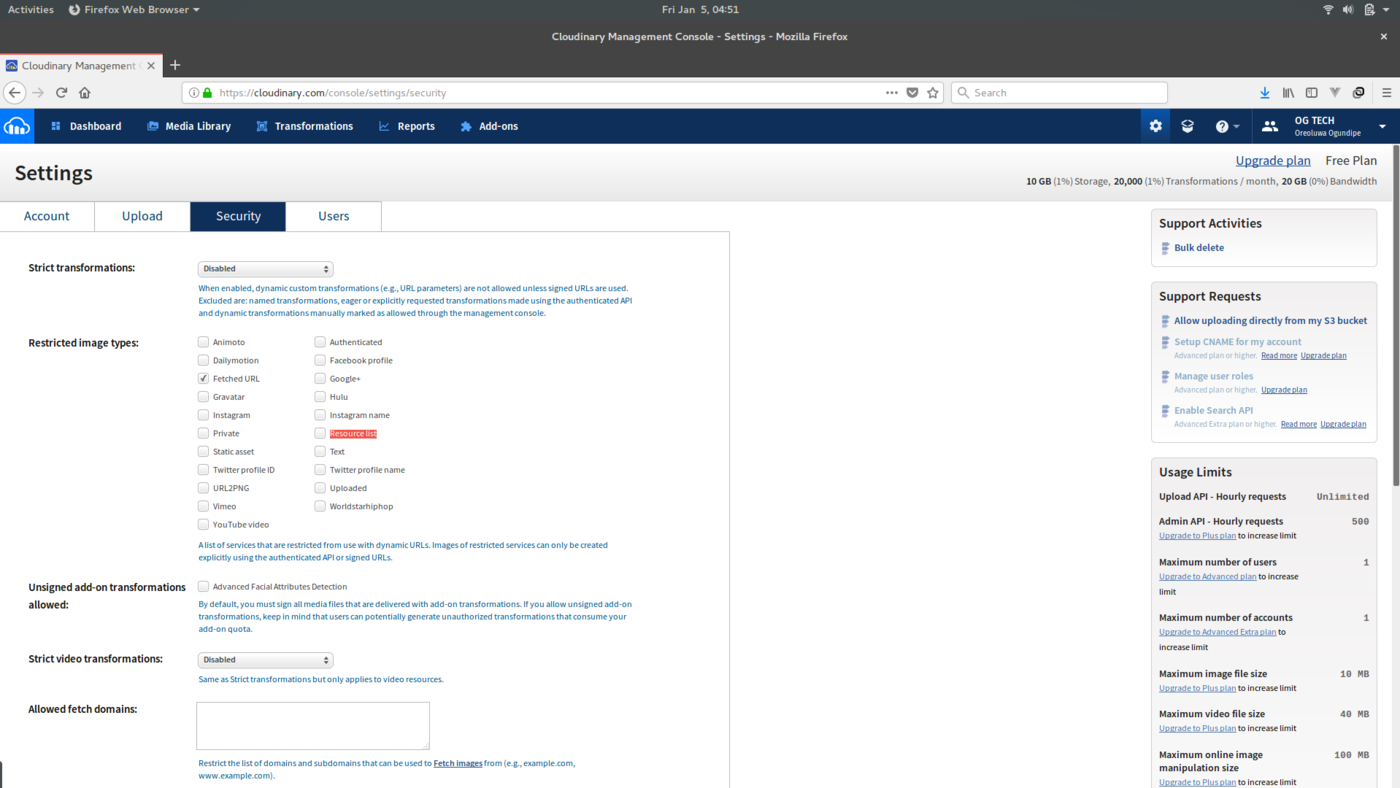
Edit Restricted Image Types
To allow your Cloudinary client to query the media on an account for different tags, you need to ensure that the resource list option is unchecked in the Restricted Image Types under the security tab of your Cloudinary account. If left checked, you will not be able to query the media library for video tags.
To handle your API calls to Cloudinary, we’ll be using an express server.
Install required node modules
We need the following node modules:
- cors - Will enable cross-origin resource sharing on our app
- express - Will be our web server
- body-parser - Will be used to parse the contents of JSON requests
- connect-multiparty - Will enable multipart requests on our app
- cloudinary-core - javascript-core package that handles Cloudinary functions
Make a new directory and change directory into it:
mkdir video-suggestion && cd video-suggestionThen install the node modules
npm install cors express body-parser connect-multiparty cloudinary-coreCreate theserver.js file
Now, we need to create a file that will contain the instructions needed for our server to work
in your video-suggestion directory:
touch server.jsThis will be the start-up file that you’ll reference when your server is running.
In your server.js file, you need to import the node modules you installed above:
Import the node modules
    const cors = require('cors')
    const express = require('express')
    const cloudinary = require('cloudinary-core')
    const bodyParser = require('body-parser')
    const multipart = require('connect-multiparty')

    [...]
Create your express app
Now let’s create our express app by adding the following to the server.js:
    [...]

    const app = express()

    [...]
Load the middlewares
We load the middlewares in our server.js by adding the following:
    [...]

    app.use(cors())
    app.use(bodyParser.json());
    app.use(bodyParser.urlencoded({ extended: false }));
    const multipartMiddleware = multipart();

    [...]
With the above commands, we set our app to use cors. We also instruct the app to the parse the requests in JSON format.
Configure the Cloudinary Client
Now you need to configure our Cloudinary client using your CLOUD_NAME, API_KEY and API_SECRET. You can find these values on the Dashboard when you log in to your Cloudinary account.
    [...]

    cloudinary.config({
        cloud_name: 'CLOUDINARY_CLOUD_NAME',
        api_key: 'CLOUDINARY_API_KEY',
        api_secret: 'CLOUDINARY_API_SECRET'
    });

    [...]
Create app routes
Our app has two basic routes:
-
/upload- to upload the user's video -
/suggest- to fetch the categories of videos the user is interested in
For the upload part of the app, we use the Cloudinary client and the video that will be sent to us as part of the post request when a call is made to the upload route of our application. This then sends the video to our Cloudinary Media Library.
In our upload command, we also include google_video_tagging as the category. This triggers the auto_tagging feature and stores detected tags together with our video in the Media Library.
    [...]

    app.post('/upload', multipartMiddleware, function(req, res){
        //  Upload video to cloudinary
        cloudinary.uploader.upload(req.files.video.path,
        function(result) {
            return res.json({
                'status' : true
            })
        },
        { resource_type: "video", categorization: "google_video_tagging", auto_tagging: 0.4 });

    [...]
auto_tagging: 0.4represents the degree of confidence to be used for the detected tags.
To get the detected tags for the videos that our user has uploaded, we use the Cloudinary client to fetch tags for resource_type: 'video'.
    [...]

    app.get('/suggest', multipartMiddleware, function(req, res){
        cloudinary.v2.api.tags( {resource_type : 'video'},
            function(error, result){
                return res.json( result );
            });
    });

    [...]
Configure Application Port
And now we finish off our backend server by setting the port we want the app to listen on:
    [...]

    let port = process.env.PORT || 3000;

    app.listen(port, function () {
      console.log('App listening on port ' + port + '!');
});Now that we have the backend of the application, we need to build the user-facing side of the application. To do this, we are going to use Vue. Vue is a progressive JavaScript framework that is quick and easy to use.
Installing Vue
If you already have Vue installed, you can confirm your installation by running:
vue --versionIf not, you can install the Vue CLI by running:
npm install --global vue-cliTo create the frontend server, run the following in the video-suggestion directory that we created in the previous step:
vue init webpack frontendInstalling Node Modules
We are going to use axios to make get requests from one of our Vue components, so if you don't have it, you'll need to install it as well. Running the following in the frontend directory:
    cd frontend
    npm install axios
Creating the Upload Component
Now, we want to create the Upload component responsible for uploading the video.
    cd frontend/src/components
    touch Upload.vue
In the Upload.vue, we need to import the axios module:
    <script>
    import axios from 'axios'
    [...]
Then we describe the component itself :
    [...]
    export default {
      name: 'Upload',
      data () {
        return {
          video: null,
          loading: ''
        }
      },
      methods: {
        upload : function(files){
          this.loading = 'Video detected';
          this.video = files[0];
        },
        onSubmit: function(){
          //  compile the form data
          const formData = new FormData();
          formData.append('video', this.video);
          this.loading = "Uploading...Please wait.";
          axios.post('http://localhost:3128/upload', formData)
          .then( res => {
            this.loading = 'Upload Complete!';
          })
        }
      }
    }
    </script>
The above component has two methods upload and onSubmit. The upload method assigns the uploaded video to this.video and the onSubmit method adds the video to the formData and then sends the post request to the /upload route of our backend server.
The component will have a template that looks like this :
<template>
<div class="container" style="margin-top:30px;" >
<div class="row">
<form class="form-inline" enctype="multipart/form-data" @submit.prevent="onSubmit">
<div class="form-group">
<label for="">Video </label>
<input type="file" class="form-control" accept="video/*" name="video" v-on:change="upload($event.target.files)">
</div>
<div class="form-group" style="margin-left: 20px;">
<button class="btn btn-primary">Upload</button>
{{ loading }}
</div>
</form>
</div>
</div>
</template>Creating the Playlist Component
Now that the video has been uploaded, we want to offer the user a playlist of similar videos. To do this, we'll use the Cloudinary Video Player:
    [...]
        <link href="https://unpkg.com/cloudinary-video-player/dist/cld-video-player.min.css" rel="stylesheet">
       <script src="https://unpkg.com/cloudinary-core/cloudinary-core-shrinkwrap.min.js" type="text/javascript"></script>
       <script src="https://unpkg.com/cloudinary-video-player/dist/cld-video-player.min.js" type="text/javascript"></script>
    [...]
This imports the video player styling and javascript that we'll need later.
Now we create the Playlist component:
    cd frontend/src/components
    touch Playlist.vue
In the Playlist.vue, we import the axios module:
    <script>
    import axios from 'axios'
    [...]
Now we describe the component :
    [...]
    export default {
      name: 'Playlist',
      data () {
        return {
            interests : '',
            loading: ''
        }
        },
        mounted : function(){
            // Get all the tags for videos uploaded by this user
            axios.get('http://localhost:3128/suggest')
            .then( result => {
                // what you get ideally from here is the json of the info
                this.interests = result.data.tags;
                let cld = cloudinary.Cloudinary.new({ cloud_name: 'demo' });
                let demoplayer = cld.videoPlayer('video-player');
                demoplayer.playlistByTag( result.data.tags[0] ,{ autoAdvance: 0, repeat: true, presentUpcoming: 15 })
            })
        }
    }
    </script>
    [...]
When the component above is mounted, we make a get request to the /suggest route of our server which returns to us the list of tags and then we play the videos for resource's the first tag using the Cloudinary VideoPlayer's playlistByTag function.
The component has a template that looks like this :
[...]
<template>
<div class="container suggestions">
<h1 class="header">Suggested Video Playist</h1>
<p><em>results are based on video uploads...</em></p>
<div class="video-area">
<!-- This will contain the video player -->
<h2>Your interests : </h2>
<template v-for="interest in interests">
{{ interest }}
</template>
<video
id="video-player"
controls
class="cld-video-player cld-video-player-skin-dark"
>
</video>
</div>
</div>
</template>
[...]And some scoped css styling :
   /*Here: https://github.com/christiannwamba/video-suggestion/blob/master/frontend/src/components/Playlist.vue#L56-L87
*/
Importing Components in our App.vue
Now that we have the components ready, we import them in our App.vue so that they will be captured when the view is compiled:
    <script>
    import Upload from './components/Upload'
    import Playlist from './components/Playlist'
    export default {
      name: 'app',
      components: {
        Upload,
        Playlist
      }
    }
    </script>
The template for the App.vue looks like this:
    <template>
      <div id="app">
        <img src="./assets/video.png" width="100">
        <Upload/>
        <Playlist/>
      </div>
    </template>
    [...]
We see the Upload and Playlist templates being used here.
Once this is done, our frontend server is ready and we can run it using the command:
npm run devWe have seen how to build a Video Suggestion App using Cloudinary and some Vue.js. You can view the complete source code on GitHub.
There are, of course, many other scenarios where you can use capture data about the content uploaded by your users in order to give them a more personalized experience in your application. This tutorial just touches the tip of the iceberg of this potential.
We'd love to hear the ways you are using such data to personalize content. Let us know in the comments below!
Get the latest Vue.js articles, tutorials and cool projects in your inbox with the Vue.js Developers Newsletter


