- Issues
- Pull Request - Guide
- Environment setup
- Documentation standard
- JAR generation
- Project structure
- Appendix
- If any problems or doubts occur while editing the project, create an issue describing the problem / doubt.
- If the changes made do not change the structure of the application or the way to use any functionality, use the current branch; otherwise, creates a new branch in the following format:
If the current branch is
N.x, the new branch should be called(N + 1).x(without parentheses), where N is a number
Attention: Do not make any changes using the master branch, as it will be the result of the merge with the latest version released.
- Always create a tag before creating a pull request
- Only create the tag at the end of your changes
- only one tag per pull request must be created
- Choose a different tag from the current tag. If the current tag is X.Y.Z, where X, Y and Z are numbers, create a new tag using the following criteria:
- If the changes made are minor, that is, small modifications that do not change the way of using a feature or even for bug fixes, create the tag
X.Y.(Z + 1)(without parentheses) - If new features are added, create the
X.(Y + 1).0tag (without parentheses) - If the way of using one or more features is changed, or even if a feature is deleted, create a new branch with the name
(X + 1).xand create a new tag with the name(X + 1).0.0(without parentheses)
- If the changes made are minor, that is, small modifications that do not change the way of using a feature or even for bug fixes, create the tag
Attention: Tag creation should be Annotated Tags type.
- Released versions should be placed in the
dist/X.Ydirectory, where X and Y are the released version numbers - Try whenever possible to add tests on each added feature. If a feature is edited, make sure the tests related to it continue to work.
- Before adding a new functionality, it is recommended to create an issue describing the new functionality and a justification of why it would be useful to the application.
If the contribution is to correct a bug, the commit should be: bug fix # xyzw, where #xyzw is the issue id that quotes the bug. If not, the commit should be bug fix <DESCRIPTION>, where <DESCRIPTION> is a brief description of the bug that has been fixed.
After making changes to the project, create a pull request with the project you have modified. Try to add a detailed description of what you changed from the original project. Avoid changing the structure of the project as much as possible to avoid breaking code.
Attention: Before making the pull request, make sure that:
- Generate the version jar in the following format:
executionflow-X.Y.Z.jar, where X, Y and Z are the numbers corresponding to the tag that will contain the changes made; - Update
pom.xmlwith new version; - Document the changes according to the documentation standard mentioned above;
- Create a new release with changelog.
In order to be able to execute any project file, it is necessary to import some dependencies to your IDE, among them:
- Eclipse v2019-06 or higher;
- AJDT dev builds for Eclipse 4.8: Eclipse IDE plugin used to enable aspect-oriented programming;
- Java 12 or higher;
- JUnit 4 or 5.
With Eclipse and dependencies installed, in order to run the project in the IDE, do the following:
- Import the project
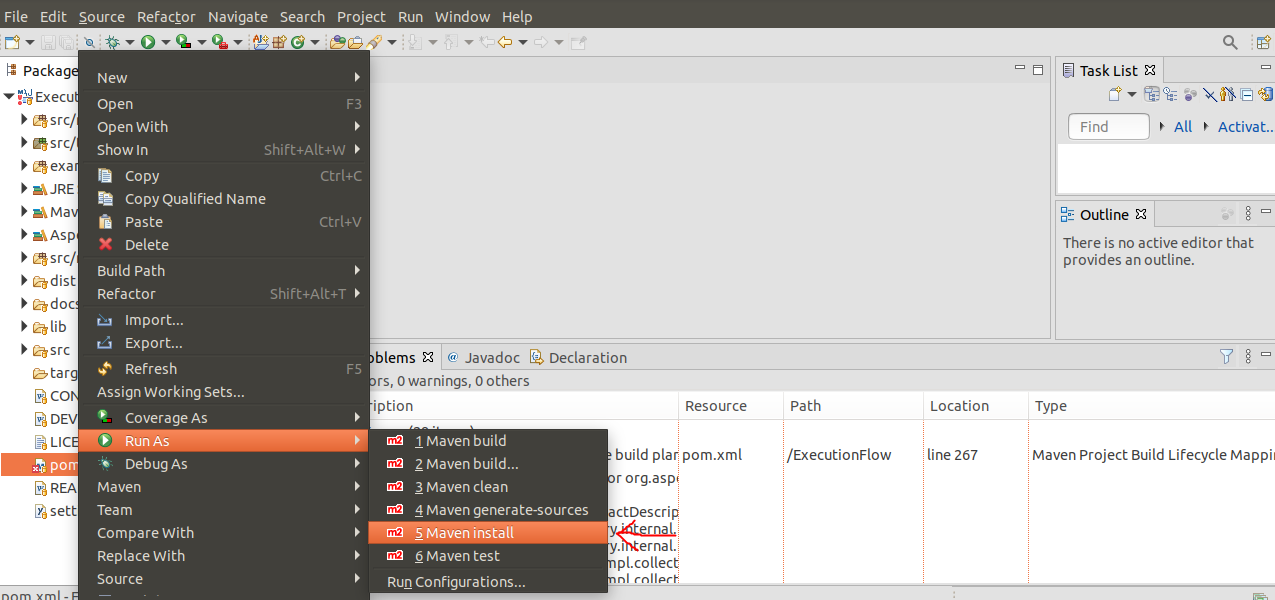
- Probably several errors will appear. Ignore them. Left-click on the file
pom.xmland selectRun As->Maven install
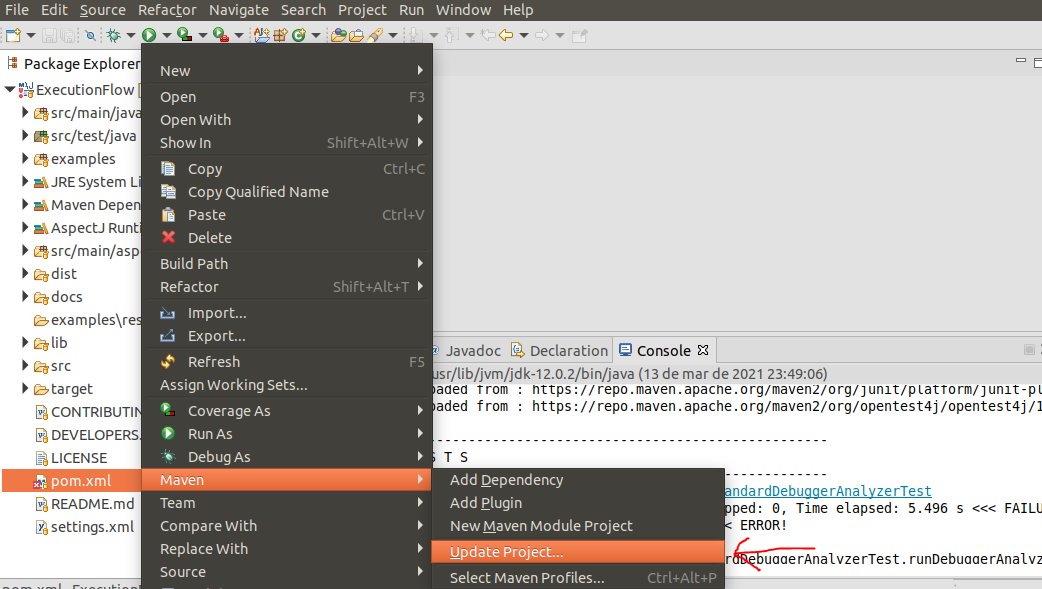
- After installation is complete, left-click on the file
pom.xmland selectMaven->Update Project...
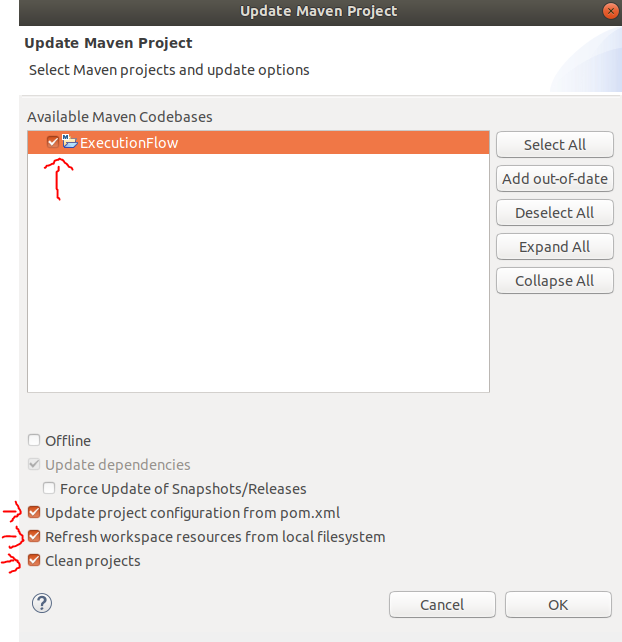
- Select the project, check the last 3 options and click on
Ok
The project uses the code style recommended by Oracle, with one exception: structures if-then-else, try-catch-finally and the like should not have a closed curly bracket (}) to the left of the keyword.
if (x == 2) {
	return "two";
}
else if (x == 3) {
	return "three"
}
if (x == 2) {
	return "two";
} else if (x == 3) {
	return "three"
}
All classes, public methods and some variables use javadoc to explain its functionality.
Classes should use the following pattern:
/**
 * Class description.
 *
 * @author		YourName < your_email@email.com >
 * @version		X.Y.Z
 * @since		A.B.C
 */
Where X, Y and Z are numbers relative to the version of the application in which the class was last modified and A, B and C identify the version of the application in which the class was created. The annotation is separated from the content with 2 tabs. In addition, internally, the class should be divided into sections, which are identified with the following pattern:
//-------------------------------------------------------------------------
//    [section_name]
//-------------------------------------------------------------------------
Where [section_name] can be:
- Attributes
- Constructor(s)
- Methods
- Getters
- Getters & Setters
- Setters
- Initialization block
- Tests
- Test hooks
- Serialization and deserialization methods
- Enumerations
- Inner classes
Public methods must be documented using javadoc.
Attention: Documentations using javadoc must have the tag name followed by two tabs followed by its value, with the exception of the @implSpec, @apiNote and @implNote tags, which contain only one tab. This is done in order to maintain uniform presentation of documentation
In order to generate the JAR file do the following:
- On the file
pom.xml, update:
- project.version
- project.properties.version.major (if necessary)
- Generate JAR file
- Console
mvn package
- Eclipse
- Left-click on the file
pom.xmland selectpom.xml->Run As->Maven build... - In the
Goalsfield, type:package - Click on
Run - Make sure that the JAR file has been generated in the directory
dist/V.X/<FILENAME>, where V =project.properties.version.majorand <FILENAME> is:executionflow-X.Y.Z.jarwhere X, Y, Z are the version numbers of the application corresponding toproject.version.
| Name | Type | Description |
|---|---|---|
| dist | Directory |
Released versions |
| docs | Directory |
Documentation files |
| examples | Directory |
Examples of JUnit tests to see how the application works |
| lib | Directory |
Libraries the project uses |
| src | Directory |
Source files |
| Name | Type | Description |
|---|---|---|
| assembly | Directory |
Configuration files related to the generation of the JAR file |
| main | Directory |
Application source files |
| test | Directory |
Application test files |
See here how to install.
Create a new branch:
git checkout -b branch_name
Add to the remote repository:
git push -u origin branch_name
git checkout -b v1.x
git push -u origin v1.x
See more here.
git tag -a tag_name -m description
Add to the remote repository:
git push -u origin tag_name
git tag -a v1.0.1 -m "Performance improvement"
git push -u origin v1.0.1
See more here.


