| title | date | categories | tags | |||||
|---|---|---|---|---|---|---|---|---|
Python环境配置 |
2022-10-26 17:54:55 -0700 |
|
|
没想到我又回来了,后面我的研究课题估计和Python逃不脱关系,终于又重新拾起了这门语言,所以便从头开始,把一些值得记录的记录下来,努力努力,向梦想前进!
我的开发环境是windows,而scoop是windows上超好用的一个包管理工具,感兴趣的小伙伴可以看这篇博客(重装系统后要干的几件事)了解哟
用下面一行命令即可安装miniconda
scoop install miniconda3安装完后重启一下everything,即可用wox输入anaconda pow快速启动anaconda的shell了
| 命令 | 备注 |
|---|---|
| conda --version | 查看conda的版本号 |
| conda env list | 列出所有环境 |
| conda create --name 环境名称 | 创建环境 |
| conda create --name 环境名称 python=2.7 | 创建指定python版本的环境 |
| conda activate 环境名称 | 进入环境 |
| conda deactivate | 退出环境 |
| conda remove --name 环境名称 --all | 删除环境,加all表示环境下的所有包一并被删除 |
创建用户配置文件
conda config --set show_channel_urls yes进入清华大学开源软件镜像站,复制配置内容到用户目录下刚创建的.condarc文件,要复制的配置内容如下
channels:
  - defaults
show_channel_urls: true
default_channels:
  - https://mirrors.tuna.tsinghua.edu.cn/anaconda/pkgs/main
  - https://mirrors.tuna.tsinghua.edu.cn/anaconda/pkgs/r
  - https://mirrors.tuna.tsinghua.edu.cn/anaconda/pkgs/msys2
custom_channels:
  conda-forge: https://mirrors.tuna.tsinghua.edu.cn/anaconda/cloud
  msys2: https://mirrors.tuna.tsinghua.edu.cn/anaconda/cloud
  bioconda: https://mirrors.tuna.tsinghua.edu.cn/anaconda/cloud
  menpo: https://mirrors.tuna.tsinghua.edu.cn/anaconda/cloud
  pytorch: https://mirrors.tuna.tsinghua.edu.cn/anaconda/cloud
  pytorch-lts: https://mirrors.tuna.tsinghua.edu.cn/anaconda/cloud
  simpleitk: https://mirrors.tuna.tsinghua.edu.cn/anaconda/cloud
:::info
注意,把.condarc文件默认的内容删掉
:::
输入conda clean -i清除默认缓存,用conda config --show-sources查看配置是否更换成功
可能要安装包里的依赖包下载依然缓慢
pip install -i https://pypi.tuna.tsinghua.edu.cn/simple 包名- 在用户目录下创建pip文件夹(如:C:\Users\Administrator\pip)
- 在刚创建的pip文件夹下创建
pip.ini文件 - 把以下配置内容放到刚创建的pip.ini文件里
[global]
index-url = https://pypi.tuna.tsinghua.edu.cn/simple/
[install]
trusted-host = pypi.tuna.tsinghua.edu.cnconda install opencvmediapipe在conda上没有,所以就用pip安装
pip install mediapipe"""
演示Demo
"""
# 导入opencv
import cv2
import numpy as np
import math
# 导入mediapipe:https://google.github.io/mediapipe/solutions/hands
import mediapipe as mp
mp_drawing = mp.solutions.drawing_utils
mp_drawing_styles = mp.solutions.drawing_styles
mp_hands = mp.solutions.hands
hands = mp_hands.Hands(
model_complexity=0,
min_detection_confidence=0.5,
min_tracking_confidence=0.5)
# 读取视频流
cap = cv2.VideoCapture(0)
# 获取画面宽度、高度
width = int(cap.get(cv2.CAP_PROP_FRAME_WIDTH))
height = int(cap.get(cv2.CAP_PROP_FRAME_HEIGHT))
while True:
ret,frame = cap.read()
# 镜像
frame = cv2.flip(frame,1)
frame.flags.writeable = False
frame = cv2.cvtColor(frame, cv2.COLOR_BGR2RGB)
# 识别
results = hands.process(frame)
frame.flags.writeable = True
frame = cv2.cvtColor(frame, cv2.COLOR_RGB2BGR)
# 如果有结果
if results.multi_hand_landmarks:
# 遍历双手
for hand_landmarks in results.multi_hand_landmarks:
mp_drawing.draw_landmarks(
frame,
hand_landmarks,
mp_hands.HAND_CONNECTIONS,
mp_drawing_styles.get_default_hand_landmarks_style(),
mp_drawing_styles.get_default_hand_connections_style())
# 显示画面
cv2.imshow('demo',frame)
if cv2.waitKey(10) & 0xFF == ord('q'):
break
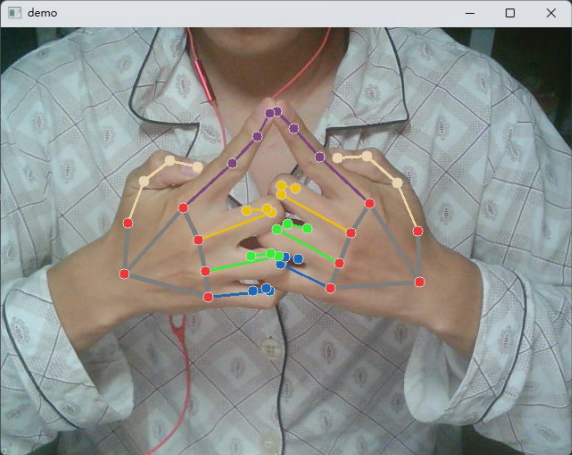
cap.release()
cv2.destroyAllWindows()哈哈,一个帅气的午印就被检测出来啦
