This repo contains all of the code, schematics, and 3d models for the Roomba Flamethrower project.
This project uses a Raspberry pi Zero W running Raspberry Pi OS Lite as the "brains" of the build. Python 3.5 or newer is required to run the software.
- To use hardware-timed servo pulses and thus avoid jittering from multiple servos being controlled by the pi, this project uses the pigpio library.
- The Xbox one controller is handled using evdev.
- Serial communication between the Roomba and the raspberry pi is handled using pyserial.
To facilitate the setup process, this repo includes a setup script. To run it, simply run the following command from the project's root directory
sudo sh setup.sh
In addition, if you want to set up the program to run on boot for a better user experience. You can use crontab to set up a cronjob for the intended user. As an example for the default pi user.
crontab -u pi -e
Then run the script on boot by adding the following line to the file.
@reboot python3 /full/path/to/project/dir/roomba_flamethrower/roomba_flamethrower/main.py
Then save the file. A quick note of caution, the Roomba class initiates a serial connection with the Roomba using safe mode by default. However, if you decide to change the mode to something else, you need to add the logic to properly return the Roomba to safe mode to avoid battery drain.
As part of the setup, you also need to pair the Xbox One Controller and the raspberry pi.
Disable Enhanced Re-Transmission Mode (not supported by the Xbox One Controller)
echo 'options bluetooth disable_ertm=Y' | sudo tee -a /etc/modprobe.d/bluetooth.conf
start bluetoothctl
sudo bluetoothctl
Start pairing mode on the Xbox One controller and scan for the controller
agent on
default-agent
scan on
once you see the controller appear, connect to it using its address
connect XX:XX:XX:XX:XX:XX
trust the controller using its address for automatic connections on boot
trust XX:XX:XX:XX:XX:XX
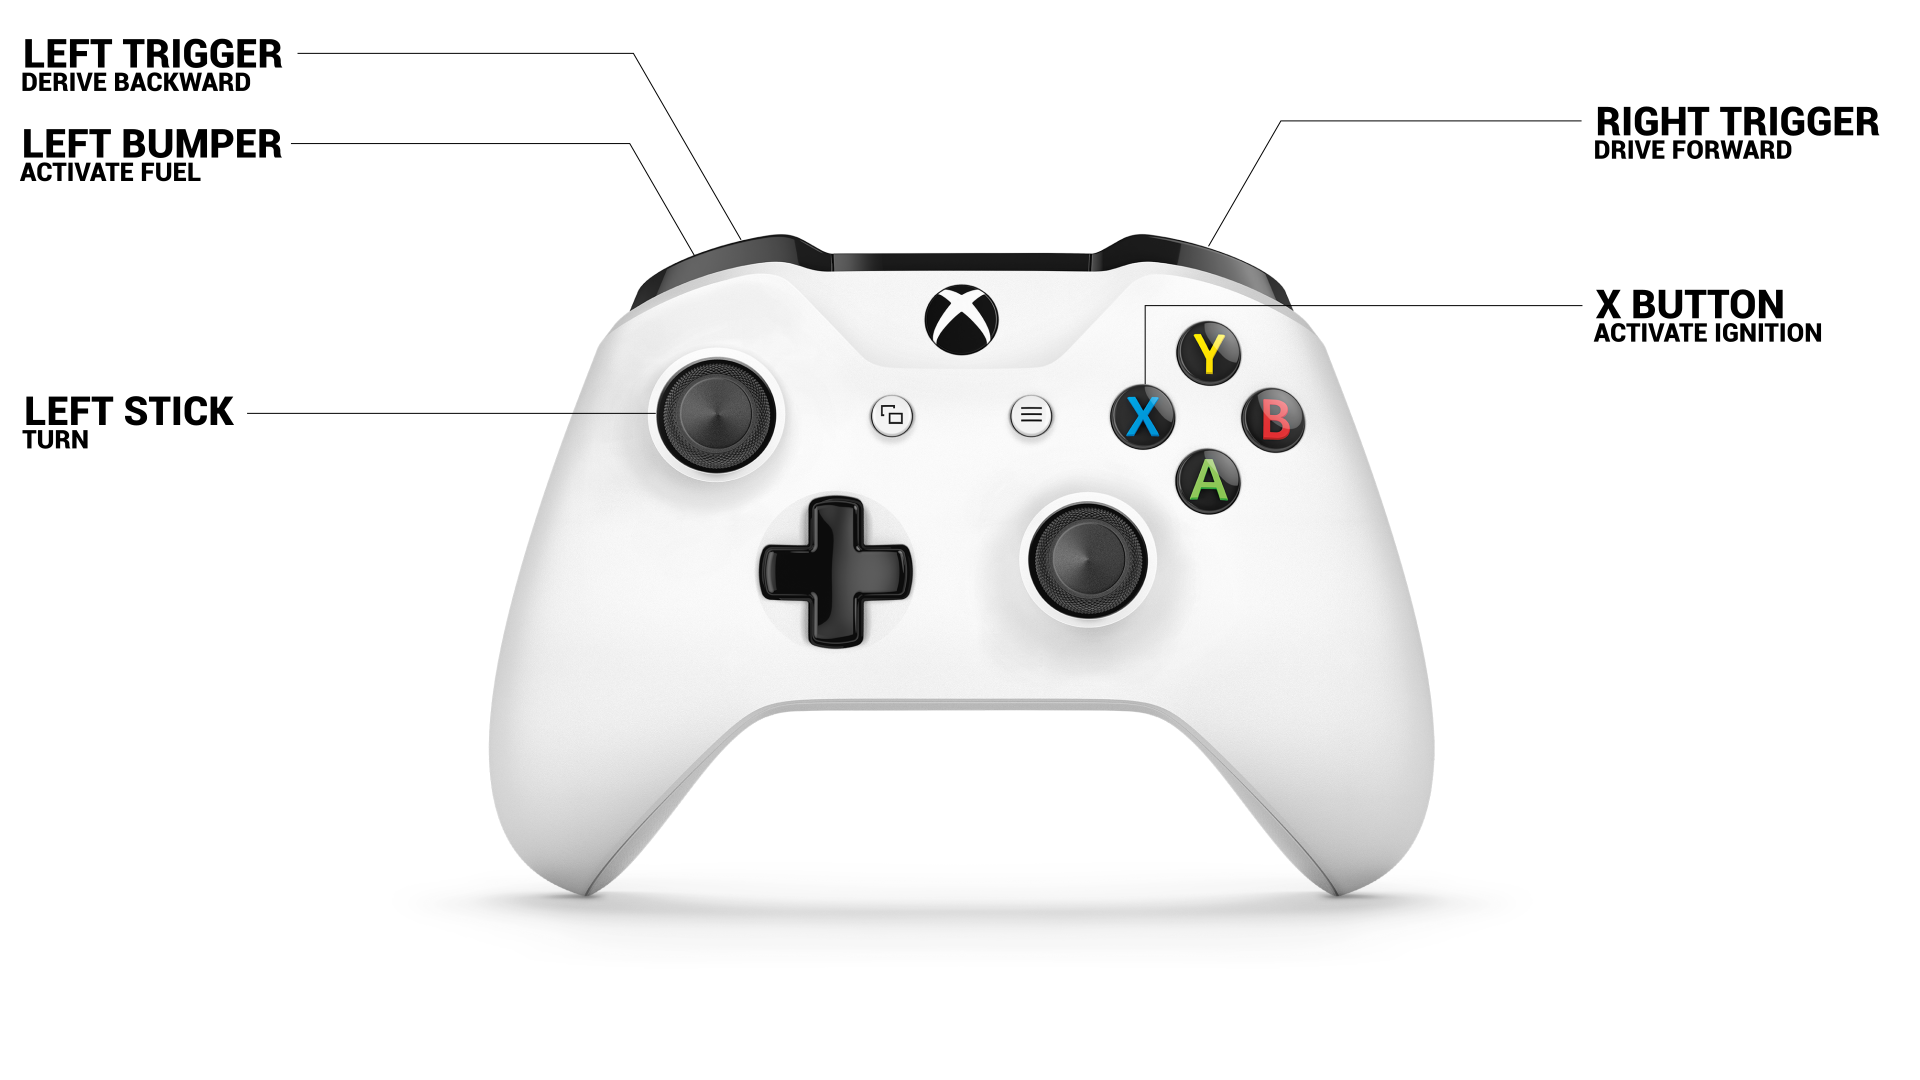
By default, these are the control mappings for the Xbox One controller.
If you want to change them, you can change the conditional statements in main.py in the main() function, which are found inside the for loop.
To build this project, the following parts were used:
- (1) Raspberry Pi Zero W
- (1) Micro USB Male to USB Female OTG Adapter
- (1) Xbox One Bluetooth Controller (1708)
- (1) Irobot Roomba 770
- (1) Irbot Communication Cable for Create® 2
- (2) 35kg-cm servos
- (1) 12kg-cm servo
- (1) M2.5 brass stanoff kit
- Neon 7X Refined Butane Gas Pack
- (1) Arc Lighter
- (1) USB Solar Power Bank
- (1) USB A Male to Micro USB cable
If you don't have it already, you may also need wire, solder, and a soldering iron.
In addition, to use the included 3d models, you will also need a 3d printer. I used the Creality Ender 3 V2 and White eSUN PLA+ filament.
All of the parts were printed using 10% infill with a 0.28mm layer height. The bed was set to 60° Celcius and the extruder to 225° Celcius. With the exception of the Raspberry Pi Zero base, all of the models were printed without using supports.
Besides the Roomba part of the build, the flame thrower part of the build is centered around the butane bottle.
The bottle stand can be used to attach the butane bottle to the Roomba using an adhesive. An option like Hot Glue can allow you to easily remove it later by heating the glue back up.
Attached to the bottle stand you cand you can use string or rope along with the provided hooks to latter hold down the bottle adapter when the butane servo uses a downward force to spray the bottle.
The bottle adapter holds the two 35kg servos using the provided hardware, The butane servo uses the smaller plastic propeller with an M2.5 standoff through one of the holes, which aids in pressing down the cap of the butane bottle and the lighter assembly servo uses the larger plastic propeller with two screws for holding down the servos attached to the lighter assembly.
Attached to the back portion of the bottle adapter is the Raspberry Pi Zero base. This base is set up with four M2.5 standoffs using screws on the underside. This is why the base has larger 4mm cylindrical cutouts on the underside. This provides a flush base that can be glued to the bottle adapter.
The lighter assembly holds the 12kg servo and the arc lighter. The servo is held in place and lifted using 3 brass standoffs. In addition, to press the button on the arc lighter, the metal adapter from the 35kg servos is attached. This is because this adapter has a much larger surface area compared to the included plastic adapters.
To wire everything together, refer to the following schematic:


