
This program is a handy GUI launcher for launching hackrf_transfer and hardware synchronization of two HackRF ONEs with each other. This program has a special frequency calculator for convenient merging of records from two hackrfs into one large frequency band!
For the utility to work successfully, you must:
In order to install hackrf_transfer on your Windows system, you need to install the PothosSDR package, which carries hackrf_tools. Please note that you need to add this to the system PATH during installation!
After you install it, run the program and press Get S/N. In return you will get a cmd window with some information about libhackrf and information about your Hackrf. The serial number of your hackrf will be listed there. Copy the S/N values into the S/N fields in the program. Please note that the very first hackrf in this list will be set as the main hackrf in the system. Specify the serial number of the first HackRF in the list in the S/N field for hackrf board 1. And transfer the serial number of the next Hackrf in the list to the S/N field for hackrf board 2. Then you can specify the parameters for your Hackrf (gain, amplifier on). Next, specify the center frequency of reception. This is the Center Freq. Specify in Hz! The Samplerate parameter must be the same for both Hackrf! Parameter Cutoff Freq. don't change. I'll talk about this option a little later. Then press the Calculate button and the program will offer frequencies for Hackrf so that when merging records from two Hackrfs, the Center Freq value will be in the center of the spectrum!
Next you need to connect the Hackrf boards together. Do it like this:
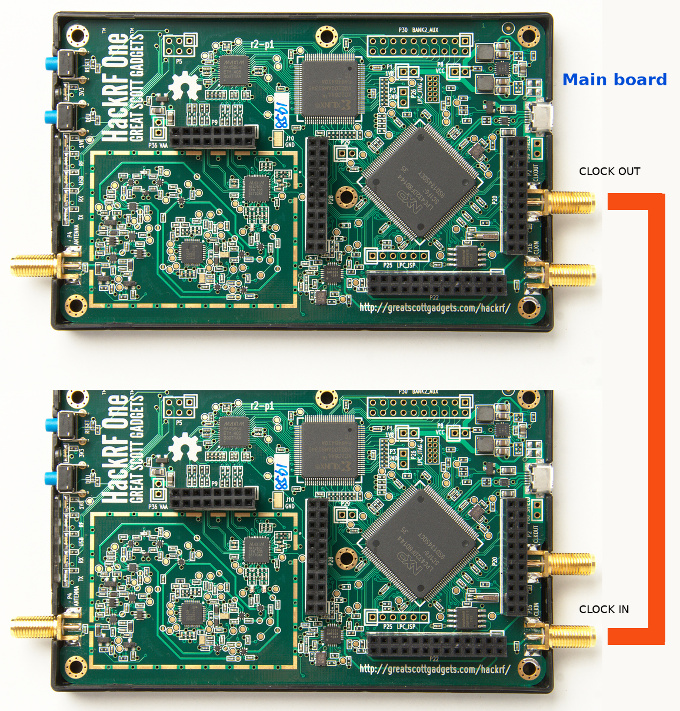
I took this photo from this article. Please note that the Main board is the topmost hackrf board that was listed in the CMD list with serial numbers!
Next, connect the GPIO lines of your Hackrf boards as shown in this picture. This is a group of contacts under the designation P20 on the board:
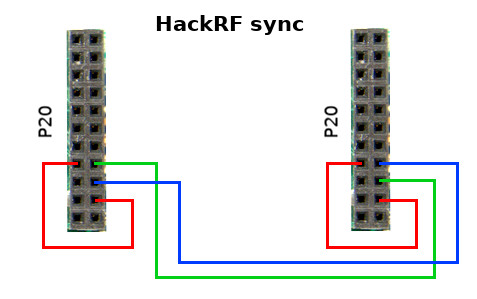
I took this photo from this article.
More info: github.com/greatscottgadgets/hackrf/pull/381
Then you can select the data recording mode (wav or raw) and start receiving data.
If you've done everything right, you'll notice all the LEDs on your SDR boards (RX and TX) light up. And in the CMD that opens, you will see how the data transfer process began.


To stop receiving, press the combination Ctrl + C directly in the CMD window!
To connect recordings Select my GNURadio GRC script and in the input files specify your recordings, and in the output file specify the file where the I / Q data with the frequency band of both Hackrf will be saved. Please note that the CropBW and Samp Rate parameters in GRC must be the same as those selected in the launcher.
As a result, you will get a large spectrum of frequencies using two HackRFs:

Such a signal received from two Hackrfs will allow you to receive analog stations in a large frequency band, but unfortunately, even this method of synchronizing Hackrf boards has an error of several samples, which is completely unsuitable for demodulating digital signals that will be in the reception band of both receivers.
If you change the cropBW parameter to 0, you will get a dip in the middle of the spectrum. To avoid this, you need to shift the spectrum. Leave CropBW at 1.5M or increase it if that's not enough. This will shift the spectra to the center and the dip will disappear, but the overall band will decrease slightly.
