Configure Teams capability use Empty Teams App template in Teams Toolkit for Visual Studio
There is a project named xxx.ttkproj and ensure that:
- Visual Studio version is greater than 17.10 Generally Available.
- Teams manifest file is under its
appPackagefolder. - You have a Microsoft 365 account to test the application. If not, you can visit Microsoft 365 developer program to create one.
Prior to continuing, we strongly recommend creating and going through an app with related capability by Teams Toolkit. You can find all templates in Visual Studio Teams Toolkit (starting from 17.10 GA).
Teams offers multiple interfaces, known as Teams Capabilities. Choose the right capability to integrate your application's functions within Teams.
If you want to embed your web application to provide a browser-like experience within Teams, configure the Teams Tab capability. For exposing your functions or APIs through chat interactions, configure the Teams Bot capability. Additionally, if you need to offer functions or APIs directly within the message composition box, configure the Teams Message Extension capability.
The following are the steps to add Teams capability to your project.
-
To configure your tab within a group or channel, or personal scope in your Teams application manifest
appPackage/manifest.json, follow these examples: Examples:"staticTabs": [ { "entityId": "index", "name": "Personal Tab", "contentUrl": "${{TAB_ENDPOINT}}/tab", "websiteUrl": "${{TAB_ENDPOINT}}/tab", "scopes": [ "personal" ] } ],Make sure
contentUrlandwebsiteUrlare right. Refer to Tab schema for customizing them. -
Add your tab domain to the
validDomainsfield. Example:"validDomains": [ "${{TAB_DOMAIN}}" ],TAB_ENDPOINTandTAB_DOMAINare built-in variables of Teams Toolkit. They will be replaced with the true endpoint in runtime based on your current environment(local, dev, etc.). -
Update the
teamsapp.local.ymlfile and add new actions. These actions will enable your tab project to work seamlessly with Teams Toolkit.provision: - uses: script # Set TAB_DOMAIN for local launch name: Set TAB_DOMAIN and TAB_ENDPOINT for local launch with: run: echo "::set-output TAB_DOMAIN=localhost:44302" echo "::set-output TAB_ENDPOINT=https://localhost:44302"
TAB_DOMAINandTAB_ENDPOINTshould be the application URL when your source code starts up. Maybe they are defined inlaunchSettings.jsonof your source code. -
Follow Prepare for local debugging then start local debugging. You will see a Teams website in a new browser opens and ask you to install your app.
-
You can configure bot in
appPackage/manifest.json. You can also refer to bot schema if you want to customize.Example:
    "bots": [
        {
            "botId": "${{BOT_ID}}",
            "scopes": [
                "personal",
                "team",
                "groupchat"
            ],
            "supportsFiles": false,
            "isNotificationOnly": false,
            "commandLists": [
                {
                    "scopes": [
                        "personal",
                        "team",
                        "groupchat"
                    ],
                    "commands": [
                        {
                            "title": "welcome",
                            "description": "Resend welcome card of this Bot"
                        },
                        {
                            "title": "learn",
                            "description": "Learn about Adaptive Card and Bot Command"
                        }
                    ]
                }
            ]
        }
    ]
-
If you have had registered a Bot app in Teams platform before, you only need to add
BOT_IDto.env.localfile. And skip step #3 & step #4. -
If you never registered a Bot app yet, follow the step 3&4 to let Teams Toolkit do it for you. You will need to edit
teamsapp.local.ymlto tell Teams Toolkit the desired actions. Add actionbotAadApp/createandbotFramework/createunder provision module. Then updatefile/createOrUpdateEnvironmentFileaction under deploy module like below code piece:provision: - uses: botAadApp/create with: # The Microsoft Entra application's display name name: bot-${{TEAMSFX_ENV}} writeToEnvironmentFile: # The Microsoft Entra application's client id created for bot. botId: BOT_ID # The Microsoft Entra application's client secret created for bot. botPassword: SECRET_BOT_PASSWORD # Create or update the bot registration on dev.botframework.com - uses: botFramework/create with: botId: ${{BOT_ID}} name: bot messagingEndpoint: ${{BOT_ENDPOINT}}/api/messages description: "" channels: - name: msteams # Generate runtime appsettings to JSON file - uses: file/createOrUpdateJsonFile with: target: ../BOT_SOURCE_CODE_PROJECT_PATH/appsettings.Development.json content: BOT_ID: ${{BOT_ID}} BOT_PASSWORD: ${{SECRET_BOT_PASSWORD}}
Replace
BOT_SOURCE_CODE_PROJECT_PATHwith your Bot project source code. Note thatBOT_IDandBOT_PASSWORDare using in the runtime. -
Configure your Bot source code project to use
BOT_IDandBOT_PASSWORD. -
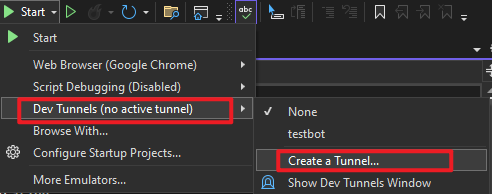
In the debug dropdown menu, select Dev Tunnels > Create A Tunnel (set authentication type to Public) or select an existing public dev tunnel
-
Follow Prepare for local debugging then start local debugging. You will see a Teams website in a new browser opens and ask you to install your app.
-
You can configure message extension in
appPackage/manifest.json. You can also refer to message extension schema if you want to customize.Example:
"composeExtensions": [
    {
        "botId": "${{BOT_ID}}",
        "commands": [
            {
                "id": "createCard",
                "context": [
                  "compose",
                  "message",
                  "commandBox"
                ],
                "description": "Command to run action to create a Card from Compose Box",
                "title": "Create Card",
                "type": "action",
                "parameters": [
                    {
                        "name": "title",
                        "title": "Card title",
                        "description": "Title for the card",
                        "inputType": "text"
                    },
                    {
                        "name": "subTitle",
                        "title": "Subtitle",
                        "description": "Subtitle for the card",
                        "inputType": "text"
                    },
                    {
                        "name": "text",
                        "title": "Text",
                        "description": "Text for the card",
                        "inputType": "textarea"
                    }
                ]
            }
        ]
    }
]
"permissions": [
    "identity",
    "messageTeamMembers"
]
-
If you have had registered a Message Extensions app in Teams platform before, you only need to add
BOT_IDto.env.localfile. And skip step #3 & step #4. -
If you never registered a Message Extensions app yet, follow the step #3 & #4 to let Teams Toolkit do it for you. You will need to edit
teamsapp.local.ymlto tell Teams Toolkit the desired actions. Add actionbotAadApp/createandbotFramework/createunder provision module.provision: - uses: botAadApp/create with: # The Microsoft Entra application's display name name: bot-${{TEAMSFX_ENV}} writeToEnvironmentFile: # The Microsoft Entra application's client id created for bot. botId: BOT_ID # The Microsoft Entra application's client secret created for bot. botPassword: SECRET_BOT_PASSWORD # Create or update the bot registration on dev.botframework.com - uses: botFramework/create with: botId: ${{BOT_ID}} name: bot messagingEndpoint: ${{BOT_ENDPOINT}}/api/messages description: "" channels: - name: msteams # Generate runtime appsettings to JSON file - uses: file/createOrUpdateJsonFile with: target: ../MESSAGE_EXTENSION_SOURCE_CODE_PROJECT_PATH/appsettings.Development.json content: BOT_ID: ${{BOT_ID}} BOT_PASSWORD: ${{SECRET_BOT_PASSWORD}}
Replace
MESSAGE_EXTENSION_SOURCE_CODE_PROJECT_PATHwith your Message Extensions project source code.BOT_IDandBOT_PASSWORDare using in the runtime. -
Configure your Message Extension source code to use
BOT_IDandBOT_PASSWORD. -
In the debug dropdown menu, select Dev Tunnels > Create A Tunnel (set authentication type to Public) or select an existing public dev tunnel
-
Follow Prepare for local debugging then start local debugging. You will see a Teams website in a new browser opens and ask you to install your app.
-
Right-click
ttkprojand runTeams Toolkit -> Prepare Teams App Dependencies. Select or login your Microsoft 365 account in the pop-up account picker. -
Configure startup projects to let
ttkprojand your source code start up together. More details.