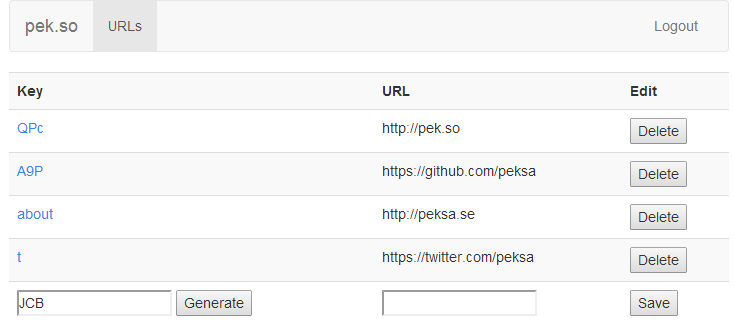
pek.so is a custom URL-shortener for private use. It is hosted entirely on Amazon AWS and is backend free!
You can download and use this code in order to create your own private URL-shortener!
Requirements:
- A custom domain (i.e. pek.so)
- Amazon AWS (S3, IAM, Route53, CloudFront optional)
- Facebook app.
- A personal Facebook account.
Let's setup an S3 bucket to host our URL-shortener.
- Create a S3 bucket in the AWS console, name it the name of your domain, i.e.
pek.so. - Edit the bucket policy to grant s3:GetObject permissions to everyone for the bucket:
{
  "Version": "2012-10-17",
  "Statement": [
    {
      "Sid": "AddPerm",
      "Effect": "Allow",
      "Principal": {
        "AWS": "*"
      },
      "Action": "s3:GetObject",
      "Resource": "arn:aws:s3:::pek.so/*"
    }
  ]
}- Add CORS configuration to the bucket:
<?xml version="1.0" encoding="UTF-8"?>
<CORSConfiguration xmlns="http://s3.amazonaws.com/doc/2006-03-01/">
    <CORSRule>
        <AllowedOrigin>*</AllowedOrigin>
        <AllowedMethod>HEAD</AllowedMethod>
        <AllowedMethod>GET</AllowedMethod>
        <AllowedMethod>PUT</AllowedMethod>
        <AllowedMethod>POST</AllowedMethod>
        <AllowedMethod>DELETE</AllowedMethod>
        <MaxAgeSeconds>3000</MaxAgeSeconds>
        <ExposeHeader>ETag</ExposeHeader>
        <ExposeHeader>x-amz-request-id</ExposeHeader>
        <ExposeHeader>x-amz-website-redirect-location</ExposeHeader>
        <AllowedHeader>*</AllowedHeader>
    </CORSRule>
</CORSConfiguration>- Enable static website hosting on the S3 bucket, and set the Index Document and the Error Document to
index.html
- Create a new hosted zone for your domain.
- Point your domain nameserver (via your domain providers control panel) to the nameserver provided by Route 53.
- Setup an A pointer for your root domain with Alias to point at your bucket, i.e.
pek.so.s3-website-eu-west-1.amazonaws.com
Now we'll create a facebook application. This will allow you to administer your URL-shortener directly online by logging into Facebook.
- Create a new Facebook app (website) on https://developers.facebook.com/apps/
- Set Site URL to your domain, i.e. http://pek.so
- In the app settings, set App Domains to your domain, i.e. pek.so
- Make a note of your Facebook App ID which will be used later, i.e. 602729056487961.
- Make a note of your Facebook App Secret, which will be used in the next step.
- We'll now manually log in to your app. Visit this URL (replace APP_ID and change the redirect_uri to your domain): https://www.facebook.com/dialog/oauth?client_id=APP_ID&redirect_uri=http://pek.so/redirect
- After authorizing the app, you'll be redirected to your domain with a code URL parameter, something like: http://pek.so/redirect?code=LONG_CODE
- Extract the code, and now visit (replace parameters with your values): https://graph.facebook.com/v2.3/oauth/access_token?client_id=APP_ID&redirect_uri=http://pek.so/redirect&client_secret=CLIENT_SECRET&code=CODE
- Save the access_token that you get back.
- Visit https://graph.facebook.com/me?access_token=ACCESS_TOKEN
- Save the ID you get back for later.
Now we'll add a role that will allow only you to modify contents of your S3 bucket after you've logged into Facebook.
- In the AWS console, head to IAM and create a new role. Name it anything, I've named mine
pek.so. - Select
Role for Identity Provider Access - Select
Grant access to web identity providers - Select Identity Provider: Facebook and enter your Facebook application id.
- Click
Add conditions, make sure Condition is StringEquals and select Key:graph.facebook.com:id - Enter your application specific user id that you found in step 3 (not the FB App ID)
- After you've saved your condition, continue.
- Your Trust Policy Document should now look similiar to mine:
{
  "Version": "2012-10-17",
  "Statement": [
    {
      "Effect": "Allow",
      "Action": "sts:AssumeRoleWithWebIdentity",
      "Principal": {
        "Federated": "graph.facebook.com"
      },
      "Condition": {
        "StringEquals": {
          "graph.facebook.com:id": "717273996",
          "graph.facebook.com:app_id": "602729056487961"
        }
      }
    }
  ]
}- Save the role and make a note of the Role ARN for later, i.e. arn:aws:iam::507606061091:role/pek.so
- Add a new inline role policy to the role, I called mine pek.so-20140209, and give it the following contents:
{
  "Version": "2012-10-17",
  "Statement": [
    {
      "Sid": "Stmt1391915077000",
      "Effect": "Allow",
      "Action": [
        "s3:DeleteObject",
        "s3:GetObject",
        "s3:ListBucket",
        "s3:PutObject"
      ],
      "Resource": [
        "arn:aws:s3:::pek.so",
        "arn:aws:s3:::pek.so/*"
      ]
    }
  ]
}Clone this repo, modify the js/app.js file and upload it to the root of your S3 bucket. The parts that need changing in app.js are:
pekso.service('$config', function() {
    this.fbAppId = '602729056487961';
    this.awsS3Bucket = 'pek.so';
    this.awsWebIdentityRole = 'arn:aws:iam::507606061091:role/pek.so';
    this.awsRegion = 'eu-west-1';
    this.domain = 'http://pek.so'; // avoid trailing slash
});
And you should be done! Head over to your domain, login and shorten some urls! :)
CloudFront configuration.
