An automated computer target scoring system
Currently, the Target Analysis system allows you to automatically:
- Score a target
- NRA A-17
- NRA/USAS-50 Orion (can also score as NRA A-17)
- Orion 50ft Conventional
- Automatic target naming
- From filename
- Using today's date
- Using initals bubbled in on NRA/USAS-50 Orion target
- Or, custom name and date
- Batch scoring of all targets in folder
- Save data to Excel-compatible CSV files
- Show most and least missed bulls
- Show single shooter trends across a range of dates
Created by Sigmond Kukla for the Mt. Lebanon Rifle Team in 2021. Project started in May 2021, still in active development.
Please see LICENSE.md for license information. This work is published under exclusive copyright to the developer.
I don't think that it is fair to think of the system as "accurate" or not, because it is just a set of if statements - does the shot touch both rings? nope, just the inside? if so, it scores an X. Instead I look for reliablility, where the system will consistently score a shot the same each time. Similarly, the only way to judge this reliablility is to compare it to a human scorer, but even that is not perfect. Explanation below:
On average, Target Analysis scores

- Download the latest TargetAnalysis.zip file on this page and extract it to a memorable location.
- Open the TargetAnalysis folder and double click to run gui.exe or TargetAnalysis.exe depending on your version.
Test after installation: The images folder includes some pre-scanned targets to test functionality. Run the software (see the Usage section of this readme) and ensure that Target Analysis functions properly.
To install Target Analysis on another operating system, you must download the Python source code and install the necessary dependencies detailed below.
Python 3 and the following Python packages must be installed:
- opencv-python
- pillow
- numpy
- matplotlib
Python and pip must first be installed on your Linux machine You can install the required packages by using the following command: $ pip install -r requirements.txt
Then, $ git clone https://github.com/PicoPlanetDev/Target-Analysis cd into the TargetAnalysis-main folder, and run $ python gui.py.s
If you are upgrading from a previous version of Target Analysis: Please make sure to back up your old config file and names file in a separate directory before overwriting the new version on top of the old one. Sometimes, configuration files will not be processed properly after an upgrade due to keys being added or removed. In this case, delete your old configuration file and config backup and allow Target Analysis to regenerate a new version. However, if there are settings that you have changed in the configuration that you would like to carry over to the new version of Target Analysis, you must manually merge the configuration files. The best way to do this is split screen the old file with a fresh one generated by Target Analysis on first run. You can then copy over your chagned key values and save them. You can also save them to the config backup if you are sure that they function properly and you would like to revert to them in case of a corrupted or improperly edited main configuration file.
For a normal-sized scanner glass, two scans must be used.
- Place the target on the scanner glass with the top left of the back of the target pressed firmly into the back right corner of the glass.
- Scan the target to the computer, saving it as an image (jpg/jpeg) in the Target Analysis -> "images" folder.
- Rotate the target 180° so that the top left of the back of the page is now in the front left corner. Firmly press the top right into the back left of the scanner glass.
- Scan the target to the computer, saving it as an image (jpg/jpeg) in the Target Analysis -> "images" folder.
If you would like to use the Open Folder operation or automatic information parsing, make sure to name the scans as such: <2 number day><3 letter shortened month>.jpeg For example: "03jan2021left1.jpeg" and "03jan2021right1.jpeg"

For an Orion Scoring System NRA/USAS-50 target, only one scan is necessary. Make sure that the corner of the target with the barcode is aligned to the front-right corner of the scanner.
To score a target:
- Select a target type by clicking one of the tabs on the main screen: NRA A-17 or NRA/USAS-50. The NRA/USAS-50 is compatible with scoring ORION targets. You can also select the NRA/USAS-50 as NRA A-17 tab to score an NRA/USAS-50 target as if it were NRA A-17.
- Click Select Image or Open Folder. If you are scanning an NRA A-17 target, please select an image for both sides of the target.
- Click Analyze Target. You may have to wait for a few seconds before anything appears. Depending on your version of Target Analysis, a you may have options to move forward or backward through the bulls. Otherwise, press any key on the keyboard or click the [X] in the top right to see the next bull. The bulls are displayed in clockwise order, starting with the top-middle bull. The sighter bull(s) in the center are omitted. After 10 bulls, you will either have a Finish button or will need to press the [X] to close the last bull.
-
- After you close the last bull, an overview window may show up, indicating the score on each bull and the target score. If not, press File -> Show Output to view this window.
- If you analyzed a batch of targets using Open Folder, a data folder will appear. Open the
data.csvfile in a program such as Microsoft Excel to view scores for the entire batch. Open individual CSV files (named as below) to view data and debug information for individual targets.
Data for each target is stored in the /data folder named as follows:
data-[Name][Day][Month][Year][Target number].csv
If "Use info from file" is selected, the program will automatically update the date and target number (and also the name for NRA/USAS-50 targets).
For this to work, you must name the target files as such:
NRA A-17:
<2 number day><3 letter shortened month><left/right>.jpeg
For example: "03jan2021left1.jpeg" and "03jan2021right1.jpeg"
NRA/USAS-50:
<2 number day><3 letter shortened month><Shooter's name>.jpeg
For example: "03jan2021Sigmond1.jpeg"
If you choose not to name your files before importing them into the Target Analysis software, you will need to manually type in a name, date, and target number:
You can click Use Today to set today's date and use target #1. The target number allows you to score multiple targets from the same person on the same day.
You can also simply type in a month, day, year, target number, and name.
When using either option, please make sure to disable "Use info from file" in this scenario.
The name should identify the target easily. I prefer to use the shooter's name for this. It is important to make the name one word only (Sigmond or SigmondKukla for example) to avoid problems related to the system path of files that use this name.
Orion Targets:
Orion targets also have a set of bubbles at the top right of the page that can be filled with the shooter's initials. If you fill in the initials before scanning the target, Target Analysis can set the name based on initials. See the below photo for example:

To set up initials-to-name mapping:
- Open Target Analysis and click File -> Settings
- Select the Names tab of the Settings menu
- Click the Open Names File button
- Under
[initials], add a key as such:
[initials]
0 = SK
- Then, under
[names], add a key as such:
[names]
0 = Sigmond
- Finally, under
[index], set theindex = 1key to the number of names that have been defined. For example, if there is one name defined, set the index to 1. Note that the index does not line up exactly with the keys. Instead, index should be set to the<highest key> + 1. For example, if the highest key is5 = SKand5 = Sigmond, then set the index to 6. This is because the keys start at zero, while the index starts at 1. - Save and close the file.
- Then, under the NRA/USAS-50 or the NRA/USAS-50 as NRA A-17 tab, enable Name from bubbles
- Name from bubbles works for both individual targets and batch scanning. In the event that a name was supplied in the filename and also by bubbles, the name from the bubbles takes priority. If the name from the bubbles is not recognized, or an error occurs in the bubble comparison process, the name from the file will be used. If no name is provided in the filename, Target Analysis will revert to the default or last used name in this case.
An example initials to names mapping might look something like this:
[index]
index = 2

[initials]
0 = SK
1 = FB

[names]
0 = Sigmond
1 = Foobar
- Click File -> Show Trends.
- Select Load Folder or Load File, depending on what trend you would like to see: a. Load Folder allows you to open the data folder (or another folder with output files in it) to see which bull has the lowest score on average versus the highest score. b. Load File allows you to select a CSV data file to see a graph of shooting performance including score and X Count. Remember, these are designed for a single shooter. Please copy and paste data files / folder to another location to isolate them to score only a single shooter.
Target Analysis supports the creation and analysis of two teams in a match. While still somewhat limited, targets can be added to a team as they are scored and team scores can be added up and viewed. Team data is saved into a CSV file for future reference.
- Click File -> Teams to open the teams menu.
- Add a name for
Team 1andTeam 2by selecting their respective tabs and typing in the names - Enable teams using the switch at the top of the menu
- Close the teams menu
- Before scoring a target, select the team to add the target to by clicking one of the radio buttons on the right side of the top options pane
- To add targets to another team, simply select the other team before scoring them.
- When using the Open Folder functionality, only one teams' targets may be in the folder. Therefore, you must separate the targets into two folders if you intend to use Open Folder.
- To add up the scores for each team, reopen the Teams window (File -> Teams) and select
Load Scores - The total scores for each team will be displayed below.
- You can click on the
Open CSVbutton for either team to see individual scores on that team. Make sure that a spreadsheet viewer is installed such as Excel or Calc. - To disable teams, turn off the switch in the Teams window. Then (warning: deletes all data in the
dataandimages/outputdirs) click File -> Clear Data to remove all team scores. Team names and enabled status remain saved.
Click File -> Settings to open the settigs menu.
Then, ensure that the DPI setting matches your scanner's selected DPI. The 300dpi setting is active by default.
Test Target Analysis again. If it still doesn't work, open settings and select the tab corresponding with the targets that you are scanning (either NRA A-17 or NRA/USAS-50). Then, tune the settings shown and retry the software after each change. A decription of settings is included below.
If you are unsure what settings to change or cannot make Target Analysis work properly, please contact Sigmond at picoplanetdev@gmail.com or skukla61@mtlstudents.net, making sure to include screenshots of the issue.
To tune the target analysis software, open the settings menu by pressing File -> Settings. Then, select the tab that corresponds with the target that you are trying to tune (NRA A-17 or NRA/USAS-50).
Settings with the DPI 1 notation correspond with the 300dpi scanner setting. Settings with the DPI 2 notation correspond with the 600dpi setting. These are not linked, but I reccomend only changing settings that correspond with your active DPI (at the top of the settings menu).
Please note that there was not a noticeable accuracy increase when using the 600dpi mode for NRA A-17 targets, so if that mode is enabled, targets will automatically be scaled in accordance with a 300dpi resolution. Using an unecessarily high DPI results in slower target processing with more CPU cost, therefore, it is discouraged. NRA/USAS-50 targets do score more accurately when using the 600dpi mode due to their smaller size. Therefore, the 600dpi mode is present in the analysis algorithm for NRA/USAS-50 targets. If your scanner supports 600dpi, I encourage you to take advantage of it for NRA/USAS-50 targets.
These settings affect the ring detection on each bull:
- Kernel Size: Affects the blur kernel used on the grayscale bull image to smooth it and remove some high-frequency noise. Higher values result in a stronger blur. Because the blur kernel is 2D, this value is passed for both kernel dimensions.
- Param 1: Affects the sensitivity of the Hough Circles detector. Higher values result in stronger edges being detected. If this is set too high, no circles will be detected. If it is set too low, more circles will be detected including false cicles. Aim for only one circle to be detected when tuning this parameter. See this StackExchange answer for more details: https://dsp.stackexchange.com/a/22649
- Param 2: Affects the number of points that must be detected on one circle for it to be used. Higher values result in stronger circles being detected. If this is set too high, no circles will be detected. If it is set too low, more circles will be detected including false cicles. Aim for only one circle to be detected when tuning this parameter. See this StackExchange answer for more details: https://dsp.stackexchange.com/a/22649
- Min Circle Radius: Any circles detected by Hough Circles will be discarded if they are smaller than this radius.
These settings affect the bullet hole detection:
- Thresh Min: The bullet hole detection system applies a threshold to the image, making it black if below this value or white if above this value and below the max value. This is to make contours more apparent to the contour detector. Range from 0 to 255.
- Thresh Max: This is the max value that the threshold uses. Not reccomended to change this.
- Morphology Opening Kernel Size: An opening morphology filter is applied to the black and white image to reduce noise. This process erodes the image (making white areas smaller), then dilates the image (making white areas larger). Small dots of noise are removed in the erosion and never appear in the dilation, but larger areas remain unchanged by the filter. This kernal size affects the number of pixels that are counted when performing these operations. Similar to the blur kernal size, this value is applied to both axes.
- Min cnt area: This defines the minimum area of a detected contour for it to be kept.
- Max cnt area: This defines the maximum area of a detected contour for it to be kept.
- Max hole radius: If a contour is detected, and it passes the min/max area filter, and its size is smaller than this radius, it is counted as a bullet hole and scored.
The Google Sheets integration allows you to upload scores from Target Analysis directly to a Google Sheet, but it does require some advanced setup.
You will need two tabs open for this process: the Google Sheet that you want to store your info on, and the following website:
- In a browser, go to console.cloud.google.com and agree to the Terms of Service
- Dismiss the
Access support tools quicklymessage in the top right, if present - At the top left, click
Select a project ⏷ - Click the
NEW PROJECTbutton on the window that appears - Name the project something distinguishable
- Click
Create - Once it has been created, click
SELECT PROJECTin the notifications window in the top right - Now use the Search bar at the top to search for and select
Google Sheets API - Click the
GOT ITbutton in the top left if a popup appears - Click the
ENABLEbutton - Repeat steps 8-10 for the
Google Drive API - Once the Google Drive API is enabled, you should see a sidebar with a
Credentialsitem on the left. If it doesn't appear there, click the menu button in the top left, then hover overAPIs & Servicesand selectCredentials. - Click
+ CREATE CREDENTIALSat the top and selectService account - Name the service account something distinguishable, and press the copy icon
⧉next to the email address - With this email address still copied to the clipboard, change tabs (don't close the Cloud Console) to your Google Sheet, select
Share, and paste in the email address. Then, clickDoneand switch back to the Cloud Console tab - Click
CREATE AND CONTINUEthen don't enter anything, just pressCONTINUEand finallyDONE - Under the Service Accounts heading, click on the email address that ends in
gserviceaccount.com - At the top, select the
KEYSmenu and click theADD KEY ⏷button. SelectCreate new keyand make sure it is set toJSON. - Now click the
CREATEbutton and save the key to the folder where Target Analysis is installed. It must be renamed tosheets_secrets.json(you can copy and paste this name) for Target Analysis to detect it.
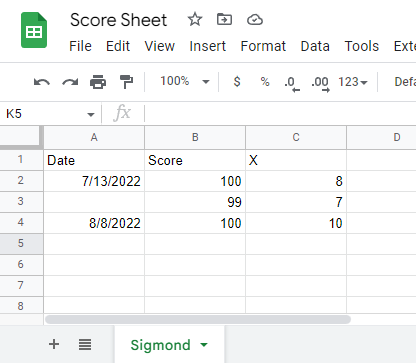
Now that the Google Sheets integration is set up, you need to make sure that your Google Sheet has a compatible layout. At present, Target Analysis expects every shooter's scores to be on a separate sheet (tab at the bottom) that is named the same as the names you enter into Target Analysis.
On this sheet, the date must be in Column A, the score out of 100 in Column B, and the X count in Column C. If there are multiple targets entered on the same day, the day is only entered once for the first target. Here is an example page of the spreadsheet:
- Score a target or batch of targets
- Open the
overview-<date>.csvfile in thedata/<current date>directory and ensure that the scores are correct - In Target Analysis, click
File -> Google Sheets - Type the name of the Google Sheet you have set up, such as
Score Book(you only have to type it the first time) - Click the
Select CSV data filebutton and open the same CSV file you want to upload - Click
Upload to Google Sheetsthen check your spreadsheet.
If nothing appears in your spreadsheet, please make sure that you have shared the sheet with the service account email address, the name of the sheet in Target Analysis is the same as online, the sheet pages are named properly, and the Google Sheets integration was correctly configured.
Target-Analysis
├───assets
├───data
├───help
└───images
    └───output
Note: depending on your version of Target Analysis, some folders may not be shown.
assets - Contains icons and tkinter theme. Do not edit.
data - Contains output CSV files. Clear them manually by deleting them, or by using File -> Clear Data inside the software. Files in this folder may be opened in a program such as Microsoft Excel. Files in this folder may be copied to another folder to preserve them for future reference.
help - Contains documentation files. Not reccomended to edit anything in this folder, although files in this folder may be manually opened in a programs such as Notepad (.txt) or Photos (.png / .jpg).
images - Put targets that need to be scored here. You can set this as your default scanning directory so that the scanner automatically sends them here.
images/output - Do not edit while Target Analysis is running, files inside are automatically overwritten every time a target is scored. Files in this folder may be viewed for debugging or verification purposes. Files in this folder may be copied to another folder to preserve them for future reference, where they will not be overwritten by Target Analysis.
This is getting to be a pretty long README, thank you for sticking with it all the way down to here!
I really enjoyed developing Target Analysis (still thinking about the name) and hope that it can be of use to someone. If you have anything that you would like to see in the software, please let me know and I will investigate ways to include it. Also, I would appreciate it if you sent me any bugs or issues that you have found. I would be happy to help sort them out.
Thanks for using Target Analysis!
- Sigmond Kukla
############################################################
## Target Analysis                                        ##
############################################################
## Copyright (c) 2022 Sigmond Kukla, All Rights Reserved  ##
############################################################
## Author: Sigmond Kukla                                  ##
## Copyright: Copyright 2022, Sigmond Kukla               ##
## The Target Analysis system does not include a license. ##
## This means that this work is under exclusive           ##
## copyright by the developer (Sigmond Kukla) alone.      ##
## Therefore, you are not permitted to copy, distribute,  ##
## or modify this work and claim it is your own.          ##
## Maintainer: Sigmond Kukla                              ##
## Contact: picoplanetdev@gmail.com (business)            ##
##          skukla61@mtlstudents.net (school)             ##
##          +1 (412)-287-0463 (mobile phone)              ##
## Status: Released, active development                   ##
############################################################