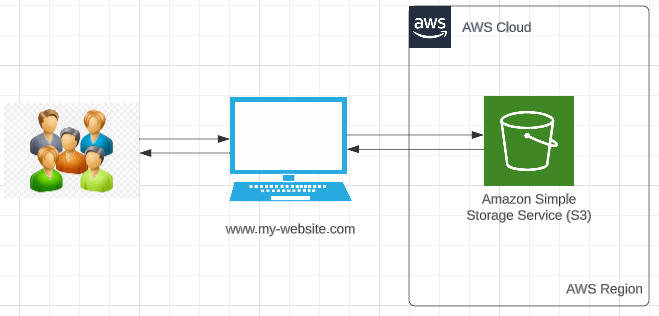
The high-level architecture for our project is illustrated in the diagram below:
In this module, we are going to deploy a simple static website to S3 bucket via AWS CloudFormation in three simple steps:
👉 Step 1. Create a simple static web app via Angular
👉 Step 2. Create S3 bucket and its policy, and configure it to host a static website
👉 Step 3. Build and deploy static website manually to newly created S3 bucket (optional, you can skip it and go to Module 2 for build automation)
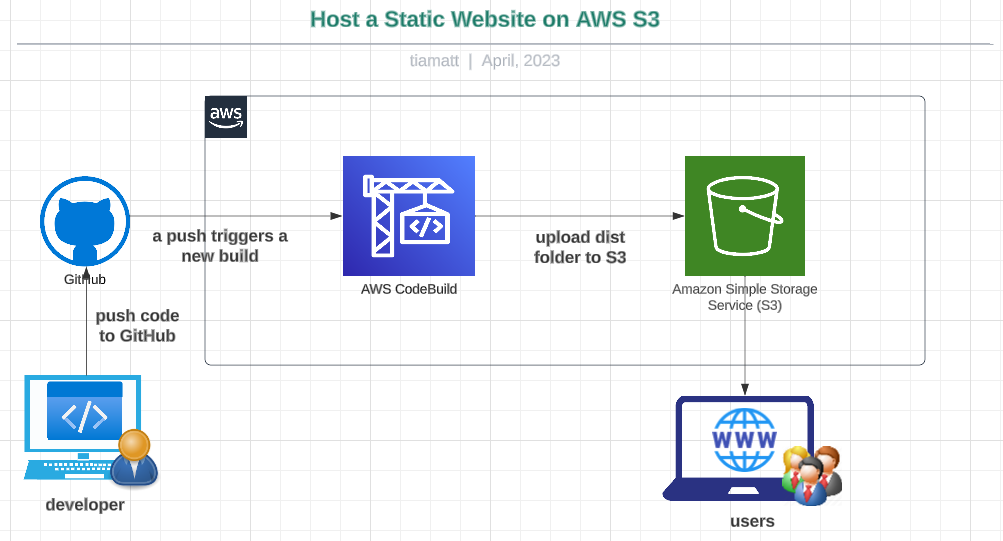
The high-level architecture for our project is illustrated in the diagram below:
In Module 1, we have created a simple static web app and hosted it on S3 bucket. However we took baby steps to deploy our static content to S3 bucket manually. Ideally we want to use a tool that would rebuild the source code every time a code change is pushed to the repository and deploy built files to S3 bucket automatically.
In this module I'll show you how to automate the build and deployment via AWS CodeBuild in six simple steps:
👉 Step 1. Create buildspec YAML file
👉 Step 2. Provide CodeBuild with access to GitHub repo
👉 Step 3. Configure how AWS CodeBuild builds your source code
👉 Step 4. Create IAM role for CodeBuild project
👉 Step 5. Run the CloudFormation stack
👉 Step 6. Update frontend source code and watch how it will be built automatically
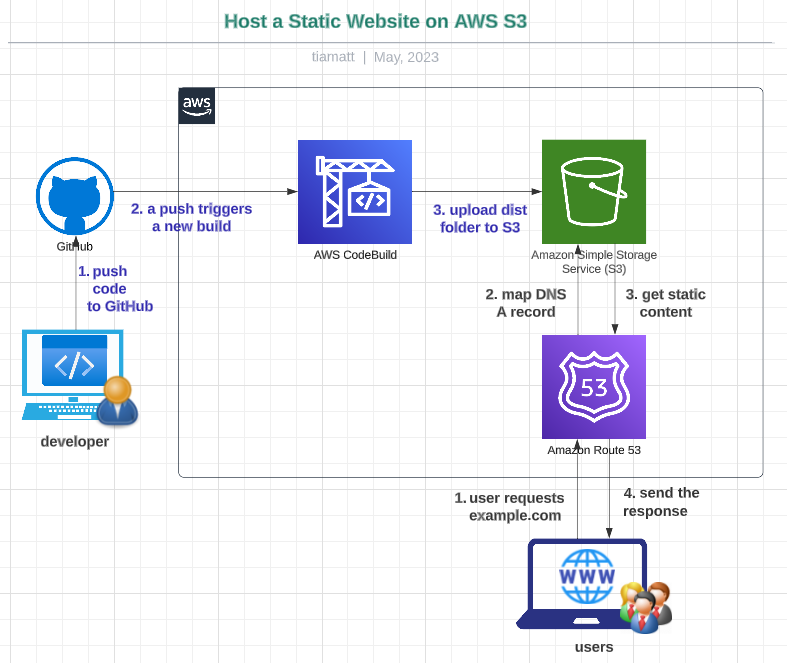
The high-level architecture for our project is illustrated in the diagram below:
In Module 1, we have created a simple static website and hosted it on S3 bucket. To access our website we used Amazon S3 website endpoint which looked like http://example.s3-website-us-east-1.amazonaws.com. However for users the link is too long and hard to remember. If you want your website appear legitimate to visitors you should use a custom domain name such as http://example.com.
In this module I'll show you how to configure Route 53 to use your domain to access the website on S3 bucket in six simple steps via CloudFormation:
✳️ Step 1. Register a custom domain name
✳️ Step 2: Create an S3 bucket for your root domain and (optionally) for subdomain
✳️ Step 3. Build and deploy static files to S3 bucket automatically using CodeBuild
✳️ Step 4. Create Route 53 hosted zone and configure your domain
✳️ Step 5. Create Route 53 record set to route your traffic for your domain to S3 bucket
✳️ Step 6. Test your static website
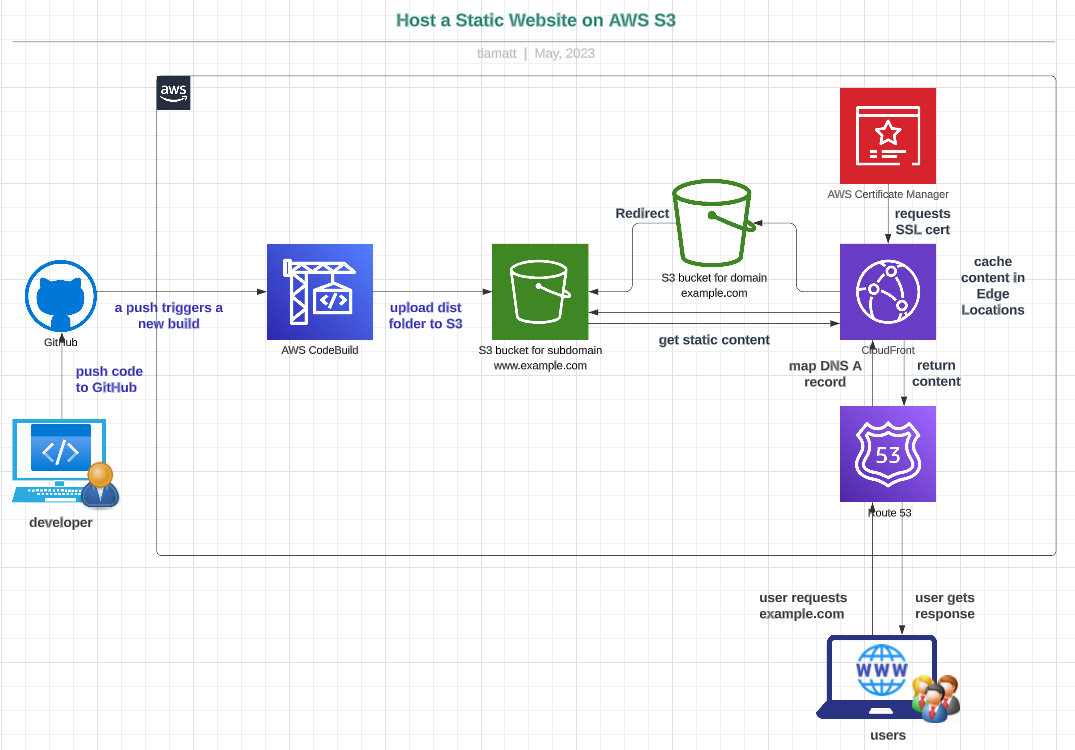
The high-level architecture for our project is illustrated in the diagram below:
In the past three modules, we successfully created a basic static web app and deployed it on an S3 bucket. We also set up a CodeBuild project to automate the website's build process on AWS S3. Additionally, we configured Route 53 to enable the use of a custom domain for our S3-hosted static website. Now, let's continue enhancing our architecture further.
In this module we are going to optimize our application’s performance and security while effectively managing cost by setting up Amazon CloudFront to work with your S3 bucket to serve and protect the content. Here is how to configure CloudFront distribution to serve a simple static website in ten steps via CloudFormation:
✳️ Step 1. Register a custom domain name
✳️ Step 2. Create S3 buckets for your root domain and subdomain
✳️ Step 3. Create Route 53 hosted zone and configure your domain
✳️ Step 4: Request public SSL/TLS certificate from AWS Certificate Manager (ACM) for our domain name and all its subdomains
✳️ Step 5. Create an Origin Access Identity (OAI) as special CloudFront user
✳️ Step 6. Create CloudFront distribution for subdomain that contains static website
✳️ Step 7. Create a policy for S3 bucket for subdomain to allow OAI to access bucket content
✳️ Step 8. Create another CloudFront distribution for root domain that redirects requests to S3 bucket for subdomain
✳️ Step 9. Create a Route 53 record set to route DNS traffic for root domain and subdomain to CloudFront domain
✳️ Step 10. Test your static website
The high-level architecture for our project is illustrated in the diagram below:


