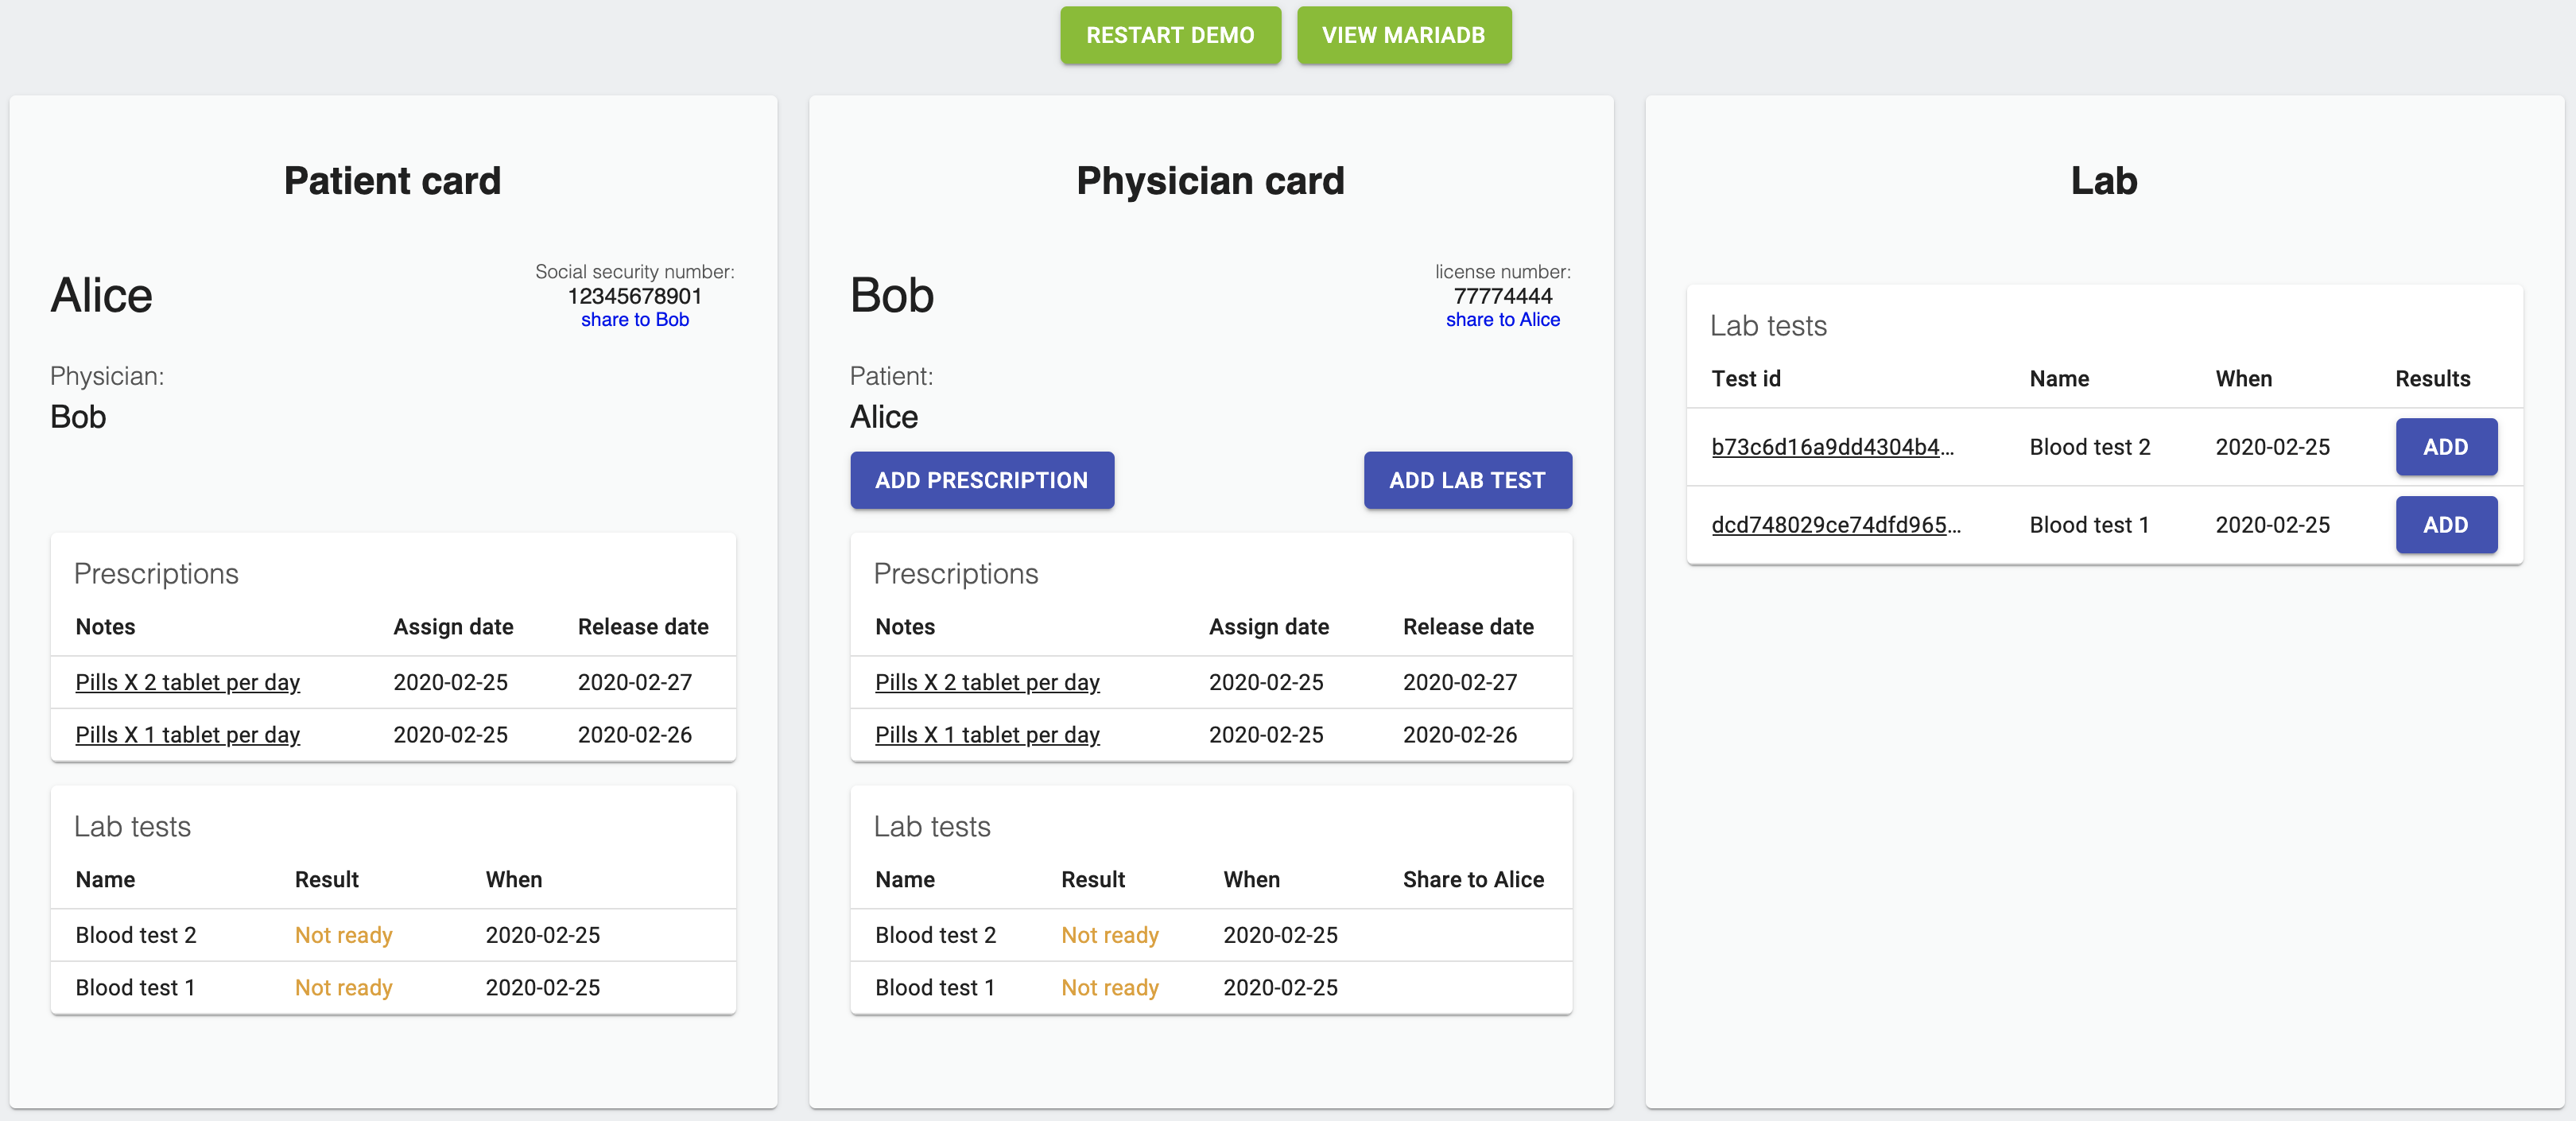
The Demo App is a simple web application that illustrates how Virgil PureKit can be used with MariaDB to store and share data in the most secure way. The Demo App is based on use case involving a hypothetical business scenario involving a patient, physician and laboratory, and shows how distinct roles within a customer's application can be defined and used to restrict ePHI access in a HIPAA-compliant manner.
Read more about demo and how it works here.
- Docker
- Virgil Developer Account and create a new Virgil Application called "PureKit Demo"
- Clone the PureKit demo application:
git clone https://github.com/VirgilSecurity/virgil-mariadb-demo.git- Step #1. Launch Docker
- Step #2. Create configuration files. Copy
env.templatefile and rename to a newenv.configfile in theserverdirectory. - Step #3. Get Virgil PureKit credentials. Fill in the Virgil PureKit values inside of
env.configfile. The following environment variables must be defined to run the server:
| Variable Name | Description |
|---|---|
virgil_appId |
Your Virgil Application ID. At Virgil Dashboard in your "PureKit Demo" application, navigate to "Settings" and copy the App ID. |
virgil_at |
Your Virgil Application token. At Virgil Dashboard in your "PureKit Demo" application, navigate to the PureKit tab and click "Generate credentials" if you haven't. Copy and save the generated App Token. |
virgil_pk |
PHE Service public key of your PureKit application. At Virgil Dashboard in your "PureKit Demo" application, navigate to the PureKit tab and click "Generate credentials" if you haven't. Copy and save the generated PHE Service public key. |
virgil_nms |
Your PureKit Nonrotatable master secret. |
virgil_bu |
Your PureKit Backup public key. |
virgil_sk |
Your PureKit App secret key. |
To generate virgil_nms, virgil_bu and virgil_sk, install the Virgil CLI and then run the following command:
virgil purekit keygen allMake sure to save the generated keys in a safe storage.
- Step #4. To run the demo client, navigate to the downloaded MariaDB PureKit repository and use the following command:
docker-compose up- Step #5. Browse to http://localhost:80 to explore the demo.
The Demo App consists of three cards (actors): Patient (Alice), Physician (Bob) and Lab.
At any moment you can restart the demo and check the database using the buttons in the top.
In the beginning of the demo flow, each actor the following:
Alice has:
- her SSN, which she can share with Bob;
- access to the 2 prescriptions, that Bob has provided;
- 2 lab tests that she is waiting for.
Bob has:
- his license number, which he can share with Alice;
- 2 prescriptions that he wrote for Alice, and a button to add new prescriptions;
- 2 lab tests that he is waiting for, and a button to add a new lab test.
Lab has:
- 2 lab tests that Bob has created for Alice.
At the Patient card:
- click "share to Bob" to securely share the Alice's social security number with the Physician.
- Also, you can review prescription, lab's results and its status.
At the Physician card:
- click "Add prescription" to create a new prescription for Alice. Alice will immediately get access to the prescription and will be able to see the notes.
- Also, at the Physician card, click "Add lab test". This will create a new record in Alice's, Bob's and Lab's "Lab tests" section.
At the Lab card:
- in the column "Results" click "Add" button to add a test result. After submitting it, the Physician will be able to see the result, but the Patient will only see "Access denied" message in the "Result" column.
- To share the result with the Patient, at the Physician card click "Share". After that the Patient will be able to read the result herself.
Now, to see the results of your actions in the database:
- click "View MariaDB" in the top of the page. There, in the left field, scroll to the very bottom to see the PureKit-related tables.
- Click on any table and "Execute" to see the data in that table.
- Note that most of the data will be encrypted (results of the lab tests in
lab_tests, Patient's SSN inpatients, Physician's license number inphysycians, notes inprescriptions, encrypted keys and etc.) and can only be decrypted by users who have the right keys to do so. Therefore, sensitive data cannot be accessed by unauthorized parties.
Prerequisites
To re-build docker images for demo's client and server use the steps below:
- Step #1. Build Java application. Navigate to the
serverdirectory of the PureKit Demo and execute the following command:
mvn clean package- Step #2. Build Docker image. Execute the next command in
serverdirectory:
docker build -t virgilsecurity/mariadb-demo-server .- Step #3. Build docker image for the client, navigate to the
clientdirectory and execute the next command:
docker build -t virgilsecurity/mariadb-demo-client .This Demo is released under the 3-clause BSD License.
Our developer support team is here to help you.
You can find us on Twitter or send us email support@VirgilSecurity.com.
Also, get extra help from our support team on Slack.
