Navigation
In this quickstart we will show you how to get the Echo Bot up and running. The Echo Bot echoes back messages sent to it while keeping track of the number of messages sent by the user.
This guide will show you have the set up the Echo Bot using the C# library.
To get started, ensure that you have the following tools:
| Install | For using... |
|---|---|
| Visual Studio (17.7.0 or greater) | C# build environments. Use the latest version. |
| Teams Toolkit | Microsoft Visual Studio extension that creates a project scaffolding for your app. Use the latest version. |
| Git | Git is a version control system that helps you manage different versions of code within a repository. |
| Microsoft Teams | Microsoft Teams to collaborate with everyone you work with through apps for chat, meetings, and call-all in one place. |
| Microsoft Edge (recommended) or Google Chrome | A browser with developer tools. |
| Microsoft 365 developer account | Access to Teams account with the appropriate permissions to install an app and enable custom Teams apps and turn on custom app uploading. |
-
Clone the teams-ai repository
git clone https://github.com/microsoft/teams-ai.git
-
Open Visual Studio and select
Open a project or a solution. -
Navigate to the
teams-ai/dotnet/samples/01.messaging.echoBotfolder and open theEchobot.slnfile. -
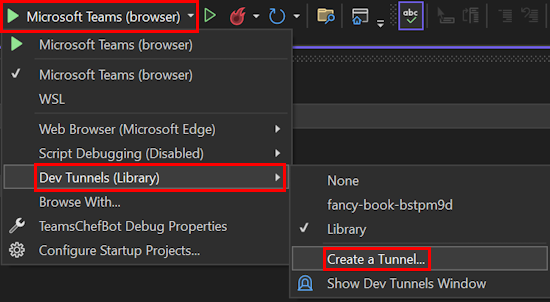
In the debug dropdown menu, select Dev Tunnels > Create A Tunnel (Tunnel type:
Persistent& Access:Public) or select an existing public dev tunnel. Ensure that the dev tunnel is selected. -
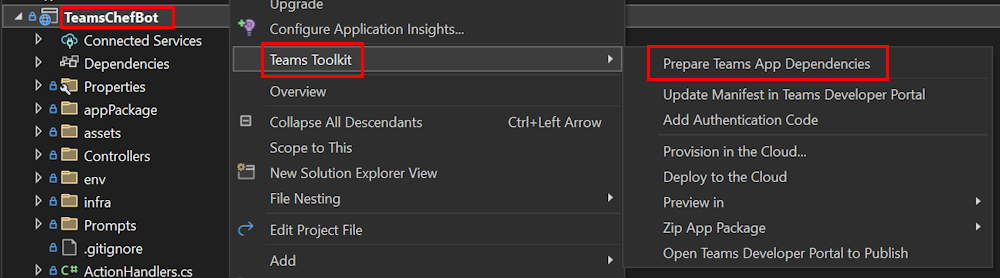
Right-click your project and select Teams Toolkit > Prepare Teams App Dependencies
Note: If you are running into errors in this step, ensure that you have correctly configured the dev tunnels in step 4.
-
If prompted, sign in with a Microsoft 365 account for the Teams organization you want to install the app to.
If you do not have permission to upload custom apps (sideloading), Teams Toolkit will recommend creating and using a Microsoft 365 Developer Program account - a free program to get your own dev environment sandbox that includes Teams.
-
Press F5, or select the
Debug > Start Debuggingmenu in Visual Studio. If step 3 was completed correctly then this should launch Teams on the browser. -
You should be prompted to sideload a bot into teams. Click the
Addbutton to load the app in Teams.
-
This should redirect you to a chat window with the bot.


This guide will show you have the set up the Echo Bot using the JS library.
| Install | For using... |
|---|---|
| Visual Studio Code | Typescript build environments. Use the latest version. |
| Teams Toolkit (5.3.x or greater) | Microsoft Visual Studio Code extension that creates a project scaffolding for your app. Use the latest version. |
| Git | Git is a version control system that helps you manage different versions of code within a repository. |
| Node.js (16 or 18) | Microsoft Teams to collaborate with everyone you work with through apps for chat, meetings, and call-all in one place. |
| Microsoft Teams | Microsoft Teams to collaborate with everyone you work with through apps for chat, meetings, and call-all in one place. |
| Microsoft Edge (recommended) or Google Chrome | A browser with developer tools. |
| Microsoft 365 developer account | Access to Teams account with the appropriate permissions to install an app and enable custom Teams apps and turn on custom app uploading. |
| Yarn (1.22.x or greater) | Node.js package manager used to install dependencies and build samples. |
-
Clone the repository.
git clone https://github.com/microsoft/teams-ai.git
-
Go to Visual Studio Code.
-
Select
File > Open Folder. -
Go to the location where you cloned teams-ai repo and select the
teams-aifolder. -
Click
Select Folder. -
Select
View > Terminal. A terminal window opens. -
In the terminal window, run the following command to go to the js folder:
cd ./js/ -
Run the following command to install dependencies:
yarn install -
Run the following command to build project and samples:
yarn build -
After the dependencies are installed and project is built, select
File > Open Folder. -
Go to
teams-ai > js > samples > 01.messaging.a.echoBotand clickSelect Folder. This open the echo bot sample folder in vscode. -
From the left pane, select
Teams Toolkit. -
Under
ACCOUNTS, sign in to the following:- Microsoft 365 account
-
To debug your app, press the F5 key.
A browser tab opens a Teams web client requesting to add the bot to your tenant.
-
Select Add.
A chat window opens.
-
In the message compose area, send a message to invoke the bot.

The bot will echo back what the user sends it while keeping track of the number of messages sent by the user.
This guide will show you have the set up the Echo Bot using the Python library.
To get started, ensure that you have the following tools:
| Install | For using... | | ----------------------------------------------------------------------------------------------------------------------------- | ------------------------------------------------------------------------------------------------------------------------------------------------------------------------------------------------------------------------------------------------------------------- | --- | | Visual Studio Code | Python build environments. Use the latest version. | | Teams Toolkit (5.3.x or greater) | Microsoft Visual Studio Code extension that creates a project scaffolding for your app. Use the latest version. | | Git | Git is a version control system that helps you manage different versions of code within a repository. | | Python (>=3.8) | Python programming language | | Poetry | Dependency management and packaging tool for Python | | | Python VSCode Extension | Provides rich support for Python on VSCode | | | Microsoft Teams | Microsoft Teams to collaborate with everyone you work with through apps for chat, meetings, and call-all in one place. | | Microsoft Edge (recommended) or Google Chrome | A browser with developer tools. | | Microsoft 365 developer account | Access to Teams account with the appropriate permissions to install an app and enable custom Teams apps and turn on custom app uploading. | |
-
Clone the repository.
git clone https://github.com/microsoft/teams-ai.git
-
Go to Visual Studio Code.
-
Select
File > Open Folder. -
Go to the location where you cloned teams-ai repo and select the
teams-aifolder. -
Select
View > Terminal. A terminal window opens. -
In the terminal window, run the following command to go to the python folder:
cd ./python/ -
Run the following command to install dependencies:
poetry install -
Run the following command to build project and samples:
poetry build -
After the dependencies are installed and project is built, select
File > Open Folder. -
Go to
teams-ai > python > samples > 01.messaging.a.echoBotand clickSelect Folder. This open the echo bot sample folder in vscode. -
From the left pane, select
Teams Toolkit. -
Under
ACCOUNTS, sign in to the following:- Microsoft 365 account
-
To debug your app, press the F5 key.
A browser tab opens a Teams web client requesting to add the bot to your tenant.
-
Select Add.
A chat window opens.
-
In the message compose area, send a message to invoke the bot.
The bot will echo back what the user sends it while keeping track of the number of messages sent by the user.