
- Linux (was tested on Ubuntu 22.04.3 LTS)
- Python 3.10.4 (was tested on this version, any other should be fine)
- Pytorch 2.0.1+cu117
- wandb account for logging (optional)
This code is runnable on any other versions of the above.
To get started, first please clone the repo
git clone https://github.com/abdalrhmanu/unet-pytorch-segmentation.git
Then, please run the following commands (to create and activate an environment on Linux, you can do this in any other approach):
python -m venv env
source env/bin/activate
pip install -r requirements.txt
If you wish to train/test using the same datasets, the code has been experimented on the following datasets
- Kvasir SEG - Segmented Polyp Dataset for Computer Aided Gastrointestinal Disease Detection.
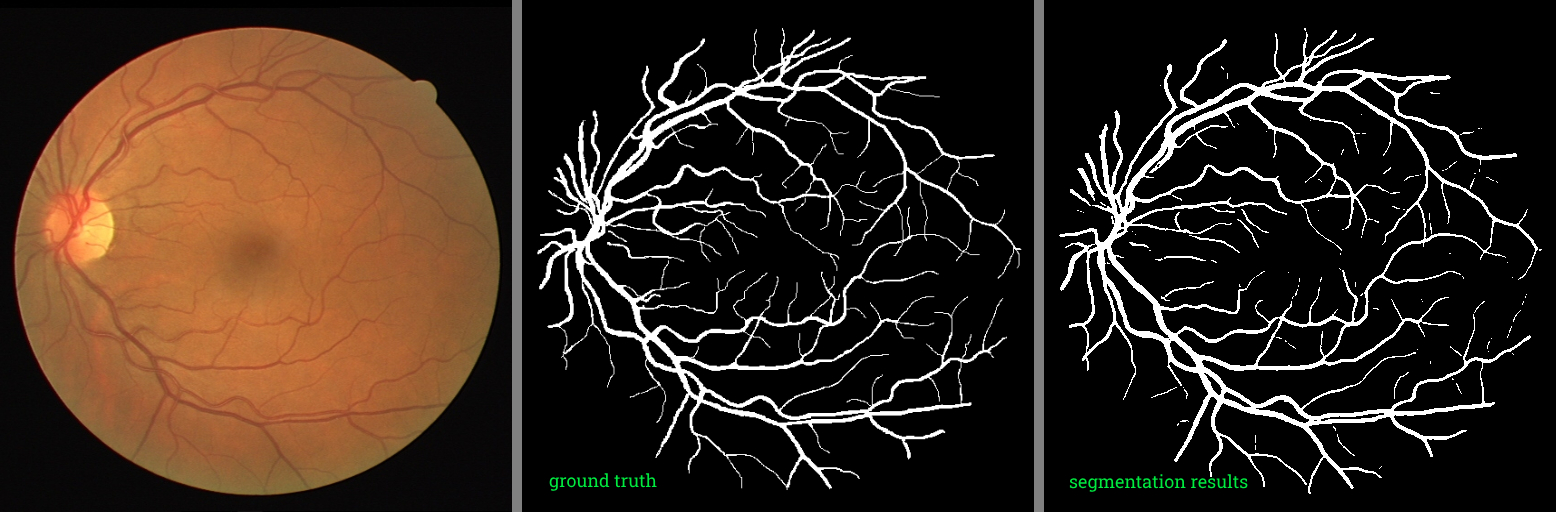
- DRIVE 2004 - Digital Retinal Images for Vessel Extraction
You can monitor the training using wandb platform. You will need to setup your accound and run the following command
wandb loginYou will be required to provide your API key. Note that you need to set the flag during the training process to True --wandb True in order to log the data on your wandb project, by default it is set to False --wandb False.

The augmentation processes can be made using the following command
python data_aug.py --dataset <dataset folder name>It is recommended to view the augmentations applied inside the file and modify them if necessary depending on your dataset. Also make sure to have the dataset folder inside the datasets folder.
NVIDIA GeForce RTX 3060 Laptop GPU was used for training.
- Please download any dataset that contains both images and masks, and put it in
datasets/<Your folder>. - Augment and prepare the dataset (it is necessary to resize your dataset at least if you won't perform any other augmentation) using
data_aug.pyfile. - Run this command to train.
python train.py --train_path "datasets/<dataset folder name>/processed/train" --val_path "datasets/<dataset-folder-name>/processed/val" --dataset "<dataset name>"Check the results in the new folder created results/<Your dataset experiment results>. It contains the checkpoint file and training logs. You can also view and change any of the training parameters by running the following command
python train.py --help

usage: train.py [-h] [--train_path TRAIN_PATH] [--val_path VAL_PATH] [--output OUTPUT] [--dataset DATASET]
                [--max_epochs MAX_EPOCHS] [--batch_size BATCH_SIZE] [--base_lr BASE_LR] [--patience PATIENCE]
                [--img_size IMG_SIZE] [--seed SEED] [--ckpt CKPT] [--wandb WANDB]

options:
  -h, --help            show this help message and exit
  --train_path TRAIN_PATH
                        root dir for train data
  --val_path VAL_PATH   root dir for validation data
  --output OUTPUT       output dir for saving the segmentation results
  --dataset DATASET     experiment_name
  --max_epochs MAX_EPOCHS
                        maximum epoch number to train
  --batch_size BATCH_SIZE
                        batch_size per gpu
  --base_lr BASE_LR     segmentation network learning rate
  --patience PATIENCE   patience for lr scheduler
  --img_size IMG_SIZE   input image size of network input
  --seed SEED           random seed
  --ckpt CKPT           pretrained checkpoint
--wandb WANDB wandb logging control flagAfter training, you should have your model best checkpoint saved automatically.
- Please run the following command
python test.py --test_path "datasets/<dataset folder name>/processed/test" --ckpt "results/<Your dataset experiment results>/checkpoints/<checkpoint file name>.pth"This will save the segmentation results masks, and testing metrics in the same directory results/<Your dataset experiment results>.