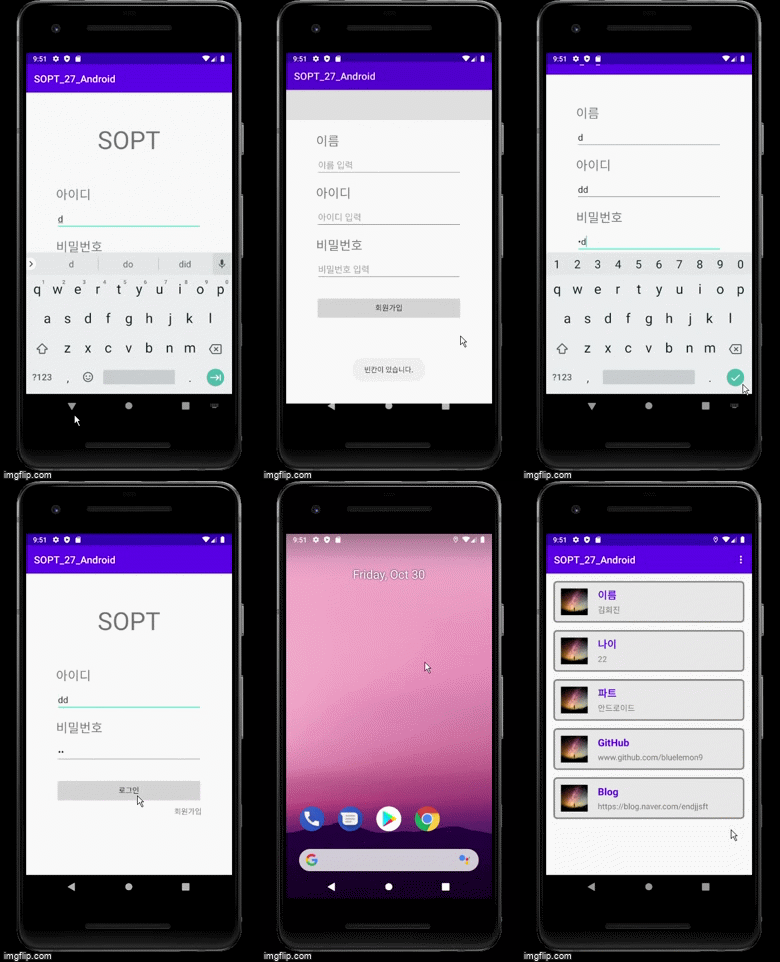
- 회원가입 완료시 SignInActivity로 돌아오고, 회원가입 성공한 id와 pw가 입력되어 있도록 구현.
- 빈칸이 있을 경우 Toast 메세지 출력
SignInActivity: 로그인 창
SignUpActivity: 회원가입 창
MainActivity: 로그인 완료 창
- 화면 전환에 주로 사용하는 StartActivity() 대신 결과값을 반환할 수 있는 StartActivityForResult를 사용한다.
- SignInActivity
tv_join.setOnClickListener{
            val intent = Intent(this, SignUpActivity::class.java)
            startActivityForResult(intent, REQUEST_CODE)
}- SignUpActivity
val intent = Intent(this, SignInActivity::class.java)

intent.putExtra("id", et_joinid.text.toString())
intent.putExtra("pw", et_joinpwd.text.toString())
setResult(Activity.RESULT_OK, intent)
finish()
intent를 통해 값을 전달할 수 있다. putExtra()의 첫번째 매개변수에는 값의 이름, 두번째 매개변수에는 값이 들어간다. setResult()를 통해 intent를 전달한다.
-
putExtra()로 값을 전달했으니 이제 값을 받는 액티비티인 SignInActivity에서 onActivityResult()함수를 오버라이드하여 getStringExtra()로 값을 받아온다.
-> onActivityResult: main액티비티에서 sub액티비티를 호출하여 넘어갔다가, 다시 main 액티비티로 돌아올때 사용되는 기본 메소드
- LoginActivity
    override fun onActivityResult(requestCode: Int, resultCode: Int, data: Intent?) {
        super.onActivityResult(requestCode, resultCode, data);
        if(requestCode == REQUEST_CODE){
            if (resultCode == Activity.RESULT_OK){
                Toast.makeText(this, "회원가입이 완료되었습니다.", Toast.LENGTH_SHORT).show()

                // 로그인 입력창에 회원가입 성공한 id와 pw가 입력되도록 함
                et_id.setText(data?.getStringExtra("id"))
et_pwd.setText(data?.getStringExtra("pw"))- 회원가입 시 SignInActivity로 돌아와 가입한 id, pw로 자동 로그인하기.
- 로그인에 성공하는 순간 id와 password를 기억해서 다음 로그인 때 자동 로그인(바로 MainActivity로 이동)
안드로이드에서 기본적으로 제공하는 SharedPreferernces는 db를 사용하지 않고도 데이터를 타입 등에 따라 관리하고, 파일로 저장한다. SharedPreferernces를 사용하면 액티비티 간 데이터를 주고받을 수 있다. (Key, Value) 형태로 사용한다.
- 계정정보 저장
- SignInActivity
val pref = getSharedPreferences("USER", Context.MODE_PRIVATE)
val editor = pref.edit()

editor.putString("id", et_id.text.toString())
editor.putString("pw", et_pw.text.toString())
editor.commit()
오버라이드 한 onActivityResult() 안에서 자동로그인을 위하여 사용자가 입력한 계정정보를 저장한다. (어플이 삭제되기 전까지 저장)
Context를 통해 접근하고, "USER"이라는 이름으로 파일이 저장되며 Editor를 이용해 값을 지정한다.
get 메서드를 제외한 Data 저장(put), 삭제(remove, clear) 등을 할 경우에는 commit()을 꼭 호출해 주어야 한다.
val loginpref = getSharedPreferences("ISLOGIN", Context.MODE_PRIVATE)
if(loginpref.getBoolean("AUTO_LOGIN", false)){
    startActivity(Intent(this, MainActivity::class.java))
onCreate()에서 종료하고 다시 접속해도 로그인 유지할 수 있도록 getSharedPreferences를 이용한다.
첫번째 매개변수에는 데이터 저장 파일명, 두번째 매개변수에는 파일의 모드가 들어간다.(현재는 MODE_PRIVATE로, 실행한 앱에서만 데이터에 접근할 수 있게 설정하였다.)
- 로그인 상태 저장
- MainActivity
val loginpref = getSharedPreferences("ISLOGIN", Context.MODE_PRIVATE)
val editor = loginpref.edit()
editor.putBoolean("AUTO_LOGIN", true)
editor.apply()
로그인을 하여 MainActivity가 실행되면 ISLOGIN이라는 파일 안에 사용자의 로그인상태가 저장이 된다. AUTO_LOGIN이 true라면 로그인 된 상태로, 종료하고 다시 시작해도 바로 MainActivity가 실행될 수 있도록 한다.
로그인 유무 판별은 SignInActivity에서 구현한 코드를 통해 이루어진다.
- SignInActivity
val loginpref = getSharedPreferences("ISLOGIN", Context.MODE_PRIVATE)
if(loginpref.getBoolean("AUTO_LOGIN", false)){
    startActivity(Intent(this, MainActivity::class.java))
종료 시 다시 접속해도 로그인 유지될 수 있도록 한다.
object MySharedPreferences {
    private val USER : String = "user"

    fun setId(context: Context, input: String) {
        val prefs : SharedPreferences = context.getSharedPreferences(USER, Context.MODE_PRIVATE)
        val editor : SharedPreferences.Editor = prefs.edit()
        editor.putString("USER_ID", input)
        editor.apply()
    }

    fun getId(context: Context) : String {
        val prefs : SharedPreferences = context.getSharedPreferences(USER, Context.MODE_PRIVATE)
        return prefs.getString("USER_ID", "").toString()
    }

    fun setPw(context: Context, input: String) {
        val prefs : SharedPreferences = context.getSharedPreferences(USER, Context.MODE_PRIVATE)
        val editor : SharedPreferences.Editor = prefs.edit()
        editor.putString("USER_PW", input)
        editor.apply()
    }

    fun getPw(context: Context) : String {
        val prefs : SharedPreferences = context.getSharedPreferences(USER, Context.MODE_PRIVATE)
        return prefs.getString("USER_PW", "").toString()
    }

    fun clearUser(context: Context) {
        val prefs : SharedPreferences = context.getSharedPreferences(USER, Context.MODE_PRIVATE)
        val editor : SharedPreferences.Editor = prefs.edit()
        editor.clear()
        editor.apply()
    }
}- SignInActivity.kt
// SharedPreferences에 정보가 저장되어 있지 않을 때 -> 일반 로그인
        if(MySharedPreferences.getId(this).isBlank() || MySharedPreferences.getPw(this).isBlank()) {
            // 로그인 버튼
            btn_login.setOnClickListener {
                if (et_id.text.isNullOrBlank() || et_pw.text.isNullOrBlank()) {
                    Toast.makeText(this, "빈칸이 있습니다.", Toast.LENGTH_SHORT).show()
                } else {
                    // 서버 통신
                    SignServiceImpl.signinservice.requestSignIn(
                        RequestSignIn(
                            email = et_id.text.toString(),
                            password = et_pw.text.toString()
                        )
                    ).enqueue(object : Callback<ResponseSignIn> {
                        override fun onResponse(
                            call: Call<ResponseSignIn>,
                            response: Response<ResponseSignIn>
                        ) {
                            if (response.isSuccessful) {
                                // 자동로그인 값 저장
                                MySharedPreferences.setId(applicationContext, et_id.text.toString())
                                MySharedPreferences.setPw(applicationContext, et_pw.text.toString())

                                Toast.makeText(this@SignInActivity, "로그인 되었습니다.", Toast.LENGTH_SHORT).show()
                                val intent = Intent(this@SignInActivity, MainActivity::class.java)
                                startActivity(intent)
                            } else {
                                showError(response.errorBody())
                            }
                        }

                        override fun onFailure(call: Call<ResponseSignIn>, t: Throwable) {
                            Toast.makeText(this@SignInActivity, "로그인 실패", Toast.LENGTH_SHORT).show()
                        }
                    })
                }
            }
        } else {
            // SharedPreferences에 값이 저장되어 있을 때 -> 자동 로그인
            Toast.makeText(this, "자동로그인 되었습니다.", Toast.LENGTH_SHORT).show()
            val intent = Intent(this, MainActivity::class.java)
            startActivity(intent)
            finish()
}- MeFragment.kt
        btn_logout.setOnClickListener {
            MySharedPreferences.clearUser(view.context)
            val intent = Intent(view.context, SignInActivity::class.java)
            intent.flags = Intent.FLAG_ACTIVITY_NEW_TASK or
                    Intent.FLAG_ACTIVITY_CLEAR_TASK or Intent.FLAG_ACTIVITY_CLEAR_TOP
            startActivity(intent)
}- item_profile_linear.xml
- item_profile_grid.xml
※ android:scaleType="centerCrop"로 이미지 크기 크롭
※ itemDecoration을 사용하면 RecyclerView에서 각 아이템 주위에 여백을 줄 수 있다.
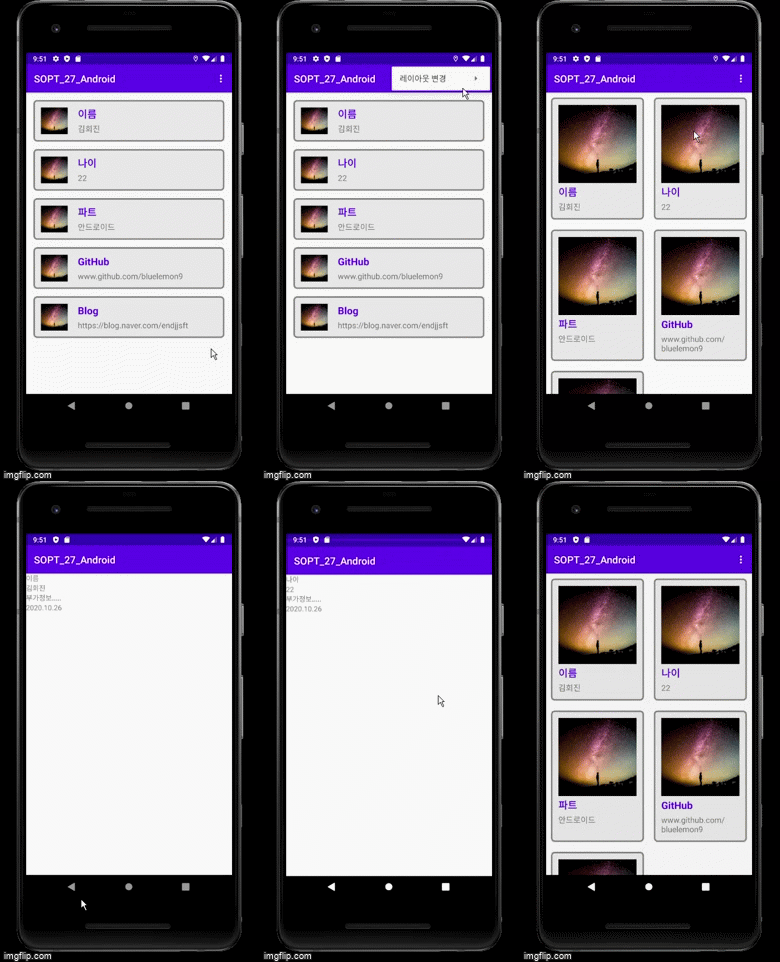
LinearLayoutManager: 선형 배치
GridLayoutManager: 바둑판 형식 배치
- activity_main.xml
app:layoutManager="androidx.recyclerview.widget.GridLayoutManager"
app:spanCount="3"
리사이클러뷰를 그리드 형태로 사용하기 위해 layoutManager을 GirdLayoutManager로 설정해준다.
spanCount는 한 줄에 넣을 수 있는 개수를 정해주는데 여기서는 3으로 설정.
원래는 위와 같이 지정해주면 되는데 상단메뉴를 선택하여 원하는 레이아웃 형태를 바꿀 수 있도록 해주기 위해 xml이 아니라 코드로 작성한다.
(그리고 res에서 menu 폴더를 만들어 상단바를 나타내는 bar.xml을 만들어준다.)
- ProfileData.kt
data class ProfileData(
    val title : String,
    val subtitle : String
)- ProfileViewHolder.kt
class ProfileViewHolder(itemView:View) : RecyclerView.ViewHolder(itemView) {
    private val title = itemView.findViewById<TextView>(R.id.item_title)
    private val subtitle = itemView.findViewById<TextView>(R.id.item_subtitle)

    val profile_item = itemView.findViewById<ConstraintLayout>(R.id.profile_item)

    fun onBind(profiledata : ProfileData){
        title.text = profiledata.title
        subtitle.text = profiledata.subtitle

        //프로필 아이템 버튼 클릭 이벤트 (상세정보)
        profile_item.setOnClickListener(object :View.OnClickListener {
            override fun onClick(v: View?) {
                val context: Context = v!!.context
                val detailIntent = Intent(v!!.context, ProfileDetatilActivity::class.java)
                detailIntent.putExtra("title",profiledata.title)
                detailIntent.putExtra("subtitle",profiledata.subtitle)
                context.startActivity(detailIntent)
            }
        })
    }
}
추가적으로 각 프로필 아이템을 선택하여 상세화면으로 이동시킬 때, 정보를 intent로 넘기기 위해 반복되는 뷰에 들어간 constraintlayout의 id를 profile_item이라고 설정한 뒤, 클릭 이벤트를 넣어준다.
이후 ProfileDetailActivity에서 getStringExtra로 각 아이템 정보(title, subtitle)를 받아온다.
- ProfileAdapter.kt
class ProfileAdapter (private val context : Context) : RecyclerView.Adapter<ProfileViewHolder>() {
    var data = mutableListOf<ProfileData>()
    var changeViewType = 1

    override fun onCreateViewHolder(parent: ViewGroup, viewType: Int): ProfileViewHolder {
        val view =
            when(viewType){
                1-> { //리니어
                    LayoutInflater.from(context).inflate(
                        R.layout.item_profile_linear,
                        parent, false)
                }
                2-> { //그리드
                    LayoutInflater.from(context).inflate(
                        R.layout.item_profile_grid,
                        parent, false)
                }
                else -> {
                    LayoutInflater.from(context).inflate(
                        R.layout.item_profile_linear,
                        parent, false)
                }
            }
        return ProfileViewHolder(view)
    }

    override fun getItemViewType(position: Int): Int {
        return changeViewType
    }

    override fun getItemCount(): Int = data.size

    override fun onBindViewHolder(holder: ProfileViewHolder, position: Int) {
        holder.onBind(data[position])
    }
}
changeViewType이라는 변수를 만들어 그 값에 따라 Linear, Grid 형태가 정해진다. getItemViewType 함수를 오버라이드 해줘야 함.
Adapter를 통해 데이터 전달. ViewHolder를 이용해 받은 데이터를 뷰에 뿌려준다.
배치 방향 확인, Adapter 갱신
- MainActivity
리사이클러뷰 적용은 세미나 때와 동일하게 하면 된다.
profileAdapter = ProfileAdapter(this)
rv_profile.adapter = profileAdapter    // 리사이클러뷰의 어댑터를 profileAdapter로 지정
rv_profile.layoutManager = GridLayoutManager(this@MainActivity, 2)
리사이클러뷰 레이아웃을 선택하여 변경할 수 있도록 onCreateOptionsMenu와 onOptionsItemSelected를 오버라이드한다.
-> 코드 참고
- Fragment에서 메뉴 적용시, onCreateView 안에 아래와 같이 있어야 액티비티보다 프레그먼트의 메뉴가 우선시 됨
setHasOptionsMenu(true)- ItemTouchHelper는 RecyclerView.ItemDecoration의 서브 클래스이다. RecyclerView 및 Callback 클래스와 함께 작동하며, 사용자가 이러한 액션을 수행할 때 이벤트를 수신한다. 우리는 지원하는 기능에 따라 메서드를 재정의해서 사용하면 된다.
- ItemTouchHelper.Callback은 추상 클래스로 추상 메서드인 getMovementFlags(), onMove(), onSwiped()를 필수로 재정의해야 한다. 아니면 Wrapper 클래스인 ItemTouchHelper.SimpleCallback을 이용해도 된다.
interface ItemDragListener {
    fun onStartDrag(viewHolder: RecyclerView.ViewHolder)
}
이건 굳이 필요한 작업은 아닌 것 같다.
interface ItemActionListener {
    fun onItemMoved(from: Int, to: Int)
    fun onItemSwiped(position: Int)
}ItemTouchHelper.Callback을 상속받는 ItemTouchHelperCallback 클래스를 구현(생성자의 파라미터로 ItemActionListener를 받음)
class ItemTouchHelperCallback(val listener: ItemActionListener) : ItemTouchHelper.Callback(){

    // Drag 및 Swipe 이벤트의 방향을 지정
    override fun getMovementFlags(
        recyclerView: RecyclerView,
        viewHolder: RecyclerView.ViewHolder
    ): Int {
        val dragFlags = ItemTouchHelper.DOWN or ItemTouchHelper.UP
        val swipeFlags = ItemTouchHelper.START or ItemTouchHelper.END
        return makeMovementFlags(dragFlags, swipeFlags)
    }

    // 아이템이 Drag 되면 ItemTouchHelper는 onMove()를 호출함
    override fun onMove(
        recyclerView: RecyclerView,
        viewHolder: RecyclerView.ViewHolder,
        target: RecyclerView.ViewHolder
    ): Boolean {
        listener.onItemMoved(viewHolder.adapterPosition, target.adapterPosition)
        return true
    }

    // 아이템이 Swipe 되면 ItemTouchHelper는 범위를 벗어날 때까지 애니메이션을 적용한 후 onSwiped()를 호출함
    override fun onSwiped(viewHolder: RecyclerView.ViewHolder, direction: Int) {
        listener.onItemSwiped(viewHolder.adapterPosition)
    }

    // 아이템을 길게 누르면 Drag & Drop 작업을 시작해야 하는지를 반환
    override fun isLongPressDragEnabled(): Boolean = true

    // 스와이프하면 Swipe 작업을 시작해야 하는지를 반환
    override fun isItemViewSwipeEnabled(): Boolean = true
}어댑터에서는 ItemActionListener 인터페이스를 구현.
onItemMoved(), onItemSwiped()을 재정의하여 아이템 이동과 제거 코드를 작성한다. 이때 어댑터가 아이템 변경 사항을 인식할 수 있도록 notifyItemMoved(), notifyItemRemoved()를 호출해야 한다.
class ProfileAdapter(private val context : Context, var datas : MutableList<ProfileData>)
    : RecyclerView.Adapter<ProfileViewHolder>(), ItemActionListener {

    //...

    // 드래그해서 위치 이동
    override fun onItemMoved(from: Int, to: Int) {
        if(from == to){
            return
        }
        val fromItem = datas.removeAt(from)
        datas.add(to, fromItem)
        notifyItemMoved(from, to)
    }

    // 스와이프해서 삭제
    override fun onItemSwiped(position: Int) {
        datas.removeAt(position)
        notifyItemRemoved(position)
    }
}RecyclerView가 있는 프래그먼트에서는 ItemDragListener 인터페이스를 구현.
onViewCreated()에서 (액티비티일 경우는 onCreate()) ItemTouchHelperCallback을 파라미터로 하는 ItemTouchHelper를 생성하고 RecyclerView에 연결한다.
ItemTouchHelper.startDrag() 메서드를 호출하는 부분은 굳이 필요한 부분이 아닌 것 같아서 생략함.
private lateinit var itemTouchHelper: ItemTouchHelper

// ItemTouchHelperCallback을 파라미터로 하는 ItemTouchHelper를 생성하고 RecyclerView에 연결
        itemTouchHelper = ItemTouchHelper(ItemTouchHelperCallback(profileAdapter))
itemTouchHelper.attachToRecyclerView(rv_profile)- fragment_me.xml
<com.google.android.material.tabs.TabLayout
        android:id="@+id/tablayout"
        android:layout_width="match_parent"
        android:layout_height="wrap_content"
        app:layout_constraintEnd_toEndOf="parent"
        app:layout_constraintTop_toBottomOf="@+id/tv_introduce"
        android:layout_marginTop="50dp"
        app:tabTextColor="#AFADAD"
        android:background="#000000"
        app:tabIndicatorColor="#E1E1E1"
        app:tabSelectedTextColor="#ffd500">
    </com.google.android.material.tabs.TabLayout>

    <androidx.viewpager.widget.ViewPager
        android:id="@+id/tab_viewpager"
        android:layout_width="match_parent"
        android:layout_height="0dp"
        app:layout_constraintBottom_toBottomOf="parent"
        app:layout_constraintEnd_toEndOf="parent"
        app:layout_constraintStart_toStartOf="parent"
app:layout_constraintTop_toBottomOf="@+id/tablayout" >- MeFragment.kt
val tabAdapter = TabAdapter(childFragmentManager)
        tab_viewpager.adapter = tabAdapter

        // Tablayout과 연동
        tablayout.setupWithViewPager(tab_viewpager)
        tablayout.apply {
            getTabAt(0)?.text = "INFO"
            getTabAt(1)?.text = "OTHER"
}- RequestSignIn.kt
data class RequestSignIn(
    val email: String,
    val password : String
)- ResponseSignIn.kt
data class ResponseSignIn(
    val status: Int,
    val success : Boolean,
    val message : String,
    val data: SomeData
)

data class SomeData(
    val email: String,
    val password: String,
    val userName: String
)- SignInInterface.kt
interface SignInInterface {
    @Headers("Content-Type:application/json")
    @POST("/users/signin")
    fun requestSignIn(@Body body: RequestSignIn): Call<ResponseSignIn>
}- SignServiceImpl.kt
object SignServiceImpl {
    private const val BASE_URL = "http://15.164.83.210:3000/"
    private val retrofit : Retrofit = Retrofit.Builder()
        .baseUrl(BASE_URL)
        .addConverterFactory(GsonConverterFactory.create())
        .build()

    val signinservice : SignInInterface = retrofit.create(SignInInterface::class.java)
    val signupservice : SignUpInterface = retrofit.create(SignUpInterface::class.java)
}- SignInActivity.kt
// 서버 통신
                SignServiceImpl.signinservice.requestSignIn(
                    RequestSignIn(
                        email = et_id.text.toString(),
                        password = et_pw.text.toString()
                    )
                ).enqueue(object : Callback<ResponseSignIn> {
                    override fun onResponse(
                        call: Call<ResponseSignIn>,
                        response: Response<ResponseSignIn>
                    ) {
                        if (response.isSuccessful) {
                            Toast.makeText(this@SignInActivity, "로그인 되었습니다.", Toast.LENGTH_SHORT).show()
                            val intent = Intent(this@SignInActivity, MainActivity::class.java)
                            startActivity(intent)
                        }else {
                            showError(response.errorBody())
                        }
                    }
                    override fun onFailure(call: Call<ResponseSignIn>, t: Throwable) {
                        Toast.makeText(this@SignInActivity, "로그인 실패", Toast.LENGTH_SHORT).show()
                    }
})- PracticeInterface.kt
interface PracticeInterface {
    @GET("/api/users?page=2")
    fun requestPractice(): Call<ResponsePractice>
}- PortFolioFragment.kt
override fun onViewCreated(view: View, savedInstanceState: Bundle?) {
        super.onViewCreated(view, savedInstanceState)

        var datas: MutableList<ProfileData> = mutableListOf<ProfileData>()

        // 서버 연결
        profileAdapter= ProfileAdapter(view!!.context, datas)


        // 어댑터에 context 객체를 파라미터로 전달 (더미)
//        profileAdapter = ProfileAdapter(view.context)

        rv_profile.adapter = profileAdapter
        rv_profile.layoutManager = LinearLayoutManager(view.context)

        // 서버 요청
        PracticeServiceImpl.service.requestPractice(
        ).enqueue(object : Callback<ResponsePractice> {
            override fun onFailure(call: Call<ResponsePractice>, t: Throwable) {
                Log.d("연습용 서버 연결 실패", "${t}")
            }

            override fun onResponse(
                call: Call<ResponsePractice>,
                response: Response<ResponsePractice>
            ) {
                // 통신 성공
                if (response.isSuccessful) {   // statusCode가 200-300 사이일 때, 응답 body 이용 가능
                    Log.d("받아온 데이터 ", response.body()!!.data.toString())

                    var i: Int = 0
                    for (i in 0 until response.body()!!.data.size) {

                        datas.apply {
                            add(
                                ProfileData(
                                    email = "${response.body()!!.data[i].email}",
                                    first_name = "${response.body()!!.data[i].first_name}",
                                    avatar = "${response.body()!!.data[i].avatar}"
                                )
                            )
                        }
                        profileAdapter.notifyDataSetChanged()
                    }
                } else {
                    Log.d("연습용 서버 연결 실패2", "${response.message()}")
                }
            }
})- ProfileViewHolder.kt
    fun onBind(profiledata : ProfileData){
        title.text = profiledata.first_name
        subtitle.text = profiledata.email
        Glide.with(itemView).load(profiledata.avatar).into(photo)

//        //더미용
//        title.text = profiledata.title
//        subtitle.text = profiledata.subtitle

        //프로필 아이템 버튼 클릭 이벤트 (상세정보)
        profile_item.setOnClickListener(object :View.OnClickListener {
            override fun onClick(v: View?) {
                val context: Context = v!!.context
                val detailIntent = Intent(v!!.context, ProfileDetatilActivity::class.java)

                detailIntent.putExtra("title",profiledata.first_name)
                detailIntent.putExtra("subtitle",profiledata.email)

//                detailIntent.putExtra("title",profiledata.title)
//                detailIntent.putExtra("subtitle",profiledata.subtitle)
                context.startActivity(detailIntent)
            }
})- ProfileAdapter.kt
/ 서버 연동
class ProfileAdapter(private val context : Context, var datas : List<ProfileData>) : RecyclerView.Adapter<ProfileViewHolder>() {

// 더미
//class ProfileAdapter (private val context : Context) : RecyclerView.Adapter<ProfileViewHolder>() {
//    var data = mutableListOf<ProfileData>()

...

//    override fun getItemCount(): Int = data.size
//
//    override fun onBindViewHolder(holder: ProfileViewHolder, position: Int) {
//        holder.onBind(data[position])
//    }

    override fun getItemCount(): Int = datas.size

    override fun onBindViewHolder(holder: ProfileViewHolder, position: Int) {
        holder.onBind(datas[position])
}구현 방식은 성장과제1과 유사함.
카카오 api 주소 https://developers.kakao.com/docs/latest/ko/daum-search/dev-guide#search-doc
-> 해시값 알아오기 (코드 참고)
-> @headers로 키값 넣어주고 @query로 검색할 키워드 넣을 수 있게 함.
-> SettingFragment.kt에서 edittext의 addTextChangedListener을 이용하여 텍스트 변화를 감지한다. 변화가 감지될 때마다 loadDatas(searchtext.toString())를 통해 서버와 통신을 하게 된다


