Welcome to "Develop using AI powered code suggestions using GitHub Copilot and VS Code"! 👋
Copilot works with many code editors including VS Code, Visual Studio, JetBrains IDE and Neovim. This skill will focus on leveraging GitHub Codespaces with Copilot. It is recommended you complete the GitHub skill Codespaces before moving forward with this skill.
Additionally GitHub Copilot is trained on all languages that appear in public repositories. For each language, the quality of suggestions you receive may depend on the volume and diversity of training data for that language
Using Copilot inside a Codespace shows just how easy it is to get up and running with GitHub's suite of Collaborative Coding tools.
We recommend opening another browser tab to work through the following activities so you can keep these instructions open for reference.
- Navigating back to your Code tab of your repository, click the Add file drop-down button, and then click
Create new file. - Type or paste the following in the empty text field prompt to name your file.
.devcontainer/devcontainer.json
- In the body of the new .devcontainer/devcontainer.json file, add the following content:
{
    // Name this configuration
    "name": "Codespace for Skills!",
    "customizations": {
        "vscode": {
            "extensions": [
                "GitHub.copilot"
            ]
        }
    }
}
-
Click Commit changes and then select Commit changes directly to the
mainbranch. -
Create a new codespace by navigating to the landing page of your repository.
-
Click the Code button located in the middle of the page.
-
Click the Codespaces tab on the box that pops up.
-
Click the Create codespace on main button.
Wait about 2 minutes for the codespace to spin itself up.
-
Verify your codespace is running. The browser should contain a VS Code web-based editor and a terminal should be present such as the below:
-
The
copilotextension should show up in the VS Code extension list. Click the extensions sidebar tab. You should see the following: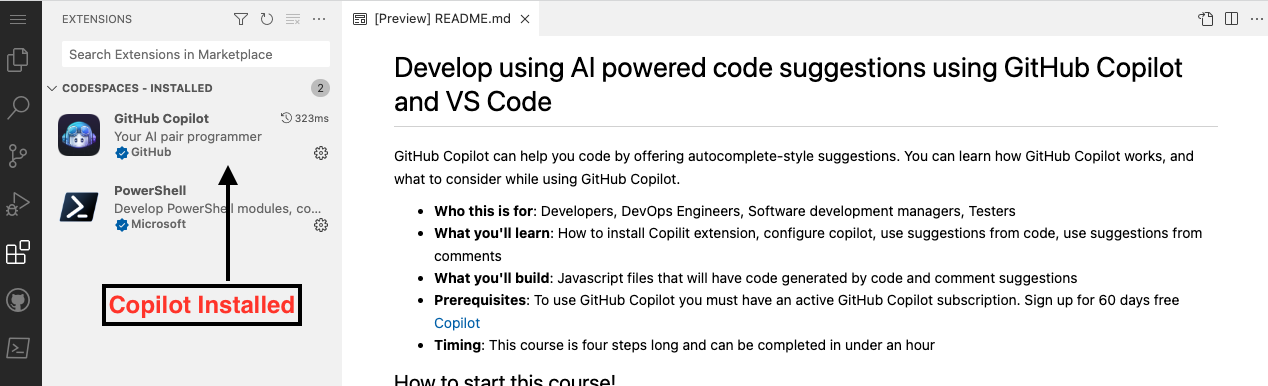
Wait about 20 seconds then refresh this page for the next step
Nice work! 🎉 You created a Codespace and have Copilot installed!
GitHub Copilot provides suggestions for numerous languages and a wide variety of frameworks, but works especially well for Python, JavaScript, TypeScript, Ruby, Go, C# and C++. The following samples are in JavaScript, but other languages will work similarly.
Let's try this out utilizing Javascript for Copilot.
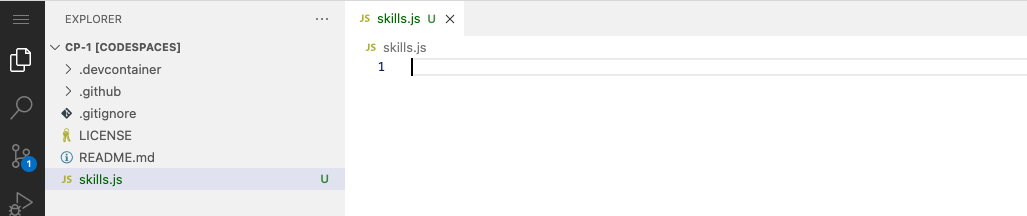
- From inside the codespace in the VS Code explorer window, create a new file. Note: If you closed the Codespace from above please open it back up or create a new Codespace.
- Name the file
skills.js - Verify your new file looks like:
- In the
skills.jsfile, type the following function header. GitHub Copilot will automatically suggest an entire function body in grayed text, as shown below. The exact suggestion may vary.
function calculateNumbers(var1, var2)
5.Accept the suggestion, press Tab.
- Use the VS Code source control tab to add the file and push back to the repository:
- In the message box type:
Copilot first commit
- Select the arrow next to the
Commitdrop down - Select `commit and sync. Should look like this:

- Select
Yeswhen asked toWould you like to stage all your changes and commit them directly?. - Select
Ok, don't show againwhen prompted for:This action will pull and push commits from and to "origin/main".
Wait about 60 seconds then refresh your repository landing page for the next step.
Nice work Seeing AI code suggestions in a Javascript file ✨
You may not want any of the initial suggestions GitHub Copilot offers. GitHub Copilot will show you multiple suggestions in a new tab.
- From inside the codespace in the VS Code explorer window, select the
skills.jsfile. Note: If you closed the Codespace from above please open it back up or create a new Codespace. - Add a new line below the end of the
calculateNumbersfunction. - Type
function skillsMember - Stop typing and view the Copilot suggestion.
- Hover over the red squiggly and select the
... - Click
Open GitHub Copilot. Copilot will synthesize around 10 different code suggestions. You should see something like this:
- Find a solution you like and click
Accept Solution. 7. Yourskills.jsfile will be updated with your solution.
- Use the VS Code source control tab to add the file and push back to the repository:
- In the message box type:
Copilot second commit
- Select the arrow next to the
Commitdrop down - Select `commit and sync. Should look like this:
- Select
Yeswhen asked toWould you like to stage all your changes and commit them directly?.
Wait about 60 seconds then refresh your repository landing page for the next step.
Nicely done utilizing the Copilot tab! 🥳
You now have leveraged the Copilot quick tab auto-suggest as well as the Copilot hub to accept AI generated suggestions.
Now lets see how you can leverage comments to generate Copilot suggestions!
- From inside the codespace in the VS Code explorer window, create a new file. Note: If you closed the Codespace from above please open it back up or create a new Codespace.
- Name the file
comments.js - Type the following comments into the file:
// Create a web server
- Press
enterto go to a new line - Copilot will suggest a code block.
- Hover over the red squggly and select the
... - Click
Open GitHub Copilot. Copilot will synthesise around 10 different code suggestions. You should see somethig like this: - Find a solution you like and click
Accept Solution. 7. Yourskills.jsfile will be updated with your solution.
- Use the VS Code source control tab to add the file and push back to the repository:
- In the message box type:
Copilot third commit
- Select the arrow next to the
Commitdrop down - Select `commit and sync. Should look like this:
- Select
Yeswhen asked toWould you like to stage all your changes and commit them directly?.
Wait about 60 seconds then refresh your repository landing page for the next step.
Congratulations friend, you've completed this course!

Here's a recap of all the tasks you've accomplished in your repository:
- You've learned how to set up Copilot inside a Codespace.
- You've learned how to use Copilot to accept suggested code.
- You've learned how to use Copilot's hub for alternate suggestions.
- You've learned how to leverage comments to have Copilot auto-suggest code.
- Copilot for Individuals
- Copilot for Business
- Getting started with Copilot
- Configure Copilot settings
- We'd love to hear what you thought of this course.
- Learn another GitHub skill.
- Read the Get started with GitHub docs.
- To find projects to contribute to, check out GitHub Explore.
Get help: TBD-support • Review the GitHub status page
© 2022 TBD-copyright-holder • Code of Conduct • CC-BY-4.0 License