-
Notifications
You must be signed in to change notification settings - Fork 311
client side
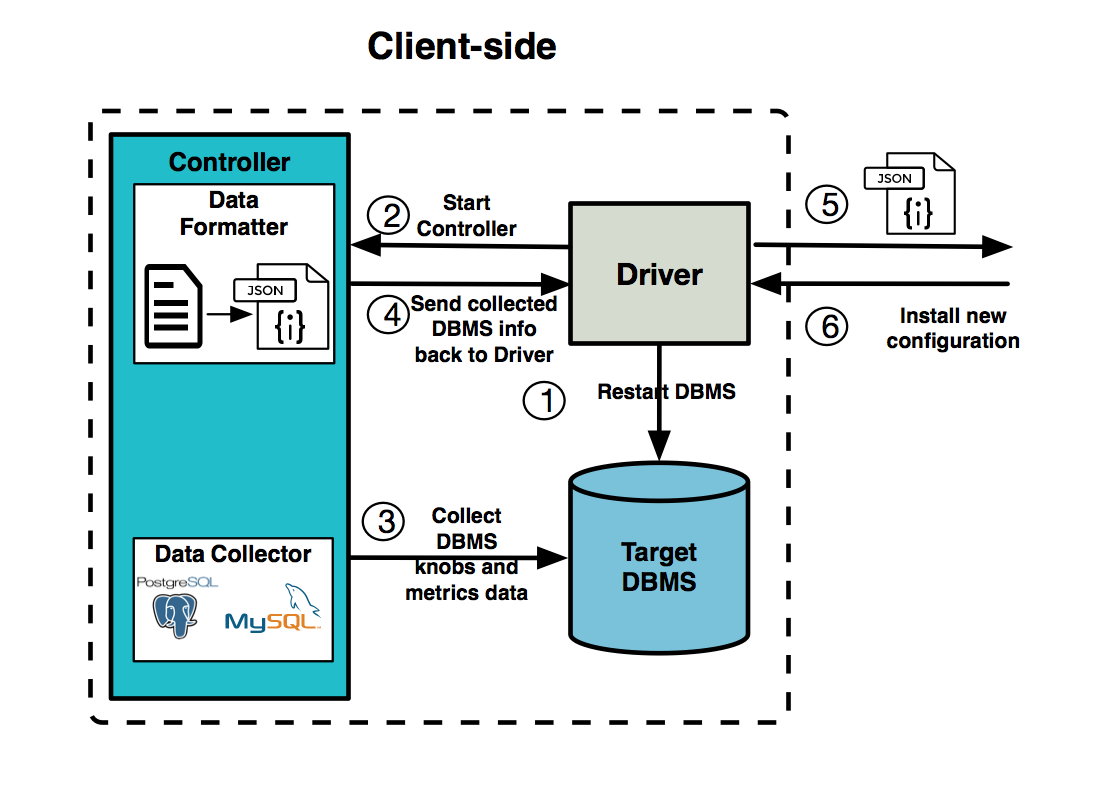
The client side consists of a driver and a controller. The driver controls all the control flow of the client's side and the controller collects DBMS knobs and metrics data.

- 1 - The driver first clears cache and restarts the database. It also checks the disk usage exceeds the maximum usage (a threshold defined by the user). If so, the driver will drop the experiment database and reload the benchmark to ensure there is enough space to carry out the experiment and for the controller to collect DBMS knobs and metrics data.
- 2 - The driver then runs the
oltpbenchmarkas a background job.oltpbenchmarkis a benchmark suite for relational databases (https://github.com/oltpbenchmark/oltpbench) . When the benchmark is ready to begin measurement, the driver sends a signal to the controller to start the experiment and waits for the benchmark to finish. The length of the experiment's observation time is defined in the benchmark configuration file. - 3 - The controller first collects knobs and metrics data before the observation. Then it waits until the driver sends another signal.
- 4 - After the
oltpbenchmarkfinishes its measurement, the driver sends a terminate signal to the controller. Upon receiving the signal, the controller collects the metrics data again. The controller will format all collected knobs and metrics data along with a metadata summary (i.e. database name and version, observation length, start/end time, workload name) as json files and send those files back to the driver. - 5 - The driver uploads all the DBMS data the controller collected to the server. The driver will receive a unique token from the server and use the token to check periodically whether the server has finished with a recommended new configuration.
- 6 - If the server has successfully generated the next configuration, the driver will query the new configuration from the server and install it to the database.
Sample configuration files are under the directory ottertune/client/controller/config/. You need to update the info in your file. Currently you do not need to care about upload_code and upload_url in controller configuration file, because the driver will handle uploading results to the server and you will set them in driver configuration file. To specify the path of controller configuration, you may want to change controller_config in driver configuration.
Driver Configuration file is located at ottertune/client/driver/driver_config.json. It includes your database information, oltpbench information, and controller information. upload_url is the url of OtterTune server website, upload_codeis unique in each session of the server website. You can set save_path to save collected information of target DBMSs for each trial loop.
Currently we use oltpbench to run workloads in the observation period (default is 5mins). You may change OLTP-Bench configuration to update workload information. The path can be specified in oltpbench_config in the driver configuration. Notice that you should also increase max_connections in the database configuration if you increase scale_factor or terminal in the OLTP-Bench configuration.
You can follow the instruction here to build Oltp-Bench and load the database.
ant
./oltpbenchmark -b tpcc -c config/tpcc_config_postgres.xml --create=true --load=true
After setting the above three configurations, you can run the loop in the description above. In each loop, it collects target DBMS info, uploads to the server, gets new recommended configuration, installs the config and restarts DBMS. Users can continue to run loops until they are satisfied with the recommended configuration. Functions are defined in the driver file ottertune/client/driver/fabfile.py
fab loop runs one single loop. fab run_loops:max_iter=10 runs 10 loops. You can set max_iter to change the maximum iterations.
See Linux Quick Start in the Wiki Page.