Development Setup
We're going over the course of this tutorial to program and build a simple program for the bitbox console on ubuntu. I'm trying it on a 16.04 Ubuntu, so adapt accordingly.
Please note that you can compile under Haiku OS or even Windows
We're going to get a build environment to compile to ARM Cortex M4 bare metal, including the compiler, the libraries and a command line debugger.
First, make sure that the standard gcc / make / ... are present for your computer. We will not use gcc to target the board, but to build the emulator versions of the games. However, make will be used to build both the bitbox binaries and the host-platform (emulated) binaries for the games/kernels.
Next, we're going to install a cross compiler, namely a version of GCC running on the PC but targeted at our console, with no OS or libs to use. We're going to use the excellent work done by the gcc arm embedded team, which makes the process a breeze. It's already in the mainstream Ubuntu repositories.
First, install some development tools; open a terminal and input
    sudo apt-get update
    sudo apt-get install build-essential git
    sudo apt-get install arm-gcc-none-eabi
    sudo apt-get install python-imaging # or alternatively, apt install python pip ; pip install pillow
    sudo apt-get install libsdl1.2-dev
The last one is useful for creating the emulated versions of your games/kernels.
Get the sample bitbox SDK on the website, either via a git clone https://github.com/makapuf/bitbox --recursive or download the source and untar it. Whatever directory you choose, do an export BITBOX=/absolute/path/to/the/bitbox in your .bashrc file, and make sure to source ~/.bashrc to add a BITBOX environment variable.
Then do a cd $BITBOX and type make. If successful, congratulations, you just built your first bitbox applications! If not, make sure you have all the necessary libraries/programs installed, and that echo $BITBOX displays the path to your bitbox SDK.
You will also notice in the root bitbox SDK directory: the main files are under lib and kernel, and each application has its own subdirectory. You can compile other applications by entering them and typing make.
As mentioned earlier, the standard make for each project will build an emulated version binary (with a name given by the NAME variable in the Makefile) for your host platform. You can test it out by running ./NAME, where you should substitute the NAME you gave your project.
Internally, the emulator also exposes the same functions defined in kernel.h. Which means that the same game can be played on the host platform or on the board - up to a certain point...
To upload to the board, the simplest (but least flexible) route is to put files on the microSD card. You will flash the main memory from here. The first bootloader (whose role is only to load the second one on the card) will not be modified, but you will be flashing the main Flash. So you cannot modify the 1st_boot bootloader, but you can modify the 2nd_boot bootloader as well as upload games to play.
The remainder of this article deals with more hardware intensive options. You can use a stlink debug interface (main option now) or directly to the board using USB dfu protocol.
You will need a stlinkv2-compatible discovery board for that. Those can be inexpensive boards from ST, useful for experimenting with STM MCUs. (not necessarily an stm32f4 one)
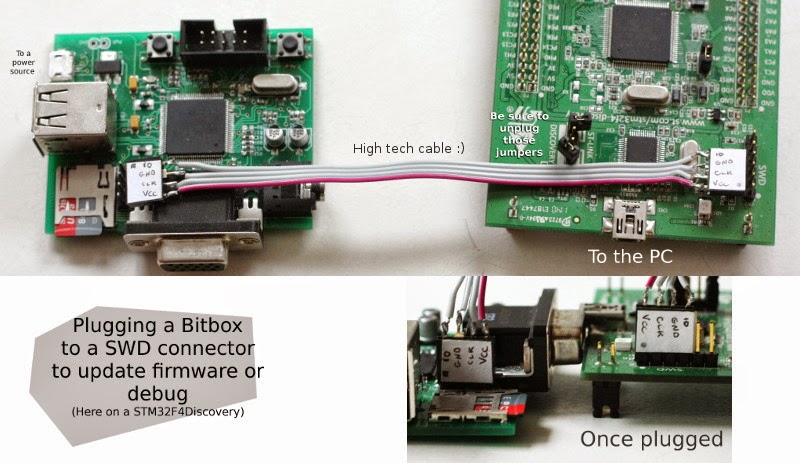
Connect the 4-pin SWD interface to the SWD interface of bitbox and the power from the Discovery to your board. Beware that the connexions on the bitbox are (as rev 0.1) gnd-IO-Clk-Vcc, while the connectors on the Discovery are Vdd, CLK, Gnd, IO.
Disconnect the two jumpers on the Discovery to let it program the bitbox instead of the embedded microcontroller.
- first, download stlink from texane (https://github.com/texane/stlink), compile it & install it.
- use st-flash to flash the binary file to SRAM or Flash
example commands (see the whole tutorial on flashing there)
st-flash write mygame.bin 0x08004000 # for flash, after it's done flashing then reset
You can also use make stlink in the game directory and it will do the above command for you.
Note there is GUI option also in the recent versions of stlink, but makapuf has exposed most of the useful commands through make.
Note : this part has to be refined and developed !!
- boot on the bootloader
- use dfu-util on the binary
Bitbox can be flashed using just an USB connection to your PC with no additional hardware.
Here are the instructions :
- solder the solder jumpers SJ1 and SJ2 on the back of the board. They are there because you shouldn't have it plugged at the same time as USB2 ; so beware !
- Plug the micro USB to a PC to bitbox using a micro USB cable
- Connect the jumper on the top of the board, close to the VGA connector. This will pull the BOOT0 Up (it is normally pulled down). BOOT1 is always pulled down.
- Reset your board.
The STM32f4 states that:
The hardware required to put the STM32F4xx into System memory boot mode consists of any circuitry, switch or jumper, capable of holding the BOOT0 pin high and the BOOT1 pin low during reset.
Well, that's just what we did. So the box can accept connections from USB
(next steps are valid on linux ubuntu)
- if it's not present, install the dfu-util software using
sudo apt-get install dfu-util
-check your board connection with
> dfu-util -l
or lsusb, where a line like
Bus 003 Device 083: ID 0483:df11 STMicroelectronics STM Device in DFU Mode
will appear
- then you can load a dfu file or a bin file ! Example (thanks to marcus) :
> sudo dfu-util -d 0483:df11 -c 1 -i 0 -a 0 -s 0x08000000 -D testkernel.bin
(you can use the micropython udev rules linked hereafter to omit the sudo thing ..)
useful pointers :
- https://github.com/micropython/micropython/wiki/Board-STM32F407-Discovery
- http://dfu-util.gnumonks.org/
- http://www.st.com/web/en/resource/technical/document/application_note/CD00167594.pdf
Optionally, if you have a st-link v2 compatible board, you will be able to connect and inspect your dev board live. You'll be able to see it all on the device it self, it's 1e100 times more easier than "LED debugging" ...
- Step by step running, hardware breakpoints ? Check.
- SRAM Memory value access ? check.
- Flash value reading ? Check.
- Hardware counter values & configuration ? check.
- Hardware DMA configuration & values read ? check.
- Read / Set Pins values ? check
You get the idea : since everything is mapped in memory and you have access to read memory.
run st-util from texane (see uploading to the board) in a separate terminal which will be serving on port 4242 locally
st-util
then run arm-none-eabi-gdb & connect to the remote:
arm-none-eabi-gdb
(gdb) target extended-remote :4242
(I like to have a "make debug" ready in my command files to check I'm debugging the right binary) Don't forget to load your binary in .elf format to the device
load mygame.elf
If you just modified your source code, you can do
make
load
run
don't forget to build your binaries including debug symbols with -g
Sometimes, run won't do anything. Thus, just try to (c)ontinue and press reset on the board. The program is stopped at reset : position you breakpoints (using br by example) and type continue (or just c).
then position breakpoints, disp values (including using stm32f4xx.h types direct from memory, ex :
p *(GPIO_Type*) 0x4002000) to see all GPIOA registers
To run step by step in your code, just run it and then press Ctrl-C. You'll have access to the command line so you can p(rint) values (in the current stack frame), bt to see backtrace, up / down to move up/down the call stack, s(tep) one line, dis(assemble) current values ...
There is a GDB cheatsheet in the list of links below.
Those links will help you understand how to setup such a toolchain (hint, the right google query is "toolchain linux stm32")
http://www.wolinlabs.com/blog/linux.stm32.discovery.gcc.html http://fun-tech.se/stm32/ http://www.triplespark.net/elec/pdev/arm/stm32.html (beware they're using JTAG )
http://darkdust.net/files/GDB%20Cheat%20Sheet.pdf
You can proceed to use the kernel in Kernel Tutorial, or start downloading games from Software Index, understanding their source, and/or playing them!