-
Notifications
You must be signed in to change notification settings - Fork 66
JACK_and_Openlase_Configuration
Jack is a sound server that allows channeling of realtime audio and MIDI data between applications. Each application that uses the JACK audio server for communications has input and/or output sockets according to if the application needs to send/transmit audio samples.
The easiest way to use Jack is via the qjackctl gui. You can install this as follows:
sudo apt-get install qjackctl
After installation, launch it
qjackctl
The following window will be displayed:
Click on the "Setup..." button.
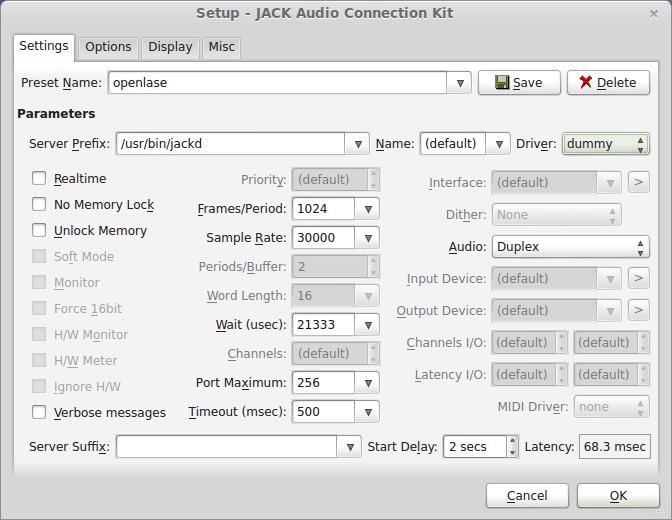
- The "Frames/Period" box is the number of "samples" to send per interval. If set too low, you may run out of samples. A value > 512 is a good idea, but will depend on your defined Sample rate.
- The "Sample Rate" box should be set to the "Kpps" rate of your galvos. Typically you can cheat and and use higher values (e.g. with 20kpps galvos you can run 30 or even 48kpps rates, but you will have to shrink the output size of your display.
- In the "Preset Name" box, enter a name for your openlase configuration.
- When done, click the "Save" button and then click the "Ok" button to close the setup window.
Click the start button for the JACK server in the main qjackctl window now.
If you fired up OpenLase without assigning any connections, you were probably very disappointed with the lack of results! Before anything will talk to anything else you need to let the JACK server know what sockets to connect to what other sockets. Think of yourself as an operator at an old telephone exchange...
The easiest way to do this is probably to first launch the applications you want to connect. This saves you the effort of having to type in some information later. Head to the openlase folder and run the following in different terminal windows:
Note: If you get the message "Cannot lock down 82274202 byte memory area (Cannot allocate memory)" you may need to add yourself to the audio group THEN LOG OUT. This can be done via the following in Mint/Ubuntu:
sudo usermod -a -G audio <your username>
- Launch an example, in this case the spinning cube. Anything that generates laser output content uses libol to include this example.
cd build/examples && ./simple - Launch the output application which allows you to modify the size, geometry, inversion, and laser power of displays.
cd build/output && ./output - Launches the simulator application which displays in an opengl window what the laser display will roughly look like.
cd build/tools && ./simulator - If you have a dedicated laser dac such as a Lasershark
- connect the device and launch whatever host application is used to communicate with the hardware.
- For simplicity's sake, set the driver to "dummy" if you don't need audio, otherwise select what sound system you plan to use (Generally ALSA).
- If you are using a soundcard dac
- Make sure the Driver is set to whatever sound system you plan to use (Generally ALSA).
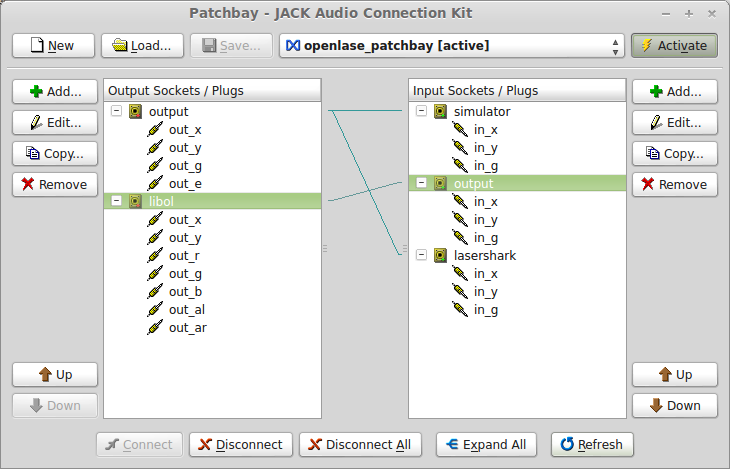
Once all of the applications have launched, click the "Patchbay" button in the main qjackctl window by dragging and dropping . Within this window you can connect what inputs go to what outputs. For OpenLase you will want to:
- Click the add button for "Output Sockets / Plugs"
- Set name to "output"
- Set client to "output"
- Click The "Add Plug" button until there are no plugs left to add.
- Click the "Ok Button"
- Click the add button for "Output Sockets / Plugs"
- Set name to "libol"
- Set client to "libol"
- Click The "Add Plug" button until there are no plugs left to add.
- Click the "Ok Button"
- Click the add button for "Input Sockets / Plugs"
- Set name to "simulator"
- Set client to "simulator"
- Click The "Add Plug" button until there are no plugs left to add.
- Click the "Ok Button"
- Click the add button for "Input Sockets / Plugs"
- Set name to "output"
- Set client to "output"
- Click The "Add Plug" button until there are no plugs left to add.
- Click the "Ok Button"
- Add an output for a dedicated laser DAC or soundcard by repeating the "Input Socket / Plugs" process.
With the sockets/plugs created, now it's time to connect them together so they do something:
- Drag the "output" socket atop of the "simulator" socket. A line should connect the two.
- Drag the "output" socket atop of the dedicated laser DAC or soundcard socket. A line should connect the two.
- Drag the "libol" socket atop of the "output" socket. A line should connect the two.
Now you can save this configuration so you can easily load it later:
- Click the "Save..." button
And finally activate this configuration:
- Click the "Activate" button
That's it! When you are done the results should look similar to these:


