Mints Automobile Sensing Kit
-
Rasberry Pi 2WH
-
Pi Sugar 3 Power Manage
-
Toggle Switch
-
Sensors
- COZIR AH : Uart Only : UART (default)
- PiSugar and Clock : I2c : I2c Bus 1 (default)
- IPS7100 : I2c or Uart : I2c Bus 3
dtoverlay=i2c-gpio,bus=3,i2c_gpio_delay_us=1,i2c_gpio_sda=27,i2c_gpio_scl=22Connecting the secondary I2C devices to gpio pins 27(13) and 22(15).
- BNO085 : I2c, SPI and Uart : I2c Bus 4
dtoverlay=i2c-gpio,bus=4,i2c_gpio_delay_us=1,i2c_gpio_sda=23,i2c_gpio_scl=24Connecting the tertiary I2C devices to gpio pins 23(16) and 24(18).
- BME280 : I2c : I2c Bus 5
- TMP117 : I2c : I2c Bus 5
dtoverlay=i2c-gpio,bus=5,i2c_gpio_delay_us=1,i2c_gpio_sda=05,i2c_gpio_scl=06Connecting the tertiary I2C devices to gpio pins 05(29) and 06(31).
- PA1010D : I2c, SPI and Uart : I2c Bus 6
dtoverlay=i2c-gpio,bus=6,i2c_gpio_delay_us=1,i2c_gpio_sda=25,i2c_gpio_scl=26Connecting the secondary I2C devices to gpio pins 25(22) and 26(37).
-
Add an extra I2c Pipeline On the to /boot/config.txt add the following lines via
sudo nano /boot/config.txt.
dtoverlay=i2c-rtc,ds3231
# Extra i2c port
dtoverlay=i2c-gpio,bus=3,i2c_gpio_delay_us=1,i2c_gpio_sda=27,i2c_gpio_scl=22
dtoverlay=i2c-gpio,bus=4,i2c_gpio_delay_us=1,i2c_gpio_sda=23,i2c_gpio_scl=24
dtoverlay=i2c-gpio,bus=5,i2c_gpio_delay_us=1,i2c_gpio_sda=05,i2c_gpio_scl=06
dtoverlay=i2c-gpio,bus=6,i2c_gpio_delay_us=1,i2c_gpio_sda=25,i2c_gpio_scl=26
- Check Devices
sudo i2cdetect -y 1
sudo i2cdetect -y 2
sudo i2cdetect -y 3
sudo i2cdetect -y 4
sudo i2cdetect -y 5
Inspired by this link
Download Rasberry Pi Imager to your PC via this link.
wget https://dwservice.net/download/dwagent.sh
chmod +x dwagent.sh
sudo ./dwagent.sh
Follow the on screen instructions
curl http://cdn.pisugar.com/release/pisugar-power-manager.sh | sudo bash
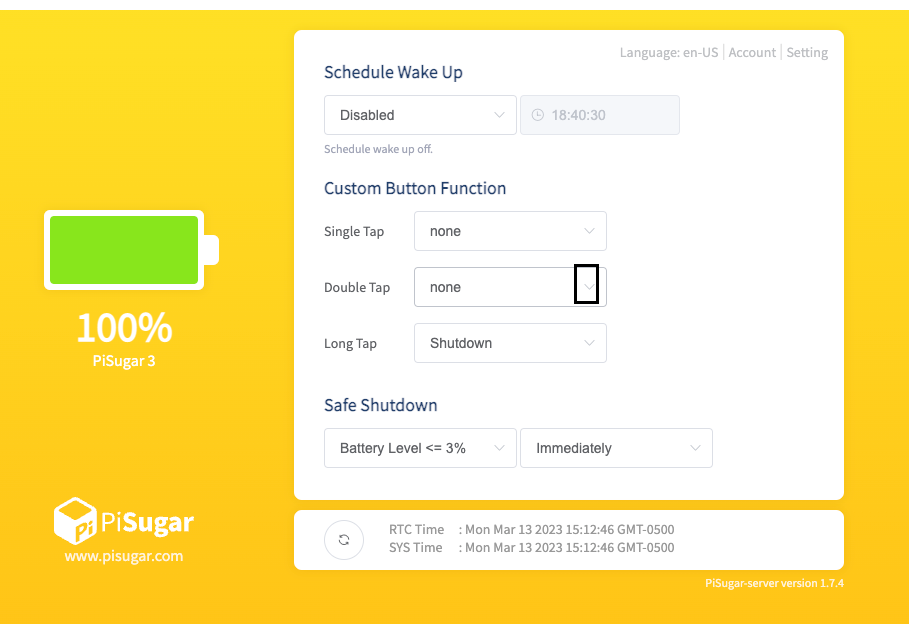
After the installation finishes - Go to the http://:8421 page and update the RTC Clock on the PI Sugar 3
To manually change the settings, edit the kernel command line with sudo nano /boot/cmdline.txt. Find the console entry that refers to the serial0 device, and remove it, including the baud rate setting. It will look something like console=serial0,115200. Make sure the rest of the line remains the same, as errors in this configuration can stop the Raspberry Pi from booting.
- Add dwservice tag
- Start the rasberry pi via main power
- update both the rtc as well as the pi time via the pisugar interface
-
Using the rasberry pi imager do an sd card image
-
Using Raspi Config, enable Wi-Fi, I2C and the serial Port.
sudo raspi-config
- Check wpa_supplimant file
sudo nano /etc/wpa_supplicant/wpa_supplicant.cpnf
-
Reboot the Pi
sudo reboot -
Install dwservice
https://www.dwservice.net/download/dwagent.sh
chmod +x dwagent.sh
sudo ./dwagent.sh
- clone the git repo
mkdir gitHubRepos
- Install pisugaru SW
curl http://cdn.pisugar.com/release/pisugar-power-manager.sh | sudo bash
- Update pisugar SW
curl https://cdn.pisugar.com/release/PiSugarUpdate.sh | sudo bash
- Add an extra I2c Pipeline
On the to /boot/config.txt add the following lines
dtoverlay=i2c-gpio,bus=4,i2c_gpio_delay_us=1,i2c_gpio_sda=23,i2c_gpio_scl=24And connect the secondary I2C devices to gpio pins 23(16) and 24(18).
sudo nano /boot/config.txt
- Update pi sugar
curl https://cdn.pisugar.com/release/PiSugarUpdate.sh | sudo bash
curl https://cdn.pisugar.com/release/PiSugarUpdate.sh | sudo bash
  pip3 install adafruit-circuitpython-gps
  pip3 install adafruit-extended-bus
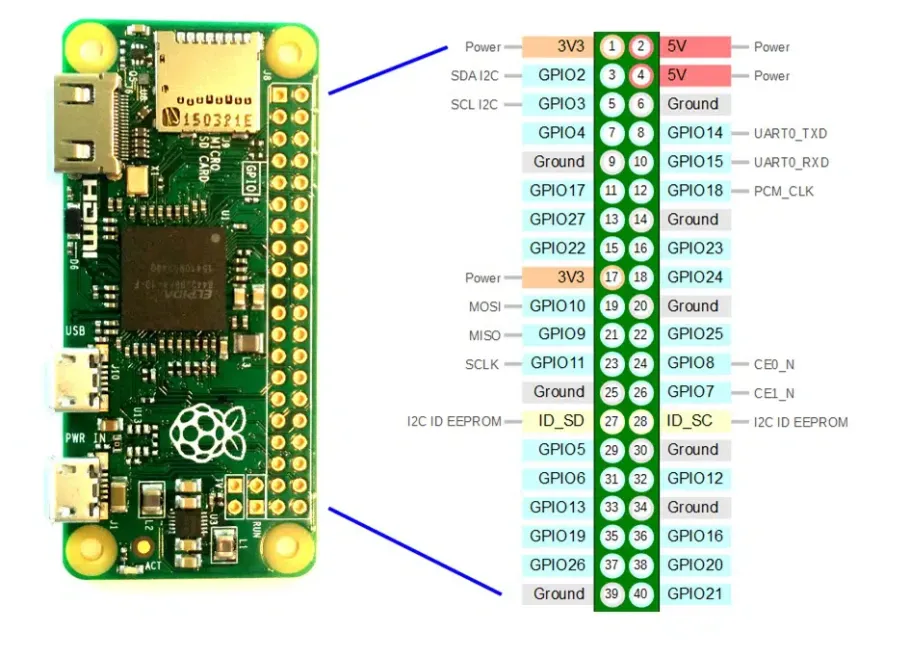
Note:GPIO pins are not header numbers
The pin diagrams for the rasbery pi zero are given below:

For RTC Problems
https://learn.adafruit.com/adding-a-real-time-clock-to-raspberry-pi/set-rtc-time
This guide covers how to set up NTP (Network Time Protocol) for synchronizing time from internet servers and configure an RTC (Real-Time Clock) on your Raspberry Pi for fallback timekeeping when the internet is unavailable.
First, install NTP to synchronize time from a time server:
sudo apt update
sudo apt install ntp
By default, NTP will sync time from internet time servers. You can configure custom time servers by editing the NTP configuration file if needed.
- Install and Configure the RTC If you haven't already set up an RTC on your Raspberry Pi, follow these steps:
Install I2C tools if needed:
sudo apt-get install i2c-toolsCheck if the RTC is detected on the I²C bus:
sudo i2cdetect -y 1Add the RTC module to the system:
Add the following to /boot/firmware/config.txt
dtparam=i2c_arm=on
dtoverlay=i2c-rtc,ds3231
Replace ds3231 with your RTC model if needed Reboot:
sudo rebootRemove fake-hwclock, which can interfere with your RTC:
sudo apt-get remove fake-hwclock
sudo update-rc.d -f fake-hwclock remove
Initialize the RTC with the correct time if necessary:
sudo hwclock -wYou can check the time with:
sudo hwclock -r- Configure Fallback to RTC Ubuntu should already try to use NTP by default and fall back to the RTC if no internet is available. However, you can automate this by ensuring that the RTC syncs with the system time when the system boots and when no internet is available.
Check Time on Boot: To sync time from the RTC on boot, add the following to/lib/udev/hwclock-set:
Find these lines:
if [ yes = "$BADYEAR" ] ; then
    /sbin/hwclock --rtc=$dev --hctosys --badyear
else
    /sbin/hwclock --rtc=$dev --hctosys
fi
Add the command to prevent the system from resetting the RTC time:
/sbin/hwclock --hctosysPeriodically Sync with RTC: Add a cron job to sync with the RTC if NTP fails. Edit the crontab:
sudo crontab -eAdd the following:
*/10 * * * * /sbin/hwclock --hctosys >/dev/null 2>&1
This will check the RTC every 10 minutes and set the system clock if the internet is unavailable.
- Verify Everything Works You can verify that the system uses NTP when internet is available by running:
timedatectl status
This will show whether the time is synced over NTP or from the RTC.
By using these steps, your Raspberry Pi will automatically synchronize time from the internet when available and fall back to the RTC when it isn't.
-
Install NTP and RTC Make sure you've already installed NTP and set up your RTC as described in the previous instructions.
-
Sync RTC Time from System Time When the internet is available, the system time will be updated automatically by NTP. To sync this updated system time to the RTC, you can use the hwclock command.
To set the RTC time based on the current system time:
sudo hwclock -w
This command writes the system time (which should be accurate after NTP sync) to the RTC.
- Automate RTC Time Update on Internet Availability You can automate this process by detecting if the internet is available and then syncing the RTC time. You can add this logic in a script or a cron job that periodically checks for internet connectivity.
Script Example: Sync RTC if Internet is Available Create a script to check for internet availability and update the RTC if connected:
Create a new script:
sudo nano /usr/local/bin/update-rtc.sh
Add the following script:
#!/bin/bash

# Check for internet connectivity by pinging Google DNS
if ping -c 1 8.8.8.8 &> /dev/null
then
    echo "Internet is available. Syncing system time to RTC..."
    sudo hwclock -w
else
    echo "No internet connection. Skipping RTC sync."
fi
Make the script executable:
sudo chmod +x /usr/local/bin/update-rtc.sh
- Schedule the Script to Run Periodically To ensure that the RTC gets updated automatically when the internet is available, you can use a cron job to run the script at regular intervals.
Open the crontab:
sudo crontab -e
Add a cron job to run the script every 10 minutes (or at your desired interval):
*/10 * * * * /usr/local/bin/update-rtc.sh
This will check for internet connectivity every 10 minutes and update the RTC if the internet is available.
- Verify the Setup After creating the script and cron job, you can test the script manually:
sudo /usr/local/bin/update-rtc.sh
If the internet is available, the RTC time will be updated from the system time. The cron job will ensure that this happens automatically at regular intervals.
