This is a project done in the course applied robotics. It's about a mobile roboter, which has a mounted camera on it. This camera is used to slam with ORB_SLAM2 . The roboter is controlled by a differential drive and has a distance measurement, which is used for speed and pose determination. ROS-Kinetic is used to bring all parts together. It is testet with Ubuntu Mate 16.04.2 LTS, both at the master and at the raspberry pi.
This project debends on ORB_SLAM2 and fin_ws. The following manual will lead you trough the installation procedure.
Run this procedure at the master computer and also at the raspberry pi. On the raspberry pi it will only install ROS and pigpio library and fin_ws. The standard password we used was
fhv
- Maybe you need to install git first
sudo apt-get update && sudo apt install git - You need to create a folder named workspace in
~/, for examplemkdir ~/workspace - clone this repo to your computer and to the raspberry pi
cd ~/workspace git clone https://github.com/pasrom/Applied-Robotics-Project.git cd Applied-Robotics-Project/installScripts - run
install.shto automatically install ROS and ORB_SLAM2 with all its dependencies.maybe you have to make it executable first./install.shchmod +x install.sh - Go grab ☕ ☕ ☕ ...
First start the roscore
roscore
Following command is starting ORB_SLAM2, Camera republisher, rviz, roboter pose updater, map creator and rqt gui
roslaunch fin_starter Master.launch
rosrun image_transport republish compressed in:=/camera/image_raw raw out:=/camera/camera_eigen
rosrun ORB_SLAM2 Mono Vocabulary/ORBvoc.txt Examples/Monocular/Logitech640x480.yaml
rosrun ORB_SLAM2 Monosub2 20 1 10 -15 20 -10 0.55 0.50 1 5 0 0 1 75
roslaunch nav_behaviors nav_behaviors.launch
roslaunch fin_description fin_rviz.launch
ssh into your raspberry pi. If you use two raspberry pi's, one for motor control and one for camera streaming, open for each a seperate ssh.
ssh raspy@192.168.0.105
ssh raspy@192.168.0.106
This has to be done the first time:
$user is your username, created at the raspberry pi. Also make sure, that therre is only one username, otherwise the script may fail.
su root
/home/$user/workspace/Applied-Robotics-Project/installScripts/add_bashrc.sh
Raspberry Pi 1
Starting the motor, the distance measurement and motor velocities publisher
su root
roslaunch fin_starter raspyMotor.launch
Raspberry Pi 2
open again a ssh to your second raspberry pi and start the camera starting fisheye camera:
su root
roslaunch fin_starter raspyCamFisheye.launch
starting normal camera:
roslaunch fin_starter raspyCam.launch
If you want to change the IP-address of the master you can do it in this script. Here is the line:
MASTER_IP=192.168.0.107
roslaunch video_stream_opencv camera.launch
roslaunch fin_description fin_interface.launch
Make sure, that the environment variables are set correctly.
Your ~/.bashrc should look similar like this (scrol to the end of the file):
source /opt/ros/kinetic/setup.bash
. ~/catkin_ws/devel/setup.bash
source ~/fin_ws/devel/setup.bash
. ~/workspace/Applied-Robotics-Project/installScripts/setRosIp.sh
export ROS_PACKAGE_PATH=${ROS_PACKAGE_PATH}:/home/roman/workspace/ORB_SLAM2/Examples/ROS
Important is, that the line export ROS_PACKAGE_PATH=... is at the end.
Changed ~/.bashrc
After you added or changed a environment variable in ~/.bashrc you have to start a new terminal to activate them.
Virtual Machine
If you are using a virtual machine, make sure you turned of the 3D acceleration. Otherwise the ORB_SLAM2 will not work, because Pangoling throws an error.
Not enough memory
If building is throwing errors, first check if there is enough memory left. If not, run this script.
sudo ./createSwapfile.sh
Camera starting throws error
Unplug and plug in the usb camera connector.
Not on this list
Please feel free to open an issue.
This is a quick start guide to install the raspberry pi image on a SD card (mac).
sudo diskutil list
search for the /dev/diskX entry
sudo diskutil unmountDisk /dev/disk2
sudo ddrescue -c 1Ki -v --force ubuntu-mate-16.04.2-desktop-armhf-raspberry-pi.img /dev/rdisk2
Backup your SD with ddrescue
sudo ddrescue -c 1Ki -v --force /dev/rdisk2 ubuntu-mate-16.04.2_ROS.img
- Follow the instructions given on the screen
- Connect to the wifi
- At the dialog indow "Who are you"
check the following
- Log in automatically
- Require my password to log in
- Reboot
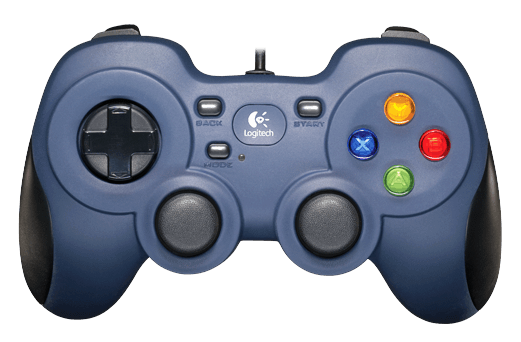
With the Logitech Controller it is possible to send a twist message to the roboter. With the left joystick you steer the roboter, but you have to press the LB Button during steering. The LB Button also resets the trajectory, this means the controller has higer priority than the trajectory. The RB Button will reset the ORB SLAM2, the odometry of the roboter and also the scale factor of the published ORB SLAM2 messages.
To calibrate the camera follow this link and this link for stereo calibration.
It is good to calibrate the camera at the laptop or computer and NOT at the raspberry pi, because it is slow.
For the ORB SLAM2 there is one more step to do. You have to extract following values out of the camera.yaml file after calibration .
camera_matrix:
fx 0 cx
0 fy cy
0 0 1

distortion_coefficients:
d0 d1 d2 d3 0

.........
and insert these values in the Logitech640x480.yaml file located at /ORB_SLAM2/Examples/Monocular/Logitech640x480.yaml
%YAML:1.0

#--------------------------------------------------------------------------------------------
# Camera Parameters. Adjust them!
#--------------------------------------------------------------------------------------------

# Camera calibration and distortion parameters (OpenCV)
Camera.fx: fx
Camera.fy: fy
Camera.cx: cx
Camera.cy: cy

Camera.k1: d0
Camera.k2: d1
Camera.p1: d2
Camera.p2: d3
Camera.k3: 0.0

.........
If you are using another fisheye camera with libuvc-camera you have to change two parameters in this script. The idVendor and idProduct has to be changed (without the hex notation).
sudo echo SUBSYSTEMS=="usb", ENV{DEVTYPE}=="usb_device", ATTRS{idVendor}=="05a3", ATTRS{idProduct}=="9230", MODE="0666" > /etc/udev/rules.d/99-uvc.rules
The idVendor and idProduct values you will get with the following command
lsusb -v
Search for your camera, coppy and paste the mentioned parameters.
Follow this link and you will be happy to start with ROS.