Automatic image caption generator is a widely used deep learning application that combines convolutional neural network and recurrent neural network to allow computer vision tasks being described in written statement and/or in sound of text.
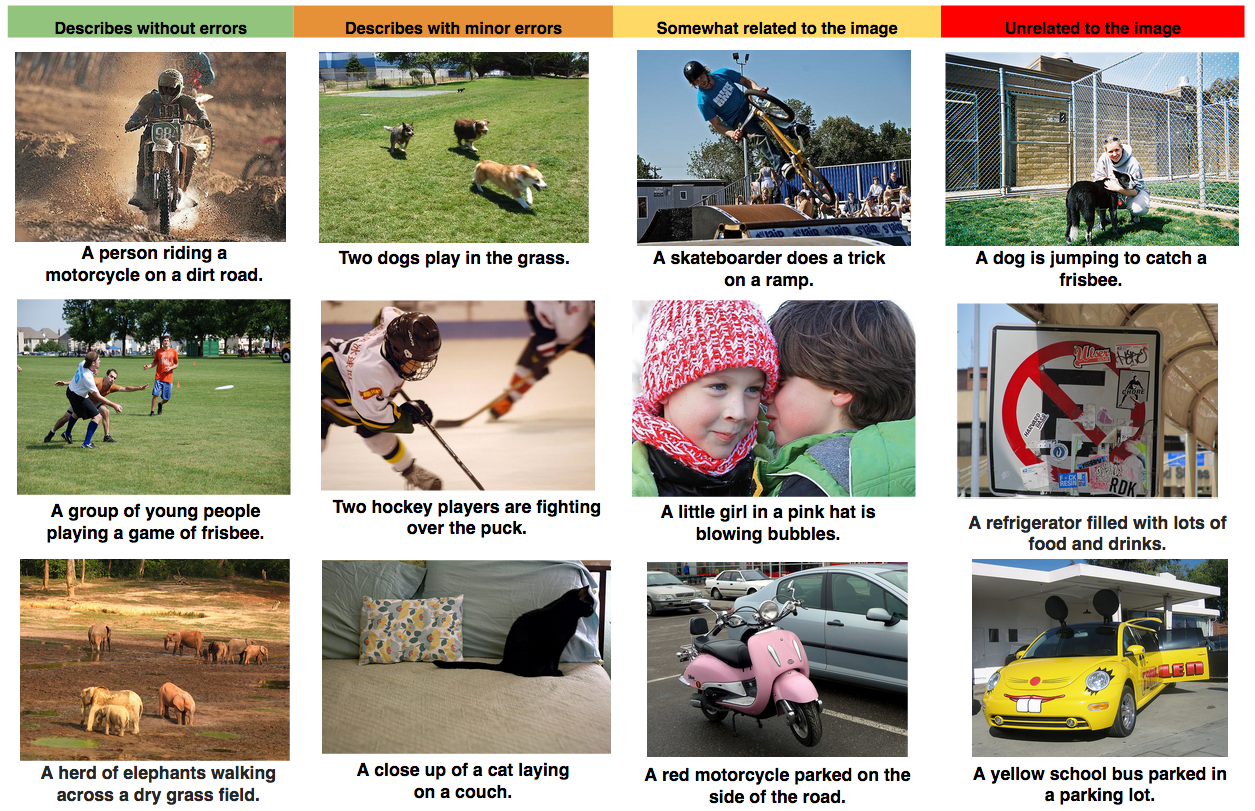
The precision of a complex scene description requires a deeper representation of what's actually going on in the scene, the relation among various objects as manifested on the image and the translation of their relationships in one natural-sounding language. Many efforts of establishing such the automatic image captioning generator combine current state-of-the-art techniques in both computer vision (CV) and natural language processing (NLP) to form a complete image description approach. We feed one image into this single jointly trained system, and a human readable sequence of words used to describe this image is produced, accordingly. Below shows you how this application can translate from images into words automatically and accurately.
Before you begin, ensure you have met the following requirements:
- You have installed
Jupyter Notebooksfor offline analysis. There're two options to setup the Jupyter Notebooks locally: Docker container and Anaconda. You will need a computer with at least 4GB of RAM. - Alternatively, you can run all tasks online via
Google Colab. Google has released its own flavour of Jupyter called Colab, which has free GPUs! - You have a
Windows/Linux/Macmachine.
To install Automatic Image Caption Generator, follow these steps:
To install Docker container with all necessary software installed, follow
instructions After that you should see a Jupyter page in your browser.
We highly recommend to install docker environment, but if it's not an option, you can try to install the necessary python modules with Anaconda.
- First, install Anaconda with Python 3.5+ from here.
- Download
conda_requirements.txtfrom here. - Open terminal on Mac/Linux or "Anaconda Prompt" in Start Menu on Windows and run:
conda config --append channels conda-forge
conda config --append channels menpo
conda install --yes --file conda_requirements.txt
To start Jupyter Notebooks run jupyter notebook on Mac/Linux or "Jupyter Notebook" in Start Menu on Windows.
After that you should see a Jupyter page in your browser.
- If you have a Linux host you can try these instructions for Docker
- The easiest way is to go with Anaconda setup, that doesn't need virtualization and thus works with a GPU on all platforms (including Windows and Mac). You will still have to install NVIDIA GPU driver, CUDA toolkit and CuDNN (requires registration with NVIDIA) on your host machine in order for TensorFlow to work with your GPU. It can be hard to follow, so you might choose to stick to a CPU version, which is also fine for the purpose of this course.
Google has released its own flavour of Jupyter called Colab, which has free GPUs!
Here's how you can use it:
- Open link, click Sign in in the upper right corner, use your Google credentials to sign in.
- Click GITHUB tab, paste link and press Enter
- Choose the notebook you want to open
- Click File -> Save a copy in Drive... to save your progress in Google Drive
- Click Runtime -> Change runtime type and select
GPUin Hardware accelerator box - Execute the following code in the first cell that downloads dependencies (change for your week number):
! shred -u setup_google_colab.py
! wget https://raw.githubusercontent.com/hse-aml/intro-to-dl/master/setup_google_colab.py -O setup_google_colab.py
import setup_google_colab
setup_google_colab.setup_week6()
- If you run many notebooks on Colab, they can continue to eat up memory, you can kill them with
! pkill -9 python3and check with! nvidia-smithat GPU memory is freed.
Known issues:
- Blinking animation with
IPython.display.clear_output(). It's usable, but still looking for a workaround.
-
Usage to use automatic image caption generator, follow these steps so that we can prepare resources inside Jupyter Notebooks (for local setups only):
- Click New -> Terminal and execute: git clone link On Windows you might want to install Git You can also download all the resources as zip archive from GitHub page.
- Close the terminal and refresh Jupyter page, you will see intro-to-dl folder, go there, all the necessary notebooks are waiting for you.
- First you need to download necessary resources, to do that open
download_resources.ipynband run cells for Keras and your week.
Now you can open a notebook by cloning this repo (for help see this tutorial).
-
-
Set-up environment: run setup_google_colab.py
- run
setup_commonfunction where keras_utils.py, download_utils.py and tqdm_utils.py are downloaded viadownload_github_codefunction - run
download_github_codefunction to download utils.py that is in specific use for automatic image caption generator - run
download_utilsfile to download image embedding pickles, compressed image and caption zip files - run
setup_kerasfunction to execute download_utils file wheredownload_all_keras_resourcesfunction downloads pre-trained inceptionV3 model
- run
-
Prepare data (Extract image features/Extract captions for images) by extracting image and caption samples from compressed files
- run
download_utils.pyto download train2014_sample.zip and val2014_sample.zip - images:
- write
get_cnn_encoderfunction to obtain one selective pre-trained model without the classifier pre-trained InceptionV3 model for CNN encoder
- get training and validation images through apply_model function where corresponding embedding features to images are extracted
- write
- captions:
- write
get_captions_for_fnsfuntion to create one dictionary where key stands for each image's file name, and value is a list of corrsponding captions to one specific kay image - write
show_trainig_examplefunction to look at training example (each has 5 captions)
- write
- run
-
image pre-processing and text cleaning (Prepare captions for training) RNN should be conditioned on images to generate image captions behaving as RNN initial hidden state

- captions:
- write
split_sentencefunction to split one sentence into tokens, i.e. lowercased words - write
generate_vocabularyfunction to select most frequent tokens that occur 5 times or more from training captions - write
caption_tokens_to_indicesfunction to construct a multi-layer of arrays in which each associated caption with one given photo image is chopped into an array of words. Every image allows up to 5 arrays of semented tokens (words), every of which hasSTARTandENDtokens being added from head and tail of one tokenized caption, respectively.captions argument is an array of arrays: [ [ "image1 caption1", "image1 caption2", ... ], [ "image2 caption1", "image2 caption2", ... ], ... ] [ [ [vocab[START], vocab["image1"], vocab["caption1"], vocab[END]], [vocab[START], vocab["image1"], vocab["caption2"], vocab[END]], ... ], ... ]batch_captionsturns out to be an array of arrays: [ [vocab[START], ..., vocab[END]], [vocab[START], ..., vocab[END]], ... ] - write
batch_captions_to_matrixfunction to convertbatch_captionsinto an equal length ofmatrixfor every given image. Since associated captions with one given image might have different lengths, we addPADtoken to make shorter caption(s) become as long as the longest caption.
Input example: [[1, 2, 3], [4, 5]] Output examples: 1. if max_len=None or 100 np.array([[1, 2, 3], [4, 5, pad_idx]]) 2. if max_len=2 np.array([[1, 2], [4, 5]]) - write
- captions:
-
model training (Training)
- write
decoderclass in which we compute cross-entropy betweenflat_ground_truthandflat_token_logitspredicted by LSTMdecoderclass describes how one specific type of RNN architectures, LSTM (Long Short Term Memory), works
- use
bottleneckhere to reduce the number of parameters : image embedding -> bottleneck -> LSTM initial state - use
bottleneckhere to reduce model complexity : LSTM output -> logits bottleneck -> logits for next token prediction - embed all words (word -> embedding) to be used as LSTM input of ground truth tokens :
word_embedsas context for next token prediction - know all inputs for LSTM and can get all the hidden states with one tensorflow operation (tf.nn.dynamic_rnn)
- calculate
token_logitsfor all the hidden states step-by-step as follows: (1) calculate logits for next tokens (2) predict next tokens for each time step (3) need to know where we have real tokens (notPADtoken) (4) not propagate outputPADtokens for the loss computation : fill with 1.0 for real, non-PADtokens and 0.0 otherwise - compute cross-entropy between
ground_truthandtoken_logitspredicted by LSTM : averagexentover tokens with nonzeroloss_maskso that we don't account misclassification ofPADtokens which were added simply for the batching purpose - define optimizer operation to minimize the loss
- save/load network weights
- use
- write
generate_batchfunction to generate a random batch of sizebatch_sizevia random sampling of images and captions for them
- write
-
model application to testing samples (Applying)
- write
final_modelclass which works as follows:- take an image as an input and embed it : run
get_cnn_encoderto pass images through CNN encoder in order to obtain image embedding files - condition LSTM on that embedding : run
decoderclass to initialize LSTM state being conditioned on images - predict the next token given a START input token : run
decoderclass to get current word embedding being passed to LSTM cell to produce new LSTM states - use predicted token as an input at next time step : run
decoderclass to compute logits and probabilities for next token - iterate until you predict an END token :
one_stepyields probabilities of next token and meanwhile updates LSTM hidden state
- take an image as an input and embed it : run
- write
generate_captionfunction to generate caption for given image - write
apply_model_to_image_raw_bytesandshow_valid_examplefunctions to look at validation prediction example
- write
-
-
Files This repository consist of multiple files:
capstone_project_image_caption_generator.ipynb-- main task, read and worksetup_google_colab.py-- initialize environmental settings and call python codes as belowutils.py-- execute image pre-processing and embedding feature extraction to save and read embedding files for future usekeras_utils.py-- prepare keras functions useful for model trainingdownload_utils.py-- download all necessary files, e.g. python codes and compressed data samplestqdm_utils.py-- show the completion progress of model-training tasks
-
Dataset
- train images
- validation images
- train and validation captions
- train sample images: train2014_sample.zip
- validation sample images: val2014_sample.zip


To contribute to automatic image caption generator, follow these steps:
- Fork this repository.
- Create a branch:
git checkout -b <branch_name>. - Make your changes and commit them:
git commit -m '<commit_message>' - Push to the original branch:
git push origin AutomaticImageCaptionGenerator/<location> - Create the pull request.
Alternatively see the GitHub documentation on creating a pull request.
- Multi-layered Perceptions (MLPs)
- Convolution Neural Networks (CNN)
- Recurrent Neural Networks (RNN)
- Transfer Learning
- Gradient Descent
- Backpropagation
- Overfitting
- Probability
- Text Processing
- Traditional Image Processing Techniques, e.g. use of OpenCV, Scikit-image (skimage)
- Python (3.x)
- Pandas, jupyter
- Keras (2.2 or higher)
- TensorFlow (as backend)
- TensorFlow.compat.v1 (disable_v2_behavior)
- Scikit-learn
- Matplotlib
- NumPy
The idea of creating one image caption generator originates from the machine translator among languages. For instance, one recurrent neural network (RNN) transforms a sentence in French into an array of vector representation, and another separate recurrent neural network takes this vector representation as an input and then transforms it in German. We can mimic this machine translator idea to some extent. For the sake of producing the image caption, the first recurrent neural network used to convert a sentence into a vector is now replaced with one convolutional neural network (CNN) which is in use for object detection and classification. Generally speaking, the last densely connected layer of one convolutional neural network is fed into the final softmax classifier, assigning a probability that each likely object as displayed in a image. What if we detach this softmax classifier layer, and we instead regard the last densely connected layer as one rich image embedding layer, being encoded by this pretrained convolutional neural network. This image embedding layer now behaves as the input vector representation, and it's thus fed into one recurrent neural network that is designed to produce phases. Afterward, we can then train one entire single CNN-RNN jointly system directly through a bag of images and associated captions with images. By maximizing the likelihood between ground-truth captions and recurrent neural network predictions, descriptions that recurrent neural network produces to best match each image's captions can be picked up.

- image and caption data pre-processing, along with tokenized caption cleaning
- image feature extraction from pre-trained model
- LSTM model training to predict tokenized caption with image features as initial hidden state
- Why is CNN (if MLP available)?
- What're modern CNN architectures?
- How is CNN architecture built up from scratch?
If you want to contact me you can reach me at jencmhep@gmail.com.