02 Data Management
For using factgenie, you need to have a dataset you will be working with. You also need to obtain the corresponding generated outputs.
Let us first dive into these concepts!
A dataset is represented by a Python class. The class can load the examples (from the local filesystem or from another location), visualize them, and manage the corresponding generated outputs.
Each dataset contains one or more splits. For example, a dataset can have train, dev and test splits, as it is common in a machine learning setup. The splits can be named arbitrarily – they only serve for a more fine-grained data division.
Each split contains 1 to N examples. The examples are our "input data": the data that were presented to the model to generate the output. It is also something that will help the annotators to assess the factual accuracy of the output.
Generally, the examples can be anything that can be displayed in the web interface, from plain text to images, tables, or charts. However, advanced rendering may require writing custom code.
If you are not that familiar with Python and want to use one of the pre-defined data loaders, you need to choose from the several basic data formats we provide the loaders for.
Generated outputs are plain text strings corresponding to input examples.
Each output was generated with a specific setup, for example with a LLM with a particular prompt and a set of hyperparameters.
Later we will learn how to annotate the outputs, i.e. assign categories to specific text spans.
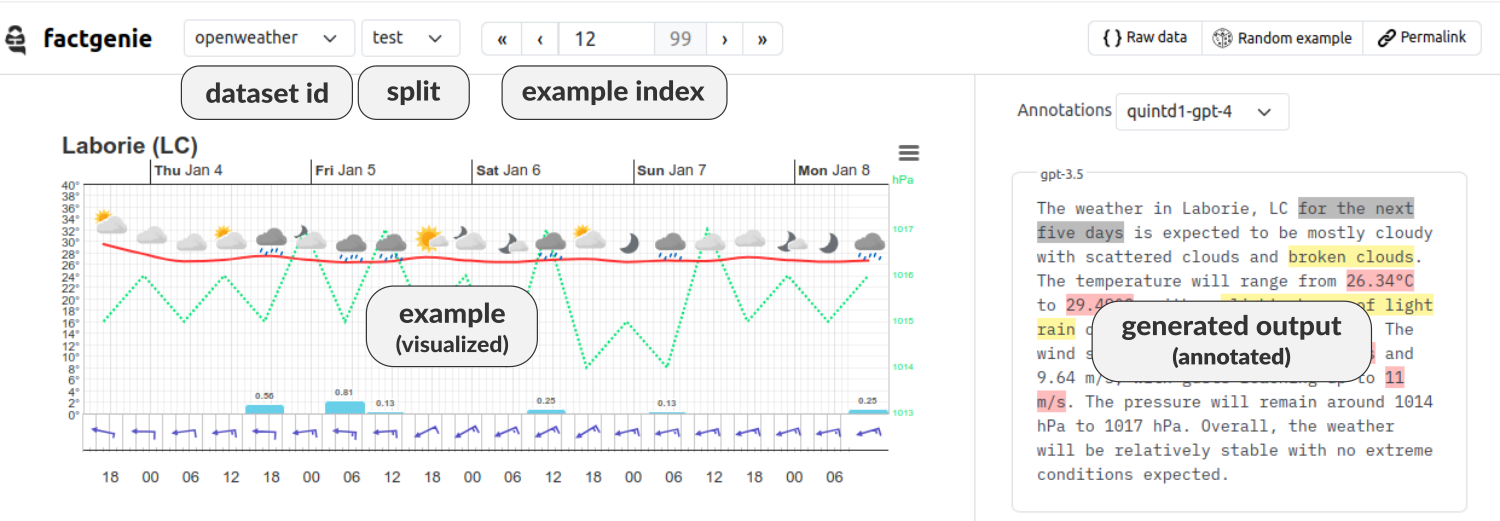
Here is a brief overview of the concepts as displayed on the Browse page in the web interface:
There are two ways how to add your data to factgenie:
- basic: using pre-defined data loaders
- advanced: using custom data loaders
The pre-defined data loaders support a limited set of data visualizations for common formats such as .txt, .jsonl, .csv or .html. If you decide to using the pre-defined loaders, adding a dataset is as simple as uploading the data file through the web interface.
For adding a custom data loaders, you will need to write a Python class implementing the data loader yourself. The advantage is the customizability of the data loading and rendering methods.
For using a pre-defined data loader, navigate to /datasets and select Add dataset. You can select from the following formats:
| Format | Input | Notes |
|---|---|---|
| Text | Plain text file containing one input example per row. | Each row will be displayed as a separate example. If the text contains newlines, make sure to escape them with \n. |
| JSONL | JSONL (JSON Lines) file containing one input example per row. | Each JSON object will be visualized using the json2table package. |
| CSV | CSV file with headers containing one input example per row. | Each row will be displayed as a set of key-value pairs where the values are the row values and the keys are corresponding column headings. |
| HTML | ZIP archive with a set of HTML files in the root directory (and optionally external files). | Each of the HTML pages will be displayed as a separate example. The files will be sorted by name (number-aware sorting). You can include external files by using relative paths, e.g. for images in the ./img subdirectory use <img src="img/xyz.png"/>. |
Note that you will need to upload each split in a separate file.
You can also write your custom data loader. The advantage of writing a custom data loader is that you can load data in arbitrary formats and customize the data visualization to your need.
To write a data loader, you need to:
- Create a new file
<your-module>.pyin factgenie/loaders. - Add a class to
<your-module>.py. The class needs to be a subclass of theDatasetclass from factgenie/loaders/dataset.py. - Implement the
load_data()andrender()methods:
- The
load_data()method receives two arguments:split: stranddata_path: str.- By default, the
data_pathwill be thefactgenie/data/<dataset_id>. You can ignore this argument if you are loading your dataset e.g. from Huggingface Datasets. - The method needs to return a list of examples for the given split.
- By default, the
- The
render()method will receive a specific example and needs to return a string containing a HTML representation of the example.
- Optionally override other methods of the
Datasetclass. - Add your dataset to
factgenie/config/datasets_local.yml(see below).
To make your job easier, we provide a set of example data loaders in factgenie/loaders: see the section Example Datasets below.
There are three ways of adding model outputs to factgenie:
- uploading existing outputs through the web interface,
- uploading existing outputs manually,
- generating new outputs with factgenie.
For adding the model outputs through the web interface, prepare a plain text file with one output per line:
... output for example 1 ...
... output for example 2 ...
.
.
.

... output for example N ...
If the text contains newlines, escape them with \n.
In factgenie, navigate to /model_outputs and select Upload outputs. In the modal window, select the corresponding dataset and split, and input a unique identifier for the outputs.
Note that the total number of lines need to correspond with the total number of examples in the split.
You can add the model outputs also manually by adding them to the factgenie/outputs/<dataset_id>/<split>/<setup_id>/ directory.
First, you can include any information about the setup that was used to generate the outputs in the file metadata.json:
{
    "id": <setup_id>,
    (... other parameters ...)
}
Next, create a subdirectory /files.
In this directory, create one or more JSONL files. Each line of a JSONL file needs to contain an object with the following structure:
{
    "dataset": <dataset_id>,
    "split": <split>,
    "setup_id": <setup_id>,
    "example_idx": <example_idx>,
    "out": <model_output>
}
where example_idx is 0-indexed and links the output to a specific input example.
If you do not have model outputs yet, you can also generate them directly in factgenie.
For more details, see the guide on Generating Outputs.
Factgenie provides a user-friendly web interface for managing both the datasets and model outputs on the /manage page.
You can manage here:
- External resources,
- Datasets,
- Model outputs,
- Annotations.
On the External Resources tab, you can download datasets, model outputs, and annotations demonstrating ways how to handle both basic and more advanced kinds of data.
💡 You are welcome to add more resources here! Please see the Contributing guidelines for more details.
Here is an overview of the resources as of 04/10/2024:
| Dataset | Description | Type | Outputs | Annotations |
|---|---|---|---|---|
| quintd1 | A data-to-text generation dataset. We provide all the five subsets (gsmarena, ice_hockey, openweather, owid, wikidata) with custom visualizations and outputs annotated for semantic errors. |
custom classes | ✅ | ✅ |
| logicnlg | A table-to-text generation dataset (sample of 100 examples) loaded from HuggingFace Datasets. | HF dataset | ✅ | ➖ |
| xsum-debug | A sample of 5 examples from a text summarization dataset. Useful for debugging. | plain text | ✅ | ➖ |
| easy-vqa | A toy visual question answering dataset (sample of 100 examples) using the HTML loader. The dataset demonstrates how to prepare HTML files for displaying external images. | HTML | ➖ | ➖ |
As discussed previously, you can use the web interface for adding new datasets and model outputs in a pre-defined formats.
- For adding a dataset, go to
/manage#localand click on "Add dataset". - For adding model outputs, go to
/manage#outputsand click on "Add model outputs".
You can also manage the existing datasets, model outputs, and annotations here.
The information about local datasets is stored in factgenie/loaders/datasets_local.yml.
The file has the following structure:
<dataset_id>:
  class: <module>.<class> # module is the filename (without .py)
  description: <dataset_description> # can contain HTML tags
  enabled: <boolean>
  splits:
  - <split1>
  - ...
  - <splitN>
You can also manage the datasets manually by editing this file. Note that you need to restart the factgenie server after the edit.