This is the project repo for the final project of the Udacity Self-Driving Car Nanodegree. For more information about the project, see the project introduction here.
| Name | Udacity Account Email |
|---|---|
| Venkata Vishal Kajjam | vishal.kvn(at)gmail.com |
Since this is an individual submission, the code is designed to work with the simulator.
The code mostly follows the walk-throughs, with some additional handling of the simulator lag. The single hardest aspect of the project was dealing with the high resource demands of the simulator. If not enough resources are allocated, the simulator introduces lag, which critically affects driving quality: the position of the car in the video stream does not agree with the reported position of the car, and errors keep accummulating.
As part of the initial run, VirtualBox was used to run ROS. An alternative approach was to use Docker to run ROS with the assumption that if the app is dockerized, it can be run on more poweful hardware in the cloud. Surprisingly the VirtualBox approach had lesser lag compared to the Docker approach. The following setups were used for running the ROS -
- VirtualBox on Host Machine(2.5 GHz Intel Core i7, 16 GB 1600 MHz DDR3, NVIDIA GeForce GT 750M 2 GB Intel Iris Pro 1536 MB)
- Docker Container on Host Machine(2.5 GHz Intel Core i7, 16 GB 1600 MHz DDR3, NVIDIA GeForce GT 750M 2 GB Intel Iris Pro 1536 MB)
- Udacity Workspace
- Docker Container on Paperspace Linux Desktop with RAM: 30 GB, CPUS: 8, HD: 50 GB, GPU: 8 GB.
Both the Udacity Workspace and Containerized Docker approach had more lag compared to the VirtualBox approach. Hence, VirtualBox was used to run ROS.
To reduce the resource demands of the simulator the following steps were taken -
- Turn on camera streaming when the car is less than 300 waypoints to the traffic light
- Process an image at a 20 millsecond interval
- Reduce the Rate of the waypoint updater to 20Hz from 50Hz
The following system architecture diagram shows the ROS nodes and topics used in the project.
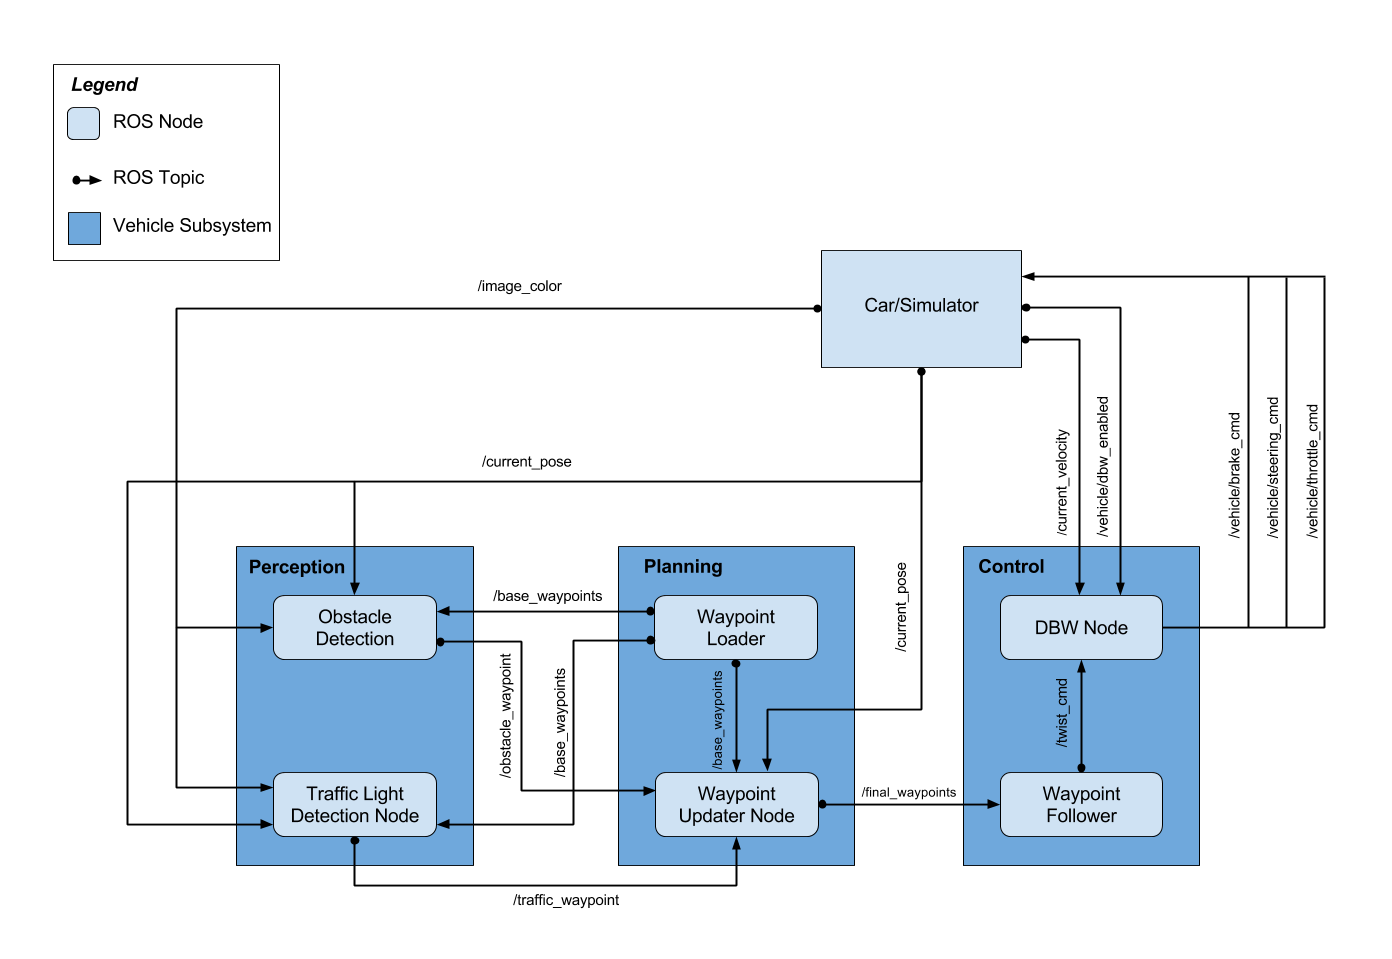
Waypoint Updated node is a part of path planning block, along with the Waypoint Loader node. We have implemented Waypoint Updater node as a part of this project. Waypoint Loader node implementation is already provided. The purpose of this node is to update the target velocity property of each waypoint based on traffic light and obstacle detection data. A waypoint in this case is a data structure that embeds position information along the driving track. These positions serve as target positions for the car. The car will eventually plan its trajectory along the subset of these waypoints.
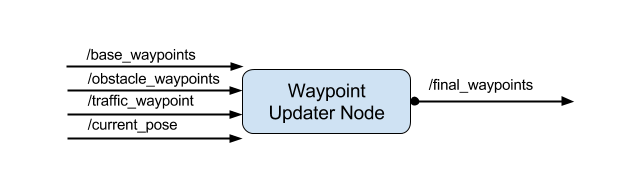
The inputs to the Waypoint Updater node are following topics:
-
/base_waypoints: Base waypoints is a list of all the waypoints along the driving track. These are published to the car only once at the beginning. The car is responsible for figuring out, what waypoints are ahead of its current position. Waypoint Updater gets this input from the Waypoint Loader node.
-
/traffic_waypoint: Waypoint updater receives this waypoint information from the Traffic light detection node. Traffic waypoint is the waypoint at which the car is expected to come to a complete stop. Waypoint Updater node is responsible for planning the velocities for waypoints leading up to the traffic waypoint, so that the car smoothly decelerates and eventually stops at traffic waypoint.
-
/current_pose: This is the current position of the car as reported by the simulator used for testing. Waypoint Updater will use this information to estimate Car's current position relative to the base waypoints
-
/obstacle_waypoints: Waypoint updater can subscribe to this waypoints information from Obstacle Detection node and determine the obstacle positions in terms of their waypoint positions. For the purpose of this project, we are not using this information since the testing is going to be performed in a controlled environment where there will be no obstacles. So the car only has to respect the traffic light states
As an output, the Waypoint Updater node will publish a fixed number of waypoints ahead of the vehicle with the correct target velocities, depending on traffic lights How many waypoints to publish ahead of car's current position depends on various factors such as visibility horizon, driving speed of the car as well as the processing power. In our testing environment we determined that the final waypoints count in the range of 250-300 leads to an acceptable performance. The environment configuration was as follows:
- Host machine: 2.5 GHz Intel Core i7, 16 GB 1600 MHz DDR3, NVIDIA GeForce GT 750M 2 GB Intel Iris Pro 1536 MB
- Guest machine: Udacity provided VM running on VirtualBox
- Simulator running on HOST machine
- ROS running on GUEST machine
- Waypoint updater has subscribed to the following topics:
rospy.Subscriber('/current_pose', PoseStamped, self.pose_cb)
rospy.Subscriber('/base_waypoints', Lane, self.waypoints_cb)
rospy.Subscriber('/traffic_waypoint', Int32, self.traffic_cb)
- The waypoint updater will change waypoints according to the status of the traffic lights and
waypoints will be published using
publish_waypointsAPI usingfinal_waypoints_pubpublisher:
self.final_waypoints_pub = rospy.Publisher('final_waypoints', Lane, queue_size=1)
- Final waypoints are generated from base waypoints in the
generate_lanemethod, that is responsible for returningLaneobject to the final waypoints publisher.- This method makes use of
get_closest_waypoint_idxhelper method, which in turn uses KDTree to determine the closest waypoint index. - Based on the input from Traffic Light Detection node, this method also determines
the target velocities for each waypoint using
decelerate_waypointshelper method
- This method makes use of
Test vehicle will be controlled with drive by wire system, which electronically controls throttle, brake and steering. DBW node implements logic to accept target linear and angular velocities and publish throttle, brake, and steering commands to respective topics. In addition, DBW node outputs can also be turned off and the control can be transferred to the driver using a dedicated flag.
This "drive-by-wire" node subscribes to /twist_cmd message which provides the proposed linear and angular velocities.
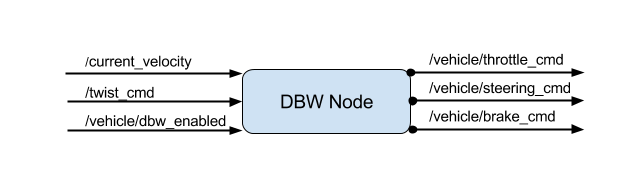
The inputs to the DBW node are following topics:
-
/twist_cmd: Twist commands are published by the waypoint follower node. DBW node subscribes to this topic and produces the required output in terms of throttle, brake, and steering commands.
-
/current_velocity: This is published by the simulator in our case and used by DBW node to determine the linear velocity of the car and provide it to the controller
-
/vehicle/dbw_enabled: This is a status of DBW electronic system that is also published by the simulator in our case. DBW node will use this status to determine whether the brake, throttle and steering are to be published to respective topics or not
Outputs from the DBW node are the throttle, brake and steering commands published to the throttle_cmd, brake_cmd and steering_cmd topics.
Implementation of DBW node is fairly straightforward.
DBW node subscribes to the required topics. In our case, we have subscribed to twist_cmd, current_velocity and /vehicle/dbw_enabled topics:
rospy.Subscriber('/vehicle/dbw_enabled', Bool, self.dbw_enabled_cb)
rospy.Subscriber('/twist_cmd',TwistStamped, self.twist_cb)
rospy.Subscriber('/current_velocity', TwistStamped, self.velocity_cb)
The internal logic in DBW node extracts the necessary information from the twist command and current velocity messages. Such as linear and angular velocity. And publishes to respective topic using publish method as follows:
self.steer_pub = rospy.Publisher('/vehicle/steering_cmd',SteeringCmd, queue_size=1)
self.throttle_pub = rospy.Publisher('/vehicle/throttle_cmd',ThrottleCmd, queue_size=1)
self.brake_pub = rospy.Publisher('/vehicle/brake_cmd',BrakeCmd, queue_size=1)
Transfer learning was used to detect and classify traffic lights. The following models were considered -
- (ssd_mobilenet_v1_coco_2018_01_28)[http://download.tensorflow.org/models/object_detection/ssd_mobilenet_v1_coco_2018_01_28.tar.gz]
- (faster_rcnn_resnet101_coco_2018_01_28)[http://download.tensorflow.org/models/object_detection/faster_rcnn_resnet101_coco_2018_01_28.tar.gz]
Given the resource constraints imposed by the simulator, ssd_mobilenet_v1 was chosen due to it's size and speed with some compromise on accuracy. The detection and classification repo can be found here, TrafficLight_Detection_Classification.
-
Be sure that your workstation is running Ubuntu 16.04 Xenial Xerus or Ubuntu 14.04 Trusty Tahir. Ubuntu downloads can be found here.
-
If using a Virtual Machine to install Ubuntu, use the following configuration as minimum:
- 2 CPU
- 2 GB system memory
- 25 GB of free hard drive space
The Udacity provided virtual machine has ROS and Dataspeed DBW already installed, so you can skip the next two steps if you are using this.
-
Follow these instructions to install ROS
- ROS Kinetic if you have Ubuntu 16.04.
- ROS Indigo if you have Ubuntu 14.04.
-
- Use this option to install the SDK on a workstation that already has ROS installed: One Line SDK Install (binary)
-
Download the Udacity Simulator.
Build the docker container
docker build . -t capstoneRun the docker file
docker run -p 4567:4567 -v $PWD:/capstone -v /tmp/log:/root/.ros/ --rm -it capstoneTo set up port forwarding, please refer to the instructions from term 2
- Clone the project repository
git clone https://github.com/udacity/CarND-Capstone.git- Install python dependencies
cd CarND-Capstone
pip install -r requirements.txt- Make and run styx
cd ros
catkin_make
source devel/setup.sh
roslaunch launch/styx.launch- Run the simulator
- Download training bag that was recorded on the Udacity self-driving car.
- Unzip the file
unzip traffic_light_bag_file.zip- Play the bag file
rosbag play -l traffic_light_bag_file/traffic_light_training.bag- Launch your project in site mode
cd CarND-Capstone/ros
roslaunch launch/site.launch- Confirm that traffic light detection works on real life images
The following resources were hugely helpful in understanding and completing the project -
- Tutorial for using Tensorflow API for object detection and classification
- Great write up on using Tensorflow 1.4 and the appropriate version of Tensorflow API https://github.com/alex-lechner/Traffic-Light-Classification#linux
- https://becominghuman.ai/traffic-light-detection-tensorflow-api-c75fdbadac62
A lot of time was spent trying to figure out the following error when the simulator was trying to connect to the Docker conatiner the ROS -
File "/capstone/ros/src/styx/server.py", line 44, in control bridge.publish_controls(data) File "/capstone/ros/src/styx/bridge.py", line 145, in publish_controls self.publishers['steering_report'].publish(self.create_steer(steering)) File "/capstone/ros/src/styx/bridge.py", line 102, in create_steer st.steering_wheel_angle_cmd = val * math.pi/180.AttributeError: 'SteeringReport' object has no attribute 'steering_wheel_angle_cmd'
The fix for this error is to use install the dbw_mkz_msgs module in the /ros/src folder of the application. The dbw_mkz_msgs module can be found in the udacity workspace or from the (here)[https://github.com/vishal-kvn/CarND-Capstone/tree/docker/ros/src/dbw_mkz_msgs]