-
Notifications
You must be signed in to change notification settings - Fork 571
basic tutorial
This tutorial does not assume any existing Ray-MMD knowledge.
We will teach you how to render a picture with MikuMikuDance and Ray-MMD in this tutorial. You will learn the basics of how to install and use Ray-MMD in this tutorial. After mastering this knowledge, you will have a deeper understanding of Ray-MMD.
hint
This tutorial is for users who prefer to learn while doing. If you prefer to learn some concepts from scratch, please refer to other documents.
You will find that this tutorial and the documentation are complementary.We assume that you are already familiar with basic computer usage, including how to browse the web, download files, and decompress compressed packages. In addition, we assume that you are already familiar with MikuMikuDance and MikuMikuEffect.
Hereinafter, we referred to as MikuMikuDance as MMD, and referred to as MikuMikuEffect as MME.
First, make sure that the operating system installed on your computer is the 64-bit version of Windows 7 and above, and install MikuMikuDance (64-bit 926 and above) and the MikuMikuEffect plug-in. Ray-MMD can only pass the test on the 64-bit version 926 and above of mikumiudance, other versions are not guaranteed to run perfectly. Therefore, if your MikuMikuDance version does not meet the requirements, we recommend that you re-download MikuMikuDance and install MikuMikuEffect.
At this point, you are ready, let us first get a general understanding of Ray-MMD!
Ray-MMD is a real-time rendering special effect tool set developed for MikuMikuDance. The rendering special effect tool set mainly uses physically-based rendering and adds as many user-configurable parameters as possible to meet the style and effect needs of different users. Physically Based Rendering (PBR) refers to the use of shading/lighting models based on physical principles and micro-plane theory modeling, and the use of surface parameters measured from reality to accurately represent the rendering concept of real-world materials.
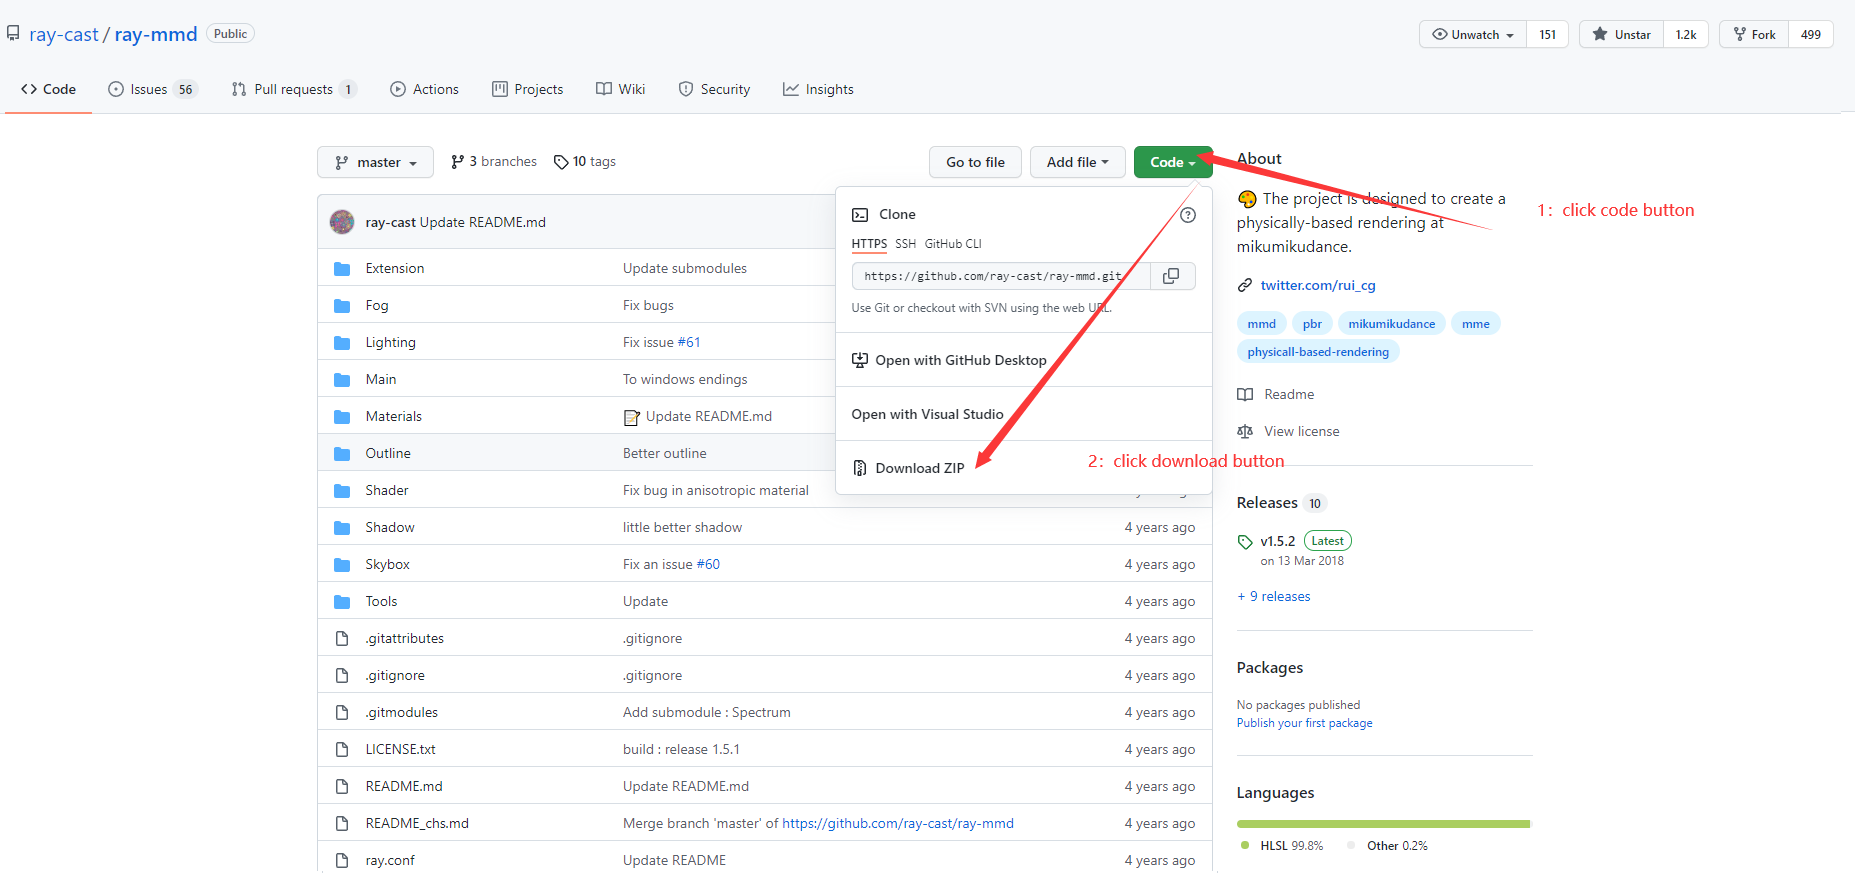
First, visit the main code repository of Ray-MMD located on GitHub, the page is as follows:

Click the code button, and then click download to download the Ray-MMD body. If you cannot find the file download location, please check the download page of your browser.
The downloaded Ray-MMD is a compressed package, the name is similar to ray-mmd-master.zip, please unzip it to any path first, and the folder name is similar to ray-mmd-master.
First run MikuMikuDance.exe to open MikuMikuDance software.

Then import the following three files:
| File name | Function |
|---|---|
| ray.x | Render body |
| ray_controller.pmx | Global Controller |
| Skybox/Sky Hemisphere/Sky with box.pmx | Sky Ball |
Since Ray's anti-aliasing and reflection will conflict when MMD's built-in anti-aliasing and reflection are turned on at the same time, we will turn it off first.

In this step, we can import the model and scene we want to render into MikuMikuDance.

Drag the pmx file directly into MikuMikuDance to complete the import
Although we loaded Ray-MMD and imported the scene and model, the whole scene still seemed unnatural.
We need to complete the parameter configuration in the Ray-MMD panel to correctly display the entire scene.

Click the MMEffect button in the upper right corner to expand the drop-down box.
Note: If there is no button in the upper right corner, it means that MMEffect is not installed or is not installed correctly. Please try again after installation.
Click the Effect Mapping button to enter the Ray-MMD parameter panel.

The panel is shown in the figure below:

Refer to - for detailed explanation of each parameter on the panel.
First, we need to assign main.fx to each pmx object in the Main panel, double-click (None) under the Effect File column to open the file selection dialog box, and select the file Main/main.fx in the Ray-MMD directory. Can. As shown in the figure after allocation:


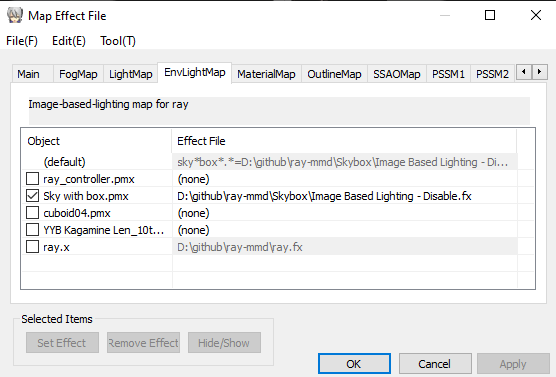
But our model is still very dark because of the lack of ambient light. Next, add ambient light to our scene.

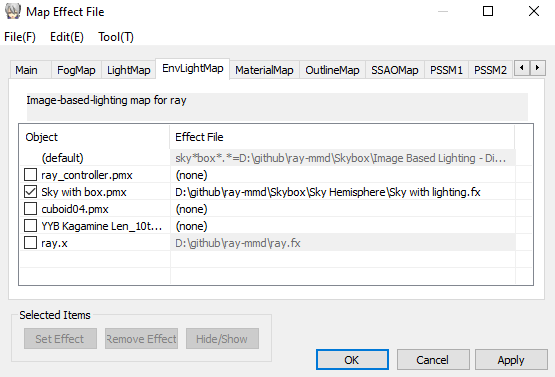
After clicking the EnvLightMap panel, select Effect File for the Sky with box. For example, here we choose Skybox/Sky Hemisphere/Sky with lightning.pmx

Finally we get this result:

At this point, congratulations on completing this introductory tutorial! In this tutorial, you should have learned how to install Ray-MMD and use Ray-MMD to render a scene of your dreams.
Please refer to the advanced tutorial and other documents for the implementation principle of the parameter configuration of Ray-MMD.
Thanks Yu Higuchi, the developer of MikuMikuDance, for the great work of creating MikuMikuDance.
The model in this tutorial comes from Kagamine Len_10th_v1.0 of YYB
Thanks to M.Liang's excellent tutorial for inspiration nagongze