02. Getting Started
Accenture SFMC DevTools can be installed as Node.JS package. The following guide will demonstrate how you can get started within 10 minutes or less.
- To check if it is already installed, at the OS command prompt, type:
node --version- If this command reports Node version 15.0.0 or later, you’re done—proceed to the next installation. If the reported version is earlier than 15.0.0, continue to step 2.
- If you get a “command not found” error message, continue to step 2.
- In a web browser, go to nodejs.org
- Download and run the latest LTS installer for your operating system.
- When the installer finishes, try step 1 again. If it fails, please restart your terminal. If it still does not work, reboot your computer and try the version check then.
- To check if git is already installed, at the OS command prompt, type:
git version- If this command reports a git version such as “git version 2.31.0” (or "git version 2.31.0.windows.1" on Windows), you’re done. Proceed to native Android or iOS environment setup.
- If you get a “command not found” error message, continue to step 2.
- Go to git-scm.com/downloads.
- Under Downloads, click the icon for your operating system.
- Run the installer.
- When the installer finishes, try step 1 again. If it fails, please restart your terminal. If it still does not work, reboot your computer and try the version check then.
If you experience issues installing Accenture SFMC DevTools, please check out the Troubleshooting section in this manual.
How to:
- Install Accenture SFMC DevTools by running
npm install -g mcdev(prefix withsudoon MacOS)- If you get an error, please see the troubleshooting section.
When completed run mcdev --version and it will show you which version you installed (e.g. 6.0.0).
Side note for proud nerds:
The
-gpart behindnpm installtriggers a so-called "global installation". This is a term coined by Package Managers, in this case Node's package manager (npm) and it means that Accenture SFMC DevTools is installed on your computer and usable across projects. The alternative is a "local installation" would install Accenture SFMC DevTools only for the current project folder. This local install is a technique used to ensure everyone in the team is using the same version of a tool. Nevertheless, we strongly recommend going with the global installation to be able to use the full feature-set of Accenture SFMC DevTools.You may choose to install mcdev globally or locally. Global install runs faster and allows you to initialize new projects by running
mcdev initin any directory. If your project does require a local installation, please refer to the Local Install Guide.
After the successful installation, you will now need to set up the connection to your Marketing Cloud instance.
- In your Marketing Cloud instance
- Ensure that you selected your Parent/Global Business Unit.
- Go to
Setup -> Apps -> Installed Packages. - Create a new "installed package" and name it "Accenture SFMC DevTools Deployment Tool"
Note: On some older SFMC instances it will ask you if you want the enhanced version. Please enable this option.
- Click on the Add Component button and select
API IntegrationwithServer-To-Servermode. - Make sure you grant all available rights.
- Go to the access tab and grant it access to all Business Units that you want to use it for, but ensure that the Parent/Global Business Unit is among these.
- Why? Shared Data Extensions, roles, users, Business Unit info and some other metadata is internally stored solely on the parent Business Unit and hence can only be retrieved and updated via that BU.
- Note down EID (Parent MID), Client Id, Client Secret and Authentication Base URI.
- In your project folder
- Open a CLI in your project folder (e.g.
C:\repos\MyProject\on Windows or~/repos/MyProject/on Mac) - Run
mcdev initto start the interactive setup wizard.- If not found yet, default configuration files will be copied into your project folder, copied by initializing an npm project and a local Git repository.
- The wizard will ask you to name your credential. The name you choose here will be used by all team members because the config is shared via Git.
Being specific here reduces the chance of deploying to the wrong server (instance) in stressful situations. We suggest you use something like
ClientName, orClientName-ProjectNameif you have multiple projects with the same client. In case your project uses multiples instances you might like to use something likeClient-ProjectName-SandboxandClient-ProjectName-PROD. - It will then continue to ask for the EID (Parent MID), client ID, client secret and Authentication Base URI.
- The credentials will be automatically tested & your list of BUs downloaded until finally the central configuration file
.mcdevrc.jsongets created in your project folder. - The last step is to download an initial backup and commit it into git. No worries - the wizard does that for you!
- If this is the first time you set up Accenture SFMC DevTools or you recently upgraded Accenture SFMC DevTools, please restart VS Code now! A pop-up will likely appear in the lower right corner prompting you to install recommended extensions.
- Done.
- Open a CLI in your project folder (e.g.
- Sharing the project with your team
- Make sure you have a Git repo (Bitbucket, GitHub, GitLab) set up somewhere. If you are an SI partner, usually, your client will have to do this for you.
While running
mcdev init, the tool already made sure to set up a local Git repo for you. Now, you need to upload ("push") it to the online repo: - Open the URL of your online repo and find the "CLONE" button. This will likely show you a normal URL, ending on ".git"
- Add this as your repository remote named "origin". If you use a GUI-based tool, that should be fairly simple, otherwise, execute
git remote add origin YOUR-URLin your project folder. - Now run
git push -u origin masterto start the upload.
- Make sure you have a Git repo (Bitbucket, GitHub, GitLab) set up somewhere. If you are an SI partner, usually, your client will have to do this for you.
If Accenture SFMC DevTools was already used to set up the project by somebody in your team, including all of the steps in the above chapter Initial project configuration, then basically you are in luck. Things are much faster from here on:
- Make sure you went through the chapters Pre-requisites and Install Accenture SFMC DevTools. Do skip Initial project configuration!
- Acquire the URL to your Git repo and Clone it to your computer. It should end on
.git. Also ask your team lead forEID (Parent MID),Client ID,Client Secretand theAuthentication Base URI. You will need this later.We recommend you create a folder like
C:\repos\and clone the repo for your current project into that. By default, the repo name will be suggested as a sub-folder name which you should keep in place. That way you will always have one folder in which all your projects can be found in with their respective sub-folders. - Open your main repo folder (e.g.
C:\repos\) in the CLI of your choice (e.g. PowerShell on Windows) - Assuming you installed Accenture SFMC DevTools globally (recommended!), now execute
mcdev join. - It will ask you for your git repo's URL (ending on .git) and then commence cloning it.
- The system will then recognize the previously set up project and ask you for
EID (Parent MID),Client ID,Client Secretand theAuthentication Base URI. - Done.
The following seeks to enhance your daily process. Our guide assumes that you are using Visual Studio Code to develop, backup and deploy your project. For smooth operations, we highly recommend the following Marketing Cloud specific plugins for it.
Nevertheless, Accenture SFMC DevTools will run without them and is not associated with the development of these publicly available apps & plugins.
Note: The following lists are automatically installed when you run
mcdev initormcdev upgrade.
Visual Studio Code extensions:
When you run mcdev init or mcdev upgrade we add/update the file .vscode/extensions.json in your project directory with a list of recommended VSCode extensions that will help your daily workflow with Salesforce Marketing Cloud.
Restart VS Code after cloning a prepared repo or after you've run init / upgrade and VS Code will prompt you in the lower right corner with:

Click on Install All to quickly get things ready or review the recommendations first via Show Recommendations. If you opt for the second option, be aware that there are 2 kinds of recommendations:
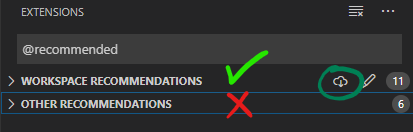
The "Workspace Recommendations" were defined by Accenture SFMC DevTools. Clicking on the little cloud icon will install all at once. The "Other Recommendations" are auto-generated by VS Code and are not controlled by Accenture SFMC DevTools. You may look through those as well, but they might also be completely irrelevant to you.
Node modules:
- eslint: code linting
- eslint-config-prettier: ensures that prettier and eslint do not have conflicting rules
- eslint-config-ssjs: allows you to have accurate code linting in *.SSJS files
- eslint-plugin-jsdoc: will help you write proper jsdoc comments in your SSJS code
- eslint-plugin-prettier: runs prettier and ESlint together
- prettier: opinionated code formatter
- npm-check: makes it easier to keep your node modules up-to-date
- sfmc-boilerplate: build tool for your more complex email, cloudpage and automation code.
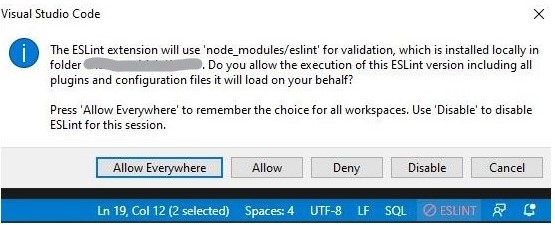
Please note that Visual Studio Code might warn you about using the local installation of ESLint with a pop-up like the following. Please confirm this with Allow or, if you are certain about what you are doing, with Allow Everywhere. Inside of Accenture SFMC DevTools project folders this warning is normal because we ask to install the VSCode extension and the node module for ESLint.
Install it locally first via the following (or with a specific version):
npm install --save mcdevAnd then require it in your code:
const mcdev = require("mcdev");

// download all metadata from your instance's Parent BU
mcdev.retrieve("MyCredential/_ParentBU_");

// or download all metadata from your instance's Parent BU
mcdev.retrieve("MyCredential/_ParentBU_", "dataExtension");
For more details on the available methods look out for what Intellisense will return or refer to the developer documentation.