Common Operations
- ELN's
- Navigation
- Opening files
- Basic file operations
- Trashing files
- Selecting files
- Tagging files
- Searching files
- Bookmarks
- File details
- Basic usage examples
The expression ELN is crucial for clifm.1 It stands for Entry List Number and could be used for any operation involving file names in the current directory. For example, given the following list of files:
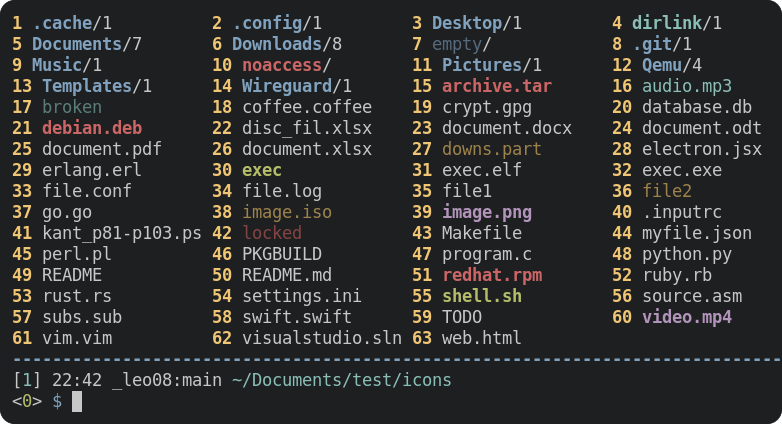
we see that the ELN corresponding to the Documents directory is 5. So, we can change to this directory either using its file name or its ELN: Documents or just 5. TAB completion is available to automatically expand a given ELN into its corresponding file name (minimizing thus the chances of inadvertently operating on the wrong file(s)).
Entering Documents is thus equivalent to entering just 5: both will cd into the Documents directory.
Of course, any file operation (be it internal or external) could be used instead. For example:
s5to select the directory
r5to remove the directory
NOTE: In the case of internal commands, ELN's could be written fused to the command name, as in this case (s5 indeed is equivalent to s 5). However, this does not apply to external commands.
or, using now a shell, external command:
diff 5 6to compare two files, in this case Documents and Downloads directories.
ELN ranges are also understood:
s 1-5 9-12to select all files from 1 through 5 and from 9 through 12. Or,
file 3-7to run file(1) over files from 3 through 7.
The second field of the range can be omitted (since version 1.15.11), in which case the ELN of the last listed file name is assumed. For example, provided there are 100 listed files, s1- will select all files (this command is equivalent to s1-100 or s *).
Since ranges, just as ELN's, could be a bit tricky, TAB completion is available to make sure that this particular range actually includes the desired filenames.
1 As far as I know, the first file manager to implement this notion of ELN (though not called as such), was nffm. The project is sadly no longer maintained.
For file names and ELN's, and ELN ranges TAB completion is available. The procedure is as straightforward as well known:
5 -> TAB -> Documents
Doc -> TAB -> Documents
If the auto-suggestions system is enabled, Documents will be automatically printed (by default in an underlined cyan color) next to the current input string as you type. If the typed string refers to a file name, the suggestion will just complete the input string. When it comes to ELN's (like the 5 above), the file name corresponding to this ELN will be printed as follows:
5_ > Documentswhere the underscore represents the current cursor position.
To accept the given suggestion, press Right or Ctrl-f: the text typed so far will be automatically replaced by the corresponding suggestion.
For more information about the suggestions system, consult the suggestions page.
By default, and unlike the ls(1) shell command, clifm lists files automatically for each entered directory (a feature know as autols). To disable this function, run clifm with the -o, --no-autols option or set AutoLs to false in the configuration file (F10).1
| Action | Command | Keybinding |
|---|---|---|
Change directory to DIR
|
DIR / ELN
|
|
Change to HOME
|
cd / ~
|
Alt-e / Home |
| Change to / | / |
Alt-r |
| Go back | b |
Shift-Left / Alt-j |
| Go forward | f |
Shift-Right / Alt-k |
| Switch workspaces | ws[1-8] |
Alt-[1-4] |
| Reprint files in current directory |
rf / .
|
Enter / Ctrl-r |
| Go to parent directory | .. |
Shift-up / Alt-u |
| Jump to /some/deep/directory2 | j so dir |
|
| Go up 2 directories3 | ... |
|
| Bookmarks2 | bm |
Alt-b |
| Change to pinned directory5 | , |
|
| Change to mountpoint | mp |
Alt-m |
| Change to first visited directory | Ctrl-Alt-j | |
| Change to last visited directory | Ctrl-Alt-k | |
| Print directory history |
bh / fh
|
Alt-h |
NOTES
1 In the last years there have been some projects aimed to implement an autols function on regular shells. See auto-ls.fish, autols, and auto-ls.
2 Only provided that /some/deep/directory has been already visited and is in the jump database. See the jump section for more information.
3 Fastback function: Each dot (.) after the first two dots means one more directory to go up. Thus, to go up four directories at once enter 5 dots: ..... (the corresponding target will be suggested)
4 Once in the bookmark screen, enter the ELN corresponding to the desired file/directory or its shortcut. See the bookmarks section.
5 A directory must be already pinned. See the pin command.
There are several ways to open files:
- Automatically, via Lira (clifm's builtin resource opener). Type in the name of the file or its ELN and the file will be automatically opened using the application associated to its file name or MIME type:
myfile # or just 12 (provided 12 is myfile's ELN)You can run mm info on any file to know what application would be used to open the file. Example output:
Name: video.mp4
MIME type: video/mp4
Associated application: ffplay [MIME]Note: [MIME] means here that the associated application has been selected matching the file's MIME type (instead of its file name).
Lira can be customized to use whatever application you prefer to open your files. For more information consult the Resource opener section.
- As usual, the file name preceded by the application name (plus parameters):
nano myfileNote: myfile nano also works.
- You can also use the open-with function to get a list of possible applications to open your file:
ow myfile <TAB>NB: Whenever files and/or directories in the current directory are involved, they can be replaced by the corresponding ELN. So, supposing the ELN for myfile is 12, p myfile works the same as p 12 (p12, without space, works as well).
The URI file scheme for local file systems is also supported. For example, file:///etc/hosts amounts to this: /etc/hosts.
| Operation | Command | Keybinding |
|---|---|---|
Create FILE(s) and/or DIR(s)
|
n FILE... DIR/... |
Alt-n |
Open FILE1
|
FILE |
|
Copy FILE1 to FILE2
|
c FILE1 FILE22
|
|
Copy FILE to a remote location |
cr FILE2 3
|
|
Move FILE1 to FILE2
|
m FILE1 FILE22
|
|
Delete FILE(s)
|
r FILE...2
|
|
Rename FILE1 into FILE2
|
m FILE1 FILE2 |
|
Symlink FILE2 to FILE1
|
l FILE1 FILE2 |
|
Trash FILE(s) |
t FILE... |
|
| List trashed files | t |
|
| Restore (undelete) trashed files | u |
Ctrl-Alt-u |
| Empty the trash can | t clear |
|
Remove FILE from trash |
t del |
|
Interactively change permissions of FILE...
|
pc FILE... |
|
Interactively change ownership of FILE...
|
oc FILE... |
|
Duplicate FILE(s)
|
d FILE... |
|
Archive/compress FILE(s)
|
ac FILE... |
|
Dearchive/decompress FILE
|
ad FILE |
|
Bulk rename FILE(s)
|
br FILE... |
|
Toggle executable bit on FILE...
|
te FILE... |
|
Export FILE(s)
|
exp FILE... |
|
Select FILE(s)
|
s FILE... |
|
| Select all files in the current directory | s * .* |
Alt-a |
| Deselect all selected files | ds * |
Alt-d |
| Copy selected files into current directory | c sel |
Ctrl-Atl-v |
Copy selected files into DIR
|
c sel DIR |
|
| Move selected files into current directory | m sel |
Ctrl-Alt-n |
Move selected files into DIR
|
m sel DIR |
|
| Remove selected files | r sel |
Ctrl-Alt-d |
| Trash selected files | t sel |
Ctrl-Alt-t |
| Bulk rename selected files | br sel |
Ctrl-Alt-r |
| Export selected files | exp sel |
Ctrl-Alt-e |
| Archive selected files | ac sel |
Ctrl-Alt-a |
| Open/change to last selected file | Ctrl-Alt-g | |
| Bookmark last selected file | Ctrl-Alt-b |
1 For more information consult the Opening files section above.
2 For more information about these commands consult the corresponding description page.
2 cr is the invocation name (action name) of the cprm plugin. Enter cr --help for more information. Remote locations need to be configured first (cr --edit).
Clifm implements a built-in and FreeDesktop compliant trash system.
Only two commands are involved: t (standing for trash) and u (standing for undelete or untrash).
| Action | Command |
|---|---|
Trash FILE(s)1
|
t FILE(s). Ex: t 1 file2 *.txt sel
|
| List trashed files | t |
| Permanently remove some trashed files2 | t del |
| Restore (undelete) all trashed files | Ctrl-Alt-u |
| Restore (undelete) some trashed files3 | u |
| Empty the trash can |
t clear or t empty
|
1 Trashed files are stored in ${XDG_DATA_HOME:-$HOME/.local/share}/Trash
2 The user will be presented with a screen to chose files to be removed from the trash can. TAB completion is also available: t del TAB
3 The user will be presented with a screen to chose files to be restored to their original location. TAB completion is also available: u TAB
NOTE: In order to prevent accidental deletions, the remove command (r) could be instructed to always trash files instead of simply remove them. To achieve this use the --trash-as-rm command line option or the TrashAsRm option in the configuration file.
Three commands are used to control files selection:
| Command | Description |
|---|---|
s / sel
|
Select files |
ds / desel
|
Deselect files. See the deselecting files section below |
sb / selbox
|
Print the content of the Selection Box |
The syntax of the s command is this:
s, sel ELN/FILE ... n [[!]PATTERN] [-filetype] [:PATH]
If not in light mode,1 once a file is selected, and if the file is in the current working directory, the corresponding file name will be marked with an asterisk (colored according to the value of li in the color scheme file - by default bold green), at the left of the file name (and at the right of its ELN).
1 Selected files are tracked via device and inode numbers, obtained via a call to stat(2). But since in light mode all calls to this function are avoided for performance reasons, tracking selected files is not possible.
The s command allows you to send one or multiple elements (either files or directories) to the Selection Box. sel accepts individual elements, range of elements, say 1-6, file names and paths, just as wildcards (globbing) and regular expressions. Example:
s 1 4-10 ^r file* filename /path/to/filenameJust as in the search function, it is also possible to further filter the list of matches indicating the desired file type. For instance,
s ^ -dwill select all directories in the current working directory. For available file type filters consult the search section.
By default, the selection function operates on the current working directory. To select files in any other directory use the :PATH expression. For example, to select all regular files with a .conf extension in the /etc directory, the command would be:
s .*\.conf$ -r :/etcor using wildcards:
s *.conf -r :/etcJust as in the case of the search function, inverse matching is supported for patterns, either wildcards or regular expressions. To invert or reverse the meaning and action of a pattern, prepend an exclamation mark (!). E.g., to select all non-hidden regular files in the Documents directory, issue this command:
s !^\. -r :Documentsor, to select all directories in /etc, except those ending with ".d":
s !*.d -d :/etcGlob and regular expressions could be used together. For example:
s ^[r|R].*d$ /etc/*.confwill select all files starting with either r or R and ending with d in the current working directory, plus all .conf files in the /etc directory. However, this use is discouraged if both patterns refer to the same directory, since the second one might override the result of the first one.
It is important to note that glob expressions are evaluated before regular expressions, in such a way that any pattern that could be understood by both kinds of pattern matching mechanisms will be evaluated first according to the former, that is, as a glob expression. For example, .*, as regular expression, should match all files. However, since glob expressions are evaluated first, it will only match hidden files (files starting with a dot). To select all files using a glob expression, try .* *, or, with a regular expression: ^ or (.*?). The keyboard shortcut Alt-a is also available to perform the same operation.
The Selection Box is accessible to different instances of the program, provided they use the same profile (see the profiles section). By default, indeed, each profile keeps a private Selection Box, being thus not accessible to other profiles. You can nonetheless modify this behavior via the ShareSelbox option in the configuration file. If the ShareSelbox option is enabled, selected files are stored in ~/.config/clifm/selbox.clifm. Otherwise, the corresponding profiles directory is used instead: ~/.config/clifm/profiles/PROFILE/selbox.clifm (this is the default).
Use the sb command (or Alt-s) to show the entries currently contained in the Selection Box.
In order to operate on selected files the sel keyword is used: indeed, sel amounts to all selected files. In this way, you can use the sel keyword with any command, be it internal or external. For example:
r selto remove all selected files
or
ls -l selto print the properties of all selected files
Note: If there is a file named sel in the current directory, use ./sel to distinguish it from the sel keyword. For example, enter p ./sel to tell clifm that you want to get the properties of the file named sel rather than the properties of the currently selected files.
Note 2: Since version 1.9.9, the s: construct can be used in place of sel. For example, r s: to remove all selected files.
If using the TAB completion in FZF mode, you can operate only on some selected files as follows:
CMD sel<TAB>Note: since version 1.9.9 the s: construct can be used as well. Unlike sel, however, this new construct can be used as first word (i.e. it does not need to be preceded by a command). For example, to list all selected files type s:<TAB>.
The list of selected files will be displayed. Choose one or more of them (use TAB to mark entries) to operate only on those specific files. For example, to print the file properties of some specific selected files: p sel<TAB>, select the files you want via TAB, press Enter or Right (marked files will be inserted into the command line), and the press Enter to run the command, as usual.
The fzfsel plugin (invoked via the * action name) can be used as well:
* ls -lThe user will be prompted to mark some selected files (you need to install FZF first), which then will be passed as parameters to the corresponding command, in this case ls -l.
If you need to specify a specific position for marked selected files in your command, use the %f placeholder as follows:
* cp %f /misc/docsMarked selected files will be inserted in the place of %f. If %f is not specified, marked files will be inserted at the end of your command.
There are several ways of deselecting files, all of them involving the ds command:
a. Enter ds: you'll be prompted to select files to be deselected. To deselect all selected files at once, enter ds * or press Alt-d.
b. Type ds <TAB>: if running in FZF mode, you'll see the list of currently selected files. Mark (using the TAB key) those files to be deselected and then press Enter.
c. Via the fzfdesel plugin, bound by default to the ** action. To invoke this plugin, enter **. Here you can fuzzy search/filter selected files and easily mark those you want for deselection. You can mark individual files, all of them, just as invert the current selection. Once done, press Enter.
NOTE: Given the flexibility of fzfdesel, you might want to replace the ds command by this plugin. To do so, edit the configuration file (F10 or edit) and create the corresponding alias:
ds='**'Etiqueta is clifm's built-in files tagging system
File tags are created via symbolic links using a specific directory under the user's profile: ${XDG_CONFIG_DIR:-/home/USER/.config}/clifm/profiles/USER/tags.
Every time a new tag is created, a new directory named as the tag itself is created in the tags directory. Tagged files are just symbolic links (named as the full path to the target file and replacing slashes by colons) to the actual files created in the appropriate directory. For example, if you tag ~/myfile.txt as work, a symbolic link to ~/myfile.txt, named home:USER:myfile.txt will be created in tags/work.
NOTE: Etiqueta itself takes care of expanding these symlinks, so that you, as a user, should not worry at all about this colons notation.
tag is the main Etiqueta command and is used to handle file tags. Its syntax is as follows:
tag [add, del, list, list-full, merge, new, rename, untag] [FILE]... [[:]TAG]
NOTE: the :TAG notation is used for commands taking both file and tag names, for example, tag add FILES(s) :TAG ..., to tag files, and tag untag :TAG file1 file2, to untag files. Otherwise, TAG is used (without the leading colon). For example: tag new docs, to create a new tag named docs, or tag del png, to delete the tag named png.
Both short and long formats can be used:
| Short format | Long format | Description |
|---|---|---|
ta |
tag add |
Tag files |
td |
tag del |
Delete tag(s) |
tl |
tag list |
List tags or tagged files |
tm |
tag rename |
Rename tag |
tn |
tag new |
Create new tag(s) |
tu |
tag untag |
Untag file(s) |
ty |
tag merge |
Merge two tags |
| Short format | Long format | Description |
|---|---|---|
tl |
tag list |
List available tags |
| - | tag list-full |
List available tags and all tagged files |
tl work |
tag list work |
List files tagged as work
|
tl file.txt |
tag list file.txt |
List tags applied to the file file.txt
|
tn dogs cats |
tag new dogs cats |
Create two empty tags: dogs and cats
|
ta *.png :images :png |
tag add *.png :images :png |
Tag all PNG files in the current directory as both images and png1 2
|
ta sel :special |
tag add sel :special |
Tag all selected files as special
|
tm documents docs |
tag rename documents docs |
Rename the tag documents as docs
|
ty png images |
tag merge png images |
Merge the tag png into images3
|
td images |
tag del images |
Remove the tag images (untag all files tagged as images and remove the tag itself) |
tu :work file1 image.png dir2 |
tag untag :work file1 image.png dir2 |
Untag a few files from the work tag4
|
1 Tags are created if they do not exist.
2 Since add is the default action, it can be omitted: tag *.png :images :png.
3 All files tagged as png will be now tagged as images, and the png tag will be removed.
4 TAB completion is available to complete tagged files. If using the FZF mode, multiple files can be selected using TAB.
Tag expressions, that is, the t:TAG construct, are used to operate on tagged files via any command, be it internal or external. A few examples:
| Command | Description |
|---|---|
t:<TAB> |
List available tags (multi-selection is allowed - FZF mode only) |
p t:docs |
Print properties of all files tagged as docs
|
r t:images |
Remove all files tagged as images
|
stat t:work t:docs |
Run stat(1) over all files tagged as work and all files tagged as docs
|
NOTE: This feature, as always when multi-selection is involved, is only available when TAB completion mode is set to FZF. See the TAB completion page.
You may not want to operate on all files tagged as some specific tag, say work, but rather on some of them only. TAB completion is used to achieve this aim.
Let's suppose you have a tag named work which contains ten tagged files, but you need to operate (say, print the file properties) only on two of them, say, work1.odt and work2.odt:
p t:work<TAB>The list of files tagged as work will be displayed via FZF. Now mark the two files you need using TAB, press Enter or Right, and the full path to both files will be inserted into the command line. So, p t:work will be replaced by p /path/to/work1.odt /path/to/work2.odt.
Files searching is performed in clifm using the slash character (/). The general usage of the search function is as follows:
/PATTERN [-filetype] [-x] [DIR]Type / followed by a glob or regular (or extended regular) expression, and clifm will list all matches in the current working directory. For example, both
/*.pdfand
/.*\.pdf$will list all PDF files in the current directory, the former using wildcards, and the latter a regular expression.
Bear in mind that search patterns (if containing metacharacters) are evaluated first as glob expressions, and then, if no matches are found, as regular expressions.
Expressions containing no pattern metacharacter are automatically transformed into a regular expression: /.*EXP.*. For example, /test becomes /.*test.*.1
By default, regular expressions (and thereby expressions containing no metacharacter) are case insensitive (glob expressions, by contrast, are always case sensitive). However, you can enable case sensitive search via the CaseSensitiveSearch option in the configuration file.
To search for files in any directory other than the current one, specify the directory name as a further argument. This argument (DIR) could be an absolute path, a relative path, or an ELN. For example,
/^A 7will search for all files starting with 'A' in the directory corresponding to the ELN 7, while
/*.conf /etcwill list all .conf files in the directory /etc.
The result of the search could be further filtered by specifying a filter type:
| Filter | Meaning |
|---|---|
-d |
directory |
-f |
regular file |
-l |
symlink |
-s |
socket |
-p |
FIFO/pipe |
-b |
block device |
-c |
character device |
-D |
door (Solaris) |
-P |
port (Solaris) |
For example:
/[.-].*d$ -d Documents/will list all directories containing a dot or a dash and ending with d in the directory named Documents.
The quick search function also supports invert search: prepend the exclamation mark (!) to negate a given search pattern. For example:
/!.*s$ -d /etcwill match all directories in /etc NOT ending with s, just as /!D* will match all files in the current directory NOT starting with D.
To perform a recursive search use the -x parameter, and, optionally, a search path (DIR). The search will be performed using find(1) as follows: find DIR -name PATTERN. If no search path is provided, the search is executed starting in the current directory.
Otherwise, the search starts in DIR.
1 Clifm provides three search strategies: glob-only, regex-only, and glob-regex (default). Set the desired search strategy via the SearchStrategy option in the configuration file.
Type /*<TAB> to list previously used search patterns.
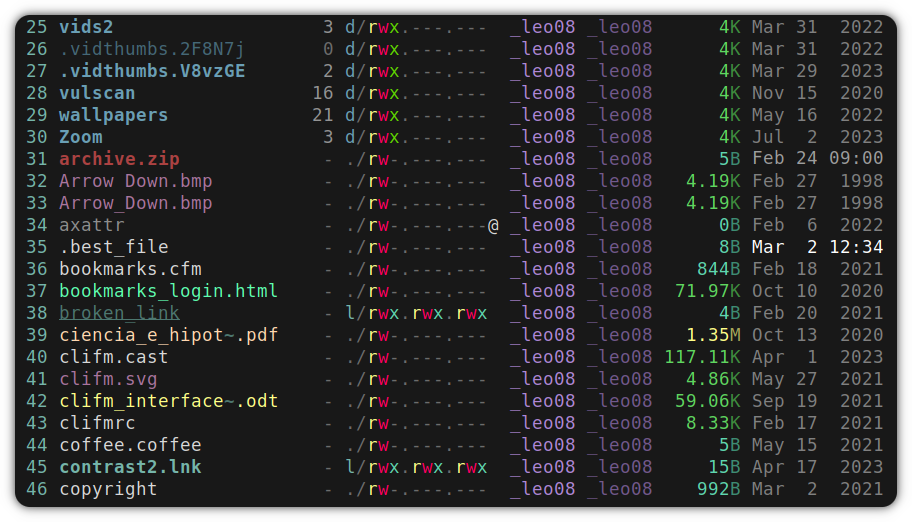
By default, clifm lists only file names. To toggle detail or long view mode press Alt-l or use the ll command. The output is quite similar to that of the ls -l shell command, though it does not depends on ls(1) at all.
Available fields are:
- File name
- Files counter (for directories)
- File inode
- File allocated blocks (since 1.17.10)
- Number of hard links (since 1.17.3)
- File permissions
- User/group IDs
- File size
- Time stamp1
1 To set a custom time format see the Time style section below.
Exception made of the name field, which is always displayed, the remaining fields can be toggled on/off and sorted anyway you like using the PropFields option in the configuration file, or --prop-fields=FORMAT in the command line. This option takes a string of at most 9 characters specifying fields to be displayed and the displaying order. These characters are:
| Character | Description |
|---|---|
f |
Files counter (for directories) |
B |
File allocated blocks1 |
d |
File inode number |
l |
Number of hard links1 |
p|n
|
File permissions: either symbolic (p) or numeric/octal (n) notation |
i|I
|
User/group IDs: either as numbers (i) or as names (I) |
G |
Don't print groups (requires i|I)1
|
a|b|m|c
|
Time stamp: last access, birth, modification, or status change time1
|
s|S
|
File size: either in human readable form (s) or in bytes (S)2 3 4
|
x |
Extended attributes/capabilities/ACLs (marked as @) (requires p|n)5
|
For example, to display all of these fields (with symbolic permissions, numeric IDs, modification time, and size in bytes):
PropFields="fBdlpimSx"or, if you prefer to list only file permissions (numeric) and file size (human readable):
PropFields="ns"Use a single dash to disable all fields (except for file name):
PropFields="-"The default value is "xfpIsm".
The order of these characters (exception made of x and G) defines the order in which fields will be printed on the screen. For example, if you want file sizes first: sxfpIm.
The space between fields (by default 1) can be doubled by setting the PropFieldsGap option in the configuration file to 2.
1 The b, l, and G switches are available since version 1.17.3, and B since 1.17.10.
2 The file's size is affected by the --si (powers of 1000 instead of 1024), --no-apparent-size (used blocks instead of used bytes), and --full-dir-size command line flags (see the command line flags section). The fz command can also be used to toggle full-dir-size on/off on the fly.
3 If full-dir-size is enabled, a red colored size prefix (B, K, M, and so on) (an exclamation mark (!) before 1.17.8) means that an error occurred while reading a subdirectory (for example, due to insufficient permissions), so sizes may not be accurate.
4 Since 1.17.8: If running with --si (powers of 1000 instead of 1024), human sizes in the order of the kilobyte are printed using k (lowercase) as prefix (instead of K, uppercase).
5 To list extended attributes and their values use the p command: p FILE. This feature is available on Linux only.
By default, timestamps in long view are printed as follows:
| Format | Description |
|---|---|
+%b %e %H:%M |
Less than 6 moths: abbreviated month name, day of the month (decimal number), plus hours and minutes |
+%b %e %Y |
Older: abbreviated month name, day of the month (decimal number), and year (four digits) |
To set a custom time style you can use (in this order of precedence):
-
--time-stylein the command line. -
TimeStylein the configuration file. - The TIME_STYLE environment variable (or CLIFM_TIME_STYLE).
Valid styles (for all the three cases) are: default, relative, iso, long-iso, full-iso, and +FORMAT (FORMAT is interpreted like in strftime(3)). A few examples:
clifm --time-style=full-isoTimeStyle="+%Y-%m-%d %H:%M:%S"TIME_STYLE=relative clifm
Note: Color shades are used by default to print timestamps and file sizes. Consult the Colors page for information on how to customize these colors.
This feature is available since version 1.11. If upgrading from a previous version, you need to update you default color scheme file as follows:
- Compile/install the latest version.
- Delete you default color scheme file (
~/.config/clifm/colors/default.clifm). - Restart clifm. A new, updated color scheme file will be created automatically.
Or, just unset the color codes dd and dz (solid colors for timestamps and file sizes respectively) in the InterfaceColors section of the color scheme file (cs edit or F8), in which case the default color shades will be used.
To get more detailed information about one or more files properties, use the p command (short for prop). For example:
p5 10to get information about those files whose ELN's are 5 and 10. The output format is based on the output of the stat(1) shell command, but, again, it is completely independent from it.
In the case of directories, you can use the pp command to include the total directory size as well (gathered via du(1)). Example:
pp5Note that, unlike p, pp always follows symlinks.
Note: An exclamation mark (!) before sizes means that an error occurred while reading a subdirectory (for example, due to insufficient permissions), so sizes may not be accurate.
bm (short for bookmarks) is the command used to manage user bookmarks.
A bookmark consists of two elements:
| Element | Description | Status |
|---|---|---|
| Path | The bookmarked file (both directories and regular files can be bookmarked) | Required |
| Name | The bookmark name | Required |
For example, the following line, as stored in the bookmarks file ($XDG_CONFIG_HOME/clifm/profiles/NAME/bookmarks.clifm), defines a bookmark pointing to /media/mount named mnt:
mnt:/media/mount
Bookmark names can be used to access your bookmarks. See below.
Note: Bear in mind that a, d, e, add, del, and edit are reserved bookmark keywords and cannot be used as bookmark names.
Bookmarks can be managed either from the command line of from the bookmarks screen.
The general syntax for the bookmarks command is as follows:
bm, bookmarks [a, add FILE NAME] [d, del [NAME]] [edit [APP]]You can list, access, create, delete, and edit bookmarks from the command line as follows:
| Command | Description |
|---|---|
bm <TAB> |
List available bookmarks (only names are listed, not shortcuts) |
bm add /media/mount mnt |
Bookmark the directory /media/mount as mnt
|
bm mnt |
Change to/open the bookmark named mnt
|
bm del mnt |
Delete the bookmark named mnt1
|
bm edit |
Edit the bookmarks file |
1 Enter bm del <TAB> to get the list of available bookmark names.
Note: a, d, and e can be used as shortcuts for the add, del, and edit arguments respectively.
With no argument, bm opens the bookmarks screen (Alt-b is also available). Here you can cd into the desired bookmark by entering either its ELN, shortcut, or name.
In this screen you can also add, remove or edit your bookmarks by entering e to edit the bookmarks file (F11 is available as well), which is simply a list of lines with this format:
name:pathFor example:
docs:/home/user/documentsEdit here your bookmarks to your liking (either name or path can be edited).
To delete a bookmark, remove the corresponding line from the bookmarks file.
Note: A handy use for the bookmarks function is to create bookmarks using short names, which will be later easily accessible via TAB completion and the suggestions system.
NOTE: If you are a Ranger or a Midnight Commander user, you can import bookmarks using the bm_import.sh plugin, bound by default to the bmi action. Just run bmi BOOKMARKS_FILE (usually ~/.local/share/ranger/bookmarks for Ranger and ~/.config/mc/hotlist for Midnight Commander).
Via the b: construct you can operate on one or more specific bookmarks as you normally do on any other file.
List available bookmarks:
b:<TAB>
Change to the bookmark named mybm:
b:mybm
Note: If unsure about where a bookmark points to, use TAB as follows: b:NAME<TAB>, in this case, b:mybm<TAB>.
Print the file properties of multiple bookmarks (multi-selection is allowed):
p b:<TAB>Note: The b: construct can be used multiple times in the same command. For example:
s b:bm1 b:bm2 b:bm3to select those bookmarks named bm1, bm2, and bm3.
Or, if you prefer to operate on all bookmarks at once:
p b:If looking for information about some specific command, take a look at the complete list of commands.
Help for all internal commands is available via the -h or --help options.
You can also make use of help topics: type help <TAB> to get the list of available topics.
A few important tips before starting:
1) ELN is one of the key notions of clifm. ELN amounts to Entry List Number, that is, the number at the left of each listed file name that can be used in place of the corresponding file name. Consult the ELN and the interface sections for more details. Any shell command, just as internal commands, can make use of ELN's. For example: diff 1 2.
2) Always try TAB: TAB completion is available for many things.
3) Pay attention to clifm's suggestions: whenever a possible completion/expansion is available, Gemini, the auto-suggestions system, will print it next to the current cursor position: if that is what you want, press Right or Ctrl-f to accept the suggestion: the text typed so far will be automatically replaced by the given suggestion. Otherwise, the suggestion will be ignored. You can disable suggestions via the --no-suggestions command line option or setting Suggestions to falsein the configuration file.
| Command | Full description | Brief description |
|---|---|---|
/etc |
Change directory | Change the current directory to /etc. The cd command could be used as well: cd /etc
|
5 |
Change directory | Change to the directory whose ELN is 5. TIP: Press TAB (or just pay attention to the auto-suggestion) to make sure 5 is the directory you want: 5<TAB>
|
bm net |
Bookmarks | Change to the bookmark named net (the same can be achieved via b:net). You can also press Alt-b to open the bookmarks screen and select your bookmark from here. bm <TAB> / b:<TAB> can also be used to list available bookmarks |
j <TAB> |
Kangaroo | Navigate through the list of visited directories1 |
j xproj |
Kangaroo | The j command allows you to fuzzy jump into already visited directories. In this example, jump to ~/media/data/docs/work/mike/xproject, provided this directory has been already visited (that is, it is in the jump database). For more accuracy you can try j mike xproj. TAB completion and suggestions are available for this command to make the search easier. For example, j xproj<TAB> will list all directories in the jump database matching the given query, in this case, xproj
|
.. / Shift-Up / Alt-u
|
Change to the parent directory | |
... |
Fastback function | Each subsequent dot after the first two dots will be understood as an extra /... In this case, we change to the parent directory of the current parent directory. TAB completion and suggestions are available |
bd <TAB> |
Backdir function | Quickly change to any parent directory |
b / Shift-left / Alt-j
|
Back / Forth | Go back in the directory history list (the previously visited directory). NOTE: Enter f, or press Shift-right or Alt-k to go forth in the directory history list |
ws2 / Alt-2
|
Workspaces | Switch to the second workspace. To go back to the first workspace, enter ws1 or press Alt-1
|
mp |
Change to a mountpoint | |
pin dir |
Pin the directory named dir
|
|
, |
Change to the pinned directory | |
/*.png<TAB> |
File filters | Quickly list all PDF files in the current directory |
=x<TAB> |
File filters | Quickly list all executable files in the current directory |
@gzip<TAB> |
File filters | Quickly list all files in the current directory whose MIME type includes "gzip" |
view / Alt+-
|
File previews | Preview files in the current directory (depends on fzf). File previews are also available for TAB completion
|
pg / Alt+0
|
Files pager | Run MAS, the files pager, on the current directory |
1 Take a look at the dh command as well.
| Command | Full description | Brief description |
|---|---|---|
myfile.txt |
Open files | Open myfile.txt. The default associated application will be used to open the file. See the resource opener section and the mm command to manage default opening applications. The open command could be used as well: o myfile.txt
|
12 |
Open files | Open the file whose ELN is 12. TIP: Press TAB (or just pay attention to the auto-suggestion) to make sure 12 is the file you want: 12<TAB>. Use the ampersand character to open the file in the background: 12&
|
n myfile |
Create files | Create a new file named myfile. Since clifm is integrated into the system shell, you can also use any of the commands you usually use to create new files. For example: touch myfile
|
n mydir/ / md mydir
|
Create files | Create a new directory named mydir (note the ending slash in the n command). You can also use mkdir(1)
|
n mydir/ && mydir |
Create a directory named mydir and cd into it at once (provided the first operation was successful). If the second command does not depend on the success of the first, use the semicolon instead: cmd1; cmd2
|
|
/*.png / /.*png$
|
Files search | Search for files ending with .png in the current directory (both wildcards and regular expressions are supported). To just search for files containing query in their names, issue /query
|
s *.c :my_project/ |
Files selection | Select all C files in the directory my_project/. If :dir is omitted, the query is made in the current directory |
s /media/*<TAB> |
Files selection and Wildcards expansion | Interactively select files in the directory /media using wildcards expansion (non-standard TAB completion mode only, i.e., fzf, fnf, or smenu) |
s 1-4 8 19-26 |
Files selection | Select multiple files in the current directory by ELN. s <TAB> is also allowed |
sb / Alt-s
|
Files selection | List currently selected files |
ds |
Files selection | Deselect a few files. Use ds * or Alt-d to deselect all files at once |
bm / Alt-b
|
Bookmarks | Open the bookmarks screen. Here you can select the desired bookmark by entering the corresponding ELN, shortcut, or name.1 You can also specify the desired bookmark in the command line as follows: bm NAME, where NAME is a bookmark name (TAB completion is available: bm <TAB>) |
bm add mydir/ md |
Bookmarks | Bookmark the directory named mydir/ as md. Regular files can also be bookmarked. To delete a bookmark run bm del NAME or bm del <TAB> to select the bookmark name to be deleted1
|
ta *.pdf :mypdfs |
Tagging files | Tag all PDF files in the current directory as mypdfs
|
p t:mypdfs |
Tagging files | Print the file properties of all files tagged as mypdfs
|
c sel |
Copy files | Copy selected files into the current directory (since version 1.9.9 s: works exactly as sel: c s:) |
c 34 file_copy |
Copy files | Create a copy (named file_copy) of the file whose ELN is 34. You can also use the d command to duplicate a file |
m 45 3 |
Move/rename files | Move the file whose ELN is 45 to the directory whose ELN is 3. To rename the file issue m 45: a secondary prompt will be displayed to edit the file name inline. m 45 NEW_NAME is also allowed |
r sel mydir 27 |
Remove files | Remove all selected files, plus the directory named mydir and the file whose ELN is 27. To remove files in bulk via a text editor use the rr command. |
t 12-18 |
Trashing files | Send the files whose ELN's are 12 through 18 to the trash can |
t del |
Trashing files | Select trashed files and remove them permanently. You can also use TAB (t del <TAB>) to get the complete list of trashed files, select a few, and then remove all of them from the trash can |
t empty |
Trashing files | Empty the trash can |
u |
Trashing files | Undelete trashed files (restore them to their original location). Hit TAB to get the list of trashed files: u <TAB>
|
p4 |
File properties | Print the properties of the file whose ELN is 4. To include directories full size as well, use the pp command: pp4
|
oc file.txt |
File ownership | Interactively change ownership of file.txt
|
pc file.txt |
File permissions | Interactively change permissions of file.txt. To just change the executable bit of a file, you can use the te command: te4. |
1 You can also enter bm edit or press F11 to open the bookmarks file and manually add/remove/edit the desired bookmark.
| Command | Full description | Brief description |
|---|---|---|
rf / Enter / Ctrl-l
|
Clear/refresh the screen | |
ll / Alt-l
|
File details | Toggle detail/long view mode on/off |
hh / Alt-.
|
Toggle hidden files on/off | |
config / F10
|
Configuration file | View and/or edit the main configuration file |
| Alt-TAB | Usage analyzer | Toggle the disk usage analyzer mode |
pf set test |
Profiles | Change to the profile named test. If the profile does not exist, it will be created |
st size rev |
Sort files | Sort the current list of files by size in reverse order. You can use Alt-z and Alt-x to quickly switch the sorting order |
actions |
Plugins | List available actions/plugins |
icons on |
Icons | Enable icons |
q |
Quit | I'm tired, quit |
Note: If you experience any problem with the default keybindings, consult the Keybindings issues section.
For more advanced use cases see the Common operations and the Advanced tricks pages.

What is clifm?
Is it for me?
Main design and goals
Dependencies
Installation
Interface
Getting help
Configuration file
Command line options
Commands
Keybindings
FAQ
ELN (entry list number)
Navigation
Opening files
Basic file operations
Selection
Search
Bookmarks
Trash
Archives
File details/Long view
Basic usage examples
The prompt
Resource opener
TAB completion (with fzf integration)
Auto-suggestions
Syntax highlighting
File tags
Actions (plugins)
Directory jumper
Autocommands
Profiles
Aliases
File names cleaner
Fastback and backdir
Remote file systems management
Workspaces
Light mode
Read-only mode
Stealth mode (incognito)
Disk usage analyzer mode
Desktop notifications
Environment
Files
Security
Tiling WM's and terminal multiplexers
FZF mode for TAB completion
File previews
Bulk operations
Archiving
File filters
Virtual directories
cp/mv progress bar
Send files to Android device
Git integration
Wildcards and REGEX
Multiple instances
Icons
Plugins
Customization
CD on quit
Files picker
Files lister (ls-mode)
stat(1) replacement
Subshell notification