Customization
All customization settings (theming) are made from a single configuration file (the color scheme file). They are installed by default in XDG_DATA_DIRS/clifm/colors (usually /usr/local/share/clifm/colors or /usr/share/clifm/colors), though color scheme files found in XDG_CONFIG_HOME/clifm/colors (usually HOME/.config/clifm/colors) take precedence. This latter could be used to store custom color schemes.
Each color scheme file may include any (or all) of the following options:
| Option | Description | Full description |
|---|---|---|
FiletypeColors |
Colors for different file types, such as directory, regular files, and so on | Here |
InterfaceColors |
Colors for clifm's interface, such as ELN's, file properties bits, suggestions, syntax highlighting, etc. | Here |
ExtColors |
Colors for files based on file name's extension | Here |
DateShades |
A comma separated list of colors to colorize timestamps1 | |
SizeShades |
A comma separated list of colors to colorize file sizes1 | |
DirIconColor |
Color for directories icon (when icons are enabled) | Here |
Prompt |
Clifm's prompt | Here |
DividingLine |
The line dividing the current list of files and the prompt | Here |
FzfTabOptions |
Options to be passed to fzf when using the fzf mode for TAB completion, including colors |
Here |
1 More information on how to set up these fields in the default color scheme file.
The color scheme (or just theme) can be set either via the command line (--color-scheme=NAME), via the ColorScheme option in the main configuration file, or using the cs command, for instance,
cs mytheme
Enter cs (or cs <TAB>) to get a list of available color schemes.
To edit the current color scheme enter
cs edit
By default, clifm ships several themes, though more can be found in our colors repository.
Note: The default theme file includes documentation on how to read/build custom themes.
If 256 colors support is detected for the current terminal (see below), and not set in any other way (either via the ColorScheme option in the configuration file or the --color-scheme command line switch), clifm will attempt to load the 256 colors version of the default color scheme: default-256. Otherwise, it falls back to the 16 colors version.
LS_COLORS is also supported. See the LS_COLORS support section for more details.
Color is always disabled in any of these cases:
- Either NO_COLOR or CLIFM_NO_COLOR is set (to any value)
-
CLICOLOR is set to
0 - If running with
--no-color - The terminfo database reports no color support for TERM (for example,
xterms).1
The amount of supported colors is taken from TERM (via the terminfo database). If COLORTERM is set to either 24bit or truecolor then clifm assumes that true color (and thereby 256 colors) is supported.
1 If your terminal does support colors, no matter what terminfo says, you can force the use of colors setting CLIFM_FORCE_COLOR to any value (or CLICOLOR_FORCE to 1). Note that if terminfo does not report color support, and you nonetheless set CLIFM_FORCE_COLOR or CLICOLOR_FORCE, clifm will run in 16 colors mode for maximum compatibility.
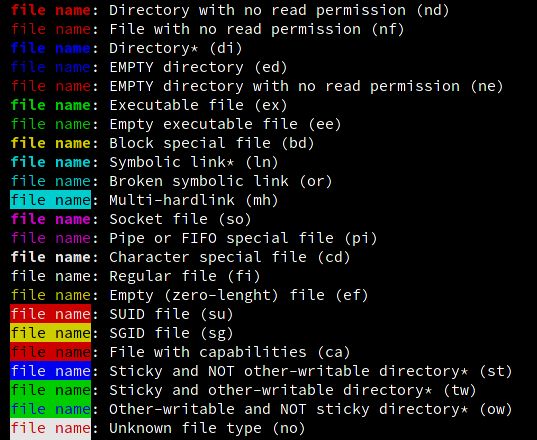
Colors and interface elements are specified in the color scheme file and can be modified as you wish using the below codes (see the colors command).
Colors are defined using the same format used by dircolors(1) and the LS_COLORS environment variable, namely, a colon separated list of codes with this general format: name=value, where name refers to an interface element and value to the color to be used by this element.
The following codes are used for different elements of clifm's interface:
File types
| Code | Reference |
|---|---|
bd |
Block device |
ca |
File with capabilities |
cd |
Character device |
di |
Directory |
ed |
Empty directory |
ee |
Empty executable file |
ef |
Empty regular file |
ex |
Executable file |
fi |
Regular file |
ln |
Symlink |
mh |
Multi-link file |
nd |
Directory with no read/exec permission |
nf |
File with no access permission |
no |
Unknown file type |
oo |
Doors/Ports (Solaris) |
or |
Orphaned or broken symbolic link |
ow |
Other writable directory |
pi |
FIFO/pipe |
so |
Socket |
su |
SUID file |
sg |
SGID file |
st |
Sticky and not other writable directory |
tw |
Sticky and other writable directory |
uf |
Inaccessible files (stat(2) error) |
NOTE: LSCOLORS Generator provides a nice and graphical way of constructing a LS_COLORS line.
Syntax highlighting
| Code | Description |
|---|---|
hb |
Parenthesis, Brackets: () [] {}
|
hc |
Comments: #comment
|
hd |
Slashes: /
|
he |
Expansion operators: * ~
|
hn |
Numbers (including ELN's) |
hp |
Commands parameters: -p --parameter
|
hq |
Quotes: "str" 'str'
|
hr |
Redirection operator: >
|
hs |
Commands separator: | & ;
|
hv |
Variables (environment and internal): $FOO
|
hw |
Backslash (aka whack): \
|
Auto-suggestions
| Code | Description |
|---|---|
sb |
Shell builtins |
sc |
Aliases and shell command names |
sd |
Internal commands description |
sf |
ELN, bookmark, tag, and file names |
sh |
Commands history entries |
sp |
Suggestions pointer (e.g.: 12 > filename, where > is the suggestion pointer) |
sx |
Clifm's internal commands and parameters |
sz |
File names (fuzzy) |
File properties
| Code | Description |
|---|---|
db |
File allocated blocks (since 1.17.10) |
dd |
Last access/birth/change/modification time1 |
de |
File inode number (long view only) (since 1.17.3) |
dg |
Group ID (provided the user has access to the file) |
dk |
Number of links (long view only) (since 1.17.3) |
dn |
Dash (unset property) |
do |
Octal value for file permissions |
dp |
SUID, SGID, sticky bit |
dr |
Read permission bit |
dt |
Timestamp identification mark2 (since 1.19.11) |
du |
User ID (provided the user has access to the file) (since 1.19.11) |
dw |
Write permission bit |
dxd |
Executable permission bit (directories) |
dxr |
Executable permission bit (regular files) |
dz |
File size1 |
1 If unset (default), gradient colors are used based on either file size or timestamp.
2 If unset (default), a dimmed version of the current timestamp color is used.
Prompt elements
| Code | Description |
|---|---|
em |
Error message indicator |
nm |
Notice message indicator |
wm |
Warning message indicator |
ro |
Read-only mode indicator |
si |
Stealth mode indicator |
li |
Selected files indicator |
ti |
Trash indicator |
tx |
Command line text (regular prompt) |
Miscellaneous interface elements
| Code | Description |
|---|---|
df |
Default color1 |
dl |
Dividing line2 |
el |
ELN's3 |
fc |
Files counter |
lc |
Symbolic link indicator (only for ColorLinksAsTarget)4
|
mi |
Miscellaneous indicators (disk usage, sort method, bulk rename, jump database list, and others) |
ts |
Matching prefix for TAB completed possible entries |
tt |
Tilde character (~) for trimmed file names |
wc |
Welcome message |
wsN |
Color for workspace N (1-8) |
xs |
Exit code: success |
xf |
Exit code: failure |
1 The default color is used when no specific color needs to be used, that is, as the base color of the interface. For example, after printing a file name, the color will be set back to df. As a rule of thumb and for consistency reasons, this color should be set to the foreground color of the console/terminal emulator, that is to say, 00, which is the default.
2 If unset, the color of the current workspace will be used instead.
3 If running clifm with the --eln-use-workspace-color command line switch, the color of the current workspace will be used instead of this color.
4 See the configuration file for details about this option.
Color codes are basically traditional ANSI color codes less the escape character and the final m. Thus, for instance, if you want non-empty directories to be bold blue, add this to the FiletypeColors line in the corresponding color scheme file:
di=1;34If you want ELN's to be red, add this code to the InterfaceColors line:
el=0;31Color codes can be used for file extensions as well (regular files only) using this format: *.ext=color. For example, to print C source files in bold green, add this to the ExtColors line in the corresponding color scheme file:
*.c=1;32Note: Non-accessible (non-readable by the current user), executable (including SUID and SGID) files, and files with capabilities take precedence over file extensions. For example, the file file.mp3, if executable, will be printed using the color code associated to executable files (ex) even if there is a color code associated to .mp3 files.
Note 2: In case ExtColors is not found in the color scheme file, or it is set to the empty string, clifm will fallback to the default colors (as defined in default and default-256 color schemes). To completely disable colors for file extensions you need to set at least one value. For example:
ExtColors="*.conf=0"8-16, 256, and 24-bit colors are supported. For example:
fi=04;38;2;245;76;00;48;2;00;00;255will print regular files underlined and using a bold orange foreground color on a blue background.
NOTE: Bear in mind that a color scheme (or theme) does not need to specify colors for each code, but only for those that differ from the defaults (as defined in the default color scheme). If you just want to change directories color to, say, red, and ELN's to bold magenta, you can create a color scheme file (named for example red.clifm) under the colors directory with the following content:
FiletypeColors="di=01;31;ed=02;31"
InterfaceColors="el=01;35"
Only di, ed, and el are defined. Undefined codes will be set to the default values. The same goes for the prompt (both regular and warning prompt), and FZF options.
For 256 colors, Xterm-like color names can be used as well. In the case of 24-bit colors, (both the RGB and the HEX format are supported).
Though ANSI escape sequences can be used to specify 8-bit colors (aka 256-colors), the following short syntax can be used as well: @NUM[-[1-9]], where 1-9 is a display attribute (only one attribute is allowed):
| Number | Name |
|---|---|
1 |
Bold or increased intensity |
2 |
Faint, decreased intensity or dim |
3 |
Italic (Not widely supported) |
4 |
Underline |
5 |
Slow blink |
6 |
Rapid blink |
7 |
Reverse video or invert |
8 |
Conceal or hide (Not widely supported) |
9 |
Crossed-out, or strike |
For instance,
di=@160-1
means that directories (di) will be printed in bold (1) red (160).
Three/six digits hexadecimal color codes are also supported using this format: #RRGGBB[-[1-9]] (or #RGB[-[1-9]]), where 1-9 is a display attribute (only a single attribute is allowed). For example, to get underlined red ELN's:
el=#ff0000-4
or, if you prefer directories to be printed in Royal Blue:
di=#4169e1
A name is assigned to each color in the 256 colors palette. The list of color names (as found in vifm(1)) is a as follows:
| Color | Name |
|---|---|
| 0 | Black |
| 1 | Red |
| 2 | Green |
| 3 | Yellow |
| 4 | Blue |
| 5 | Magenta |
| 6 | Cyan |
| 7 | White |
| 8 | LightBlack |
| 9 | LightRed |
| 10 | LightGreen |
| 11 | LightYellow |
| 12 | LightBlue |
| 13 | LightMagenta |
| 14 | LightCyan |
| 15 | LightWhite |
| 16 | Grey0 |
| 17 | NavyBlue |
| 18 | DarkBlue |
| 19 | Blue3 |
| 20 | Blue3_2 |
| 21 | Blue1 |
| 22 | DarkGreen |
| 23 | DeepSkyBlue4 |
| 24 | DeepSkyBlue4_2 |
| 25 | DeepSkyBlue4_3 |
| 26 | DodgerBlue3 |
| 27 | DodgerBlue2 |
| 28 | Green4 |
| 29 | SpringGreen4 |
| 30 | Turquoise4 |
| 31 | DeepSkyBlue3 |
| 32 | DeepSkyBlue3_2 |
| 33 | DodgerBlue1 |
| 34 | Green3 |
| 35 | SpringGreen3 |
| 36 | DarkCyan |
| 37 | LightSeaGreen |
| 38 | DeepSkyBlue2 |
| 39 | DeepSkyBlue1 |
| 40 | Green3_2 |
| 41 | SpringGreen3_2 |
| 42 | SpringGreen2 |
| 43 | Cyan3 |
| 44 | DarkTurquoise |
| 45 | Turquoise2 |
| 46 | Green1 |
| 47 | SpringGreen2_2 |
| 48 | SpringGreen1 |
| 49 | MediumSpringGreen |
| 50 | Cyan2 |
| 51 | Cyan1 |
| 52 | DarkRed |
| 53 | DeepPink4 |
| 54 | Purple4 |
| 55 | Purple4_2 |
| 56 | Purple3 |
| 57 | BlueViolet |
| 58 | Orange4 |
| 59 | Grey37 |
| 60 | MediumPurple4 |
| 61 | SlateBlue3 |
| 62 | SlateBlue3_2 |
| 63 | RoyalBlue1 |
| 64 | Chartreuse4 |
| 65 | DarkSeaGreen4 |
| 66 | PaleTurquoise4 |
| 67 | SteelBlue |
| 68 | SteelBlue3 |
| 69 | CornflowerBlue |
| 70 | Chartreuse3 |
| 71 | DarkSeaGreen4_2 |
| 72 | CadetBlue |
| 73 | CadetBlue_2 |
| 74 | SkyBlue3 |
| 75 | SteelBlue1 |
| 76 | Chartreuse3_2 |
| 77 | PaleGreen3 |
| 78 | SeaGreen3 |
| 79 | Aquamarine3 |
| 80 | MediumTurquoise |
| 81 | SteelBlue1_2 |
| 82 | Chartreuse2 |
| 83 | SeaGreen2 |
| 84 | SeaGreen1 |
| 85 | SeaGreen1_2 |
| 86 | Aquamarine1 |
| 87 | DarkSlateGray2 |
| 88 | DarkRed_2 |
| 89 | DeepPink4_2 |
| 90 | DarkMagenta |
| 91 | DarkMagenta_2 |
| 92 | DarkViolet |
| 93 | Purple |
| 94 | Orange4_2 |
| 95 | LightPink4 |
| 96 | Plum4 |
| 97 | MediumPurple3 |
| 98 | MediumPurple3_2 |
| 99 | SlateBlue1 |
| 100 | Yellow4 |
| 101 | Wheat4 |
| 102 | Grey53 |
| 103 | LightSlateGrey |
| 104 | MediumPurple |
| 105 | LightSlateBlue |
| 106 | Yellow4_2 |
| 107 | DarkOliveGreen3 |
| 108 | DarkSeaGreen |
| 109 | LightSkyBlue3 |
| 110 | LightSkyBlue3_2 |
| 111 | SkyBlue2 |
| 112 | Chartreuse2_2 |
| 113 | DarkOliveGreen3_2 |
| 114 | PaleGreen3_2 |
| 115 | DarkSeaGreen3 |
| 116 | DarkSlateGray3 |
| 117 | SkyBlue1 |
| 118 | Chartreuse1 |
| 119 | LightGreen_2 |
| 120 | LightGreen_3 |
| 121 | PaleGreen1 |
| 122 | Aquamarine1_2 |
| 123 | DarkSlateGray1 |
| 124 | Red3 |
| 125 | DeepPink4_3 |
| 126 | MediumVioletRed |
| 127 | Magenta3 |
| 128 | DarkViolet_2 |
| 129 | Purple_2 |
| 130 | DarkOrange3 |
| 131 | IndianRed |
| 132 | HotPink3 |
| 133 | MediumOrchid3 |
| 134 | MediumOrchid |
| 135 | MediumPurple2 |
| 136 | DarkGoldenrod |
| 137 | LightSalmon3 |
| 138 | RosyBrown |
| 139 | Grey63 |
| 140 | MediumPurple2_2 |
| 141 | MediumPurple1 |
| 142 | Gold3 |
| 143 | DarkKhaki |
| 144 | NavajoWhite3 |
| 145 | Grey69 |
| 146 | LightSteelBlue3 |
| 147 | LightSteelBlue |
| 148 | Yellow3 |
| 149 | DarkOliveGreen3_3 |
| 150 | DarkSeaGreen3_2 |
| 151 | DarkSeaGreen2 |
| 152 | LightCyan3 |
| 153 | LightSkyBlue1 |
| 154 | GreenYellow |
| 155 | DarkOliveGreen2 |
| 156 | PaleGreen1_2 |
| 157 | DarkSeaGreen2_2 |
| 158 | DarkSeaGreen1 |
| 159 | PaleTurquoise1 |
| 160 | Red3_2 |
| 161 | DeepPink3 |
| 162 | DeepPink3_2 |
| 163 | Magenta3_2 |
| 164 | Magenta3_3 |
| 165 | Magenta2 |
| 166 | DarkOrange3_2 |
| 167 | IndianRed_2 |
| 168 | HotPink3_2 |
| 169 | HotPink2 |
| 170 | Orchid |
| 171 | MediumOrchid1 |
| 172 | Orange3 |
| 173 | LightSalmon3_2 |
| 174 | LightPink3 |
| 175 | Pink3 |
| 176 | Plum3 |
| 177 | Violet |
| 178 | Gold3_2 |
| 179 | LightGoldenrod3 |
| 180 | Tan |
| 181 | MistyRose3 |
| 182 | Thistle3 |
| 183 | Plum2 |
| 184 | Yellow3_2 |
| 185 | Khaki3 |
| 186 | LightGoldenrod2 |
| 187 | LightYellow3 |
| 188 | Grey84 |
| 189 | LightSteelBlue1 |
| 190 | Yellow2 |
| 191 | DarkOliveGreen1 |
| 192 | DarkOliveGreen1_2 |
| 193 | DarkSeaGreen1_2 |
| 194 | Honeydew2 |
| 195 | LightCyan1 |
| 196 | Red1 |
| 197 | DeepPink2 |
| 198 | DeepPink1 |
| 199 | DeepPink1_2 |
| 200 | Magenta2_2 |
| 201 | Magenta1 |
| 202 | OrangeRed1 |
| 203 | IndianRed1 |
| 204 | IndianRed1_2 |
| 205 | HotPink |
| 206 | HotPink_2 |
| 207 | MediumOrchid1_2 |
| 208 | DarkOrange |
| 209 | Salmon1 |
| 210 | LightCoral |
| 211 | PaleVioletRed1 |
| 212 | Orchid2 |
| 213 | Orchid1 |
| 214 | Orange1 |
| 215 | SandyBrown |
| 216 | LightSalmon1 |
| 217 | LightPink1 |
| 218 | Pink1 |
| 219 | Plum1 |
| 220 | Gold1 |
| 221 | LightGoldenrod2_2 |
| 222 | LightGoldenrod2_3 |
| 223 | NavajoWhite1 |
| 224 | MistyRose1 |
| 225 | Thistle1 |
| 226 | Yellow1 |
| 227 | LightGoldenrod1 |
| 228 | Khaki1 |
| 229 | Wheat1 |
| 230 | Cornsilk1 |
| 231 | Grey100 |
| 232 | Grey3 |
| 233 | Grey7 |
| 234 | Grey11 |
| 235 | Grey15 |
| 236 | Grey19 |
| 237 | Grey23 |
| 238 | Grey27 |
| 239 | Grey30 |
| 240 | Grey35 |
| 241 | Grey39 |
| 242 | Grey42 |
| 243 | Grey46 |
| 244 | Grey50 |
| 245 | Grey54 |
| 246 | Grey58 |
| 247 | Grey62 |
| 248 | Grey66 |
| 249 | Grey70 |
| 250 | Grey74 |
| 251 | Grey78 |
| 252 | Grey82 |
| 253 | Grey85 |
| 254 | Grey89 |
| 255 | Grey93 |
For example:
ex=LightGoldenrod3
to print executable files as LightGoldenrod3, namely, color 179 (#d7af5f).
Just as with hex colors, a single attribute can be appended to color names. For example, LightGoldenrod3-1 to get the bold version of this color.
By default, color shades are used to print both timestamps and file sizes (in long view mode and via the p command).
Shades can be customized via the DateShades and SizeShades fields in the color scheme file.
In both cases, the syntax used to specify color shades is as follows:
COLOR-TYPE,ERROR,SHADE1,SHADE2,SHADE3,SHADE4,SHADE5
COLOR-TYPE is one of: 1 (4-bit: 8 colors), 2 (8-bit: 256 colors), 3 (24-bit: truecolor)
For 4-bit colors (1), valid colors are in the range 30-37
For 8-bit colors (2), valid colors are in the range 0-255
For 24-bit colors (3), valid colors have this format: #RRGGBB
ERROR is the color used to print bad values.
SHADEn is the color used for the shade N.
The meaning of each date shade is:
| Code | Meaning |
|---|---|
| SHADE1 | <= hour |
| SHADE2 | <= day |
| SHADE3 | <= weak |
| SHADE4 | <= month |
| SHADE5 | > month |
The meaning of each size shade is:
| Code | Meaning |
|---|---|
| SHADE1 | byte |
| SHADE2 | Kb |
| SHADE3 | Mb |
| SHADE4 | Gb |
| SHADE5 | Bigger |
An attribute (0-9) can be added to any color (either ERROR or SHADE) using a dash (-).
For example:
| Color-attribute | Description |
|---|---|
34-1 |
Bold blue (4-bit colors notation) |
226-2 |
Dimmed yellow (8-bit colors notation) |
#ffaff00-4 |
Underlined orange (24-bit colors notation) |
Note: For DateShades to work, the dd color code (solid color for dates) must be unset (default). In the same way, for SizeShades to work, the dz color code (solid color for sizes) must be unset (default).
Default values are:
DateShades="1,31-2,36-1,36,36-2,36-2,36-2" (4-bit colors)
DateShades="2,197-2,231,253,250,247,244" (256 colors)

SizeShades="1,31-2,36,32,33,31,35" (4-bit colors)
SizeShades="2,197-2,79,77,228,215,203" (256 colors)
Up to 128 custom color variables can be used via the define keyword to make it easier to build and read theme files.1 Example:
define RED=00;31
define MY_SPECIAL_COLOR=04;38;2;255;255;0;48;2;0;14;191

FiletpeColors="di=RED:"
InterfaceColors="el=MY_SPECIAL_COLOR:"
Color names (256 colors) can be used as well. For example:
define RED=MediumVioletRed
define MY_SPECIAL_COLOR=DarkTurquoise
1 This only applies to FiletypeColors, InterfaceColors, ExtColors, and DirIconColor. Prompt and WarningPromptStr lines use full ANSI escape sequences instead.
Besides clifm-specific themes, LS_COLORS (since version 1.15.8) is also supported via the --lscolors command line switch (GNU ls only). A few examples:
- Via vivid
LS_COLORS=$(vivid generate nord) clifm --lscolors- Via a custom dircolors file (for example Nord):
eval $(dircolors FILE)
clifm --lscolors
--lscolors can be used together with --color-scheme: while the former sets file type and file extension colors, the latter takes care of interface colors. For example:
LS_COLORS=$(vivid generate nord) clifm --lscolors --color-scheme=nordNote: Bear in mind that clifm-specific colors (like empty directories or inaccessible files) will be disabled. Note also that colors for specific file names, as defined in LS_COLORS, are not supported (only file extensions are supported). Consult dircolors(1) and the GNU guideline for more information.
You can also set colors using the following environment variables:
| Name | Description |
|---|---|
CLIFM_FILE_COLORS |
File type colors |
CLIFM_IFACE_COLORS |
Interface colors |
CLIFM_EXT_COLORS |
File extension colors |
CLIFM_DATE_SHADES |
Color shades for timestamps |
CLIFM_SIZE_SHADES |
Color shades for file sizes |
LS_COLORS |
To be used with --lscolors (see LS_COLORS support) |
For example, to temporarily set directories color to white run clifm as follows:
CLIFM_FILE_COLORS="di=01;37:ed=02;37:nd=04;37" CLIFM_IFACE_COLORS="fc=02;37" clifmTo test your terminal color capabilities use the colors script (in the plugins directory). You can also run msgcat(1) as follows:
msgcat --color=testFor further information about terminals and color support visit https://gist.github.com/XVilka/8346728.
NOTE: It might happen that, for some reason, you need to force clifm to use colors despite the value of the TERM variable.
The OpenBSD console, for example, sets TERM to vt220 by default, which, according to the terminfo database, does not support color. However, the OpenBSD console does actually support color. In this case, you can set the CLIFM_FORCE_COLOR to either true or 1 to use color even if the value of TERM says otherwise.
To see a colored list of the currently used file color codes run colors in clifm.
By default, clifm ships several themes. Some extra themes however are provided by the clifm-colors repository (for Archlinux users, the package is available on the AUR).
Color schemes are installed in DATADIR/clifm/colors (usually /usr/local/share/clifm/colors). To create your own modified and custom versions copy them to $XDG_CONFIG_HOME/clifm/colors and edit them to your liking (or create new ones if you like, in which case you can submit your cool theme to the clifm-colors repository).
To run colorless use the --no-color command line option or set either CLIFM_NO_COLOR or NO_COLOR environment variables to any value. For more information about the no-color initiative see https://no-color.org/
For a full no-color experience recall to edit your prompt removing all color codes. Clifm includes a colorless prompt in the prompts file (see the prompt command).
When running colorless this way, no ANSI escape code is used (exception made of suggestions, which are dimmed by default). For a customizable colorless theme, i.e., to use other non-color attributes like bold, italic, and so on, you can tinker with the nocolor theme.
The prompt is taken from the Prompt line in the color scheme file. This line could be set to either a prompt name or a prompt code. Example:
# By name
prompt=clifm

# By code
prompt="%{b:red}> %{reset}"
Prompt names are defined in the prompts file and can be listed via the prompt list (or prompt list <TAB>) command.
To test a given prompt, run prompt set PROMPT_NAME.
These prompts can be edited and tweaked to your liking using the prompt edit command.
Each prompt includes these values:
| Option | Description |
|---|---|
The name of the prompt (in square brackets). Example: [my_cool_prompt]. This name is to be used to invoke this prompt in the color scheme file as described below |
|
RegularPrompt |
The code used to build the regular prompt. Consult the prompt code and advanced prompt customization sections below |
Notifications |
Set to either true or false, it tells clifm whether to automatically insert notifications at the left of the prompt. You might need to set this option to false if building a custom prompt. See the examples provided by the prompts file. |
RightPrompt |
The code used to build the right prompt. See the right prompt section below for details. |
EnableWarningPrompt |
Set to either true or false, it says whether clifm should switch to an alternative prompt used to highlight invalid/non-existent command names as you type. See the warning prompt section below for details. |
WarningPrompt |
The code used to build the warning prompt. If EnableWarningPrompt is set to false, this line will be ignored. |
To permanently set a given prompt, set Prompt in the color scheme file (via cs edit) to the name of the prompt you like, for example:
Prompt="security-scanner"Note: The remaining prompt lines, if any, should be commented out to avoid overriding the values defined in the prompts file.
A prompt code (for the regular, right, and warning prompts) is built following almost the same escape codes and rules used by the Bash prompt, except that it does not accept shell functions (like conditionals and loops). Command substitution (in the form $(cmd)), prompt modules (in the form ${module}), string literals, color notation (see below), and ANSI escape sequences can be used to build the prompt line.
| Escape code | Description |
|---|---|
\e |
Escape character |
\u |
The username |
\H |
The full hostname |
\h |
The hostname, up to the first dot (.) |
\s |
The name of the shell (everything after the last slash) currently used by clifm |
\S |
Current workspace number (colored according to wsN codes (in InterfaceColors) in the color scheme file) |
\l |
Print an L if running in light mode |
\P |
The current profile name |
\n |
A newline character |
\r |
A carriage return |
\a |
A bell character |
\d |
The date, in abbreviated form (e.g.: Tue May 26) |
\t |
The time, in 24-hour HH:MM:SS format |
\T |
The time, in 12-hour HH:MM:SS format |
\@ |
The time, in 12-hour am/pm format |
\A |
The time, in 24-hour HH:MM format |
\w |
The full current working directory, with $HOME abbreviated with a tilde (~) |
\W |
The basename of the current working directory, with $HOME abbreviated with a tilde |
\p |
A mix of the two above, it abbreviates the current working directory only if longer than 40 characters. To change this value set the CLIFM_PROMPT_P_MAX_PATH environment variable to a value greater than zero. |
\f |
Abbreviate every path component but the last to a single character. To change the number of characters per path component, set the CLIFM_PROMPT_F_DIR_LEN environment variable to a value greater than zero (defaults to 1). To keep some path components unshortened, set the CLIFM_PROMPT_F_FULL_LEN_DIRS to a value greater than zero (defaults to 1). |
\z |
Exit code of the last executed command (colored according to xs (success) and xf (failure) codes in the InterfaceColors section in the color scheme file) |
\b |
Execution time of the last command (in seconds). Use the CLIFM_PROMPT_B_MIN environment variable to print times only if bigger than the specified value (defaults to 0, i.e., print always), and the CLIFM_PROMPT_B_PRECISION variable to print only the specified value of decimal places (defaults to 2). |
\i |
The value of CLIFMLVL (number of nested instances of clifm) |
\I |
Same as \i, but formatted as (n) (nothing is printed if CLIFMLVL is 1) |
\$ |
#, if the effective user ID is 0 (root), and $ otherwise |
\nnn |
The character whose ASCII code is the octal value nnn
|
\\ |
A literal backslash |
\[ |
Begin a sequence of non-printing characters. This is mostly used to add color to the prompt line |
\] |
End a sequence of non-printing characters |
The following files statistics escape sequences are available as well:
| Escape code | Description |
|---|---|
\D |
Amount of sub-directories in the current directory |
\R |
Amount of regular files in the current directory |
\X |
Amount of executable files in the current directory |
\. |
Amount of hidden files in the current directory |
\U |
Amount of SUID files in the current directory |
\G |
Amount of SGID files in the current directory |
\F |
Amount of FIFO/pipe files in the current directory |
\K |
Amount of socket files in the current directory |
\> |
Amount of door files in the current directory (Solaris only) |
\B |
Amount of block device files in the current directory |
\C |
Amount of character device files in the current directory |
\x |
Amount of files with capabilities in the current directory |
\L |
Amount of symbolic links in the current directory |
\o |
Amount of broken symbolic links in the current directory |
\M |
Amount of multi-link files in the current directory |
\E |
Amount of files with extended attributes in the current directory |
\O |
Amount of other-writable files in the current directory |
\* |
Amount of files with the sticky bit set in the current directory |
\? |
Amount of files of unknown file type in the current directory |
\! |
Amount of unstatable files in the current directory |
Escape codes for prompt notifications, mostly used for custom prompts which need to handle notifications themselves. In this case,
Notifications should be set to false in the prompts file to prevent the automatic insertion of notifications at the left of the prompt (a few examples are given in the prompts file).
| Escape code | Description |
|---|---|
\* |
* + amount of selected files |
\% |
T + amount of trashed files |
\# |
R if root user |
\) |
W + amount of warning messages |
\( |
E + amount of error messages |
\= |
N + amount of notice messages |
Note: Except for \#, nothing is printed if the number is zero (i.e. no selected, no trashed files, and so on).
Colorization is made using either of the two following methods:
1) Bash-style ANSI escape codes. For example:
\[\e[1;31m\] # Bold red
Or, for a 24-bit color:
\[e[1;38;5;128;37;45m\]
Note that \[ and \] are used to indicate that the string is made of non-printing characters.
2) (Since 1.21) Using the %{COLOR} syntax, where COLOR is:
a) A color/attribute name.
Color names: black, red, green, yellow, blue, magenta, cyan, white
To get the full-brightness variant of any of the above colors use the br prefix followed by the color name (e.g.: brblue or brblack).
Note that brblack has has higher brightness than black (close to gray).
Attribute names: bold, dim, italic, underline, reverse, strike.
To disable a specific attribute use the no prefix followed by the attribute name (e.g.: nounderline or nobold).
To disable all previous attributes use the reset keyword.
For example:
%{bold}%{underline}%{brred}text%{nounderline}text%{reset}
prints text twice, first in a bold underlined bright red, and then in a bold bright red (no underline), disabling all attributes afterwards.
Use the special fgreset and bgreset keywords to set the foreground and background color respectively to the default terminal value. For example:
%{k:red}%{blue}text%{bgreset}
prints text in blue on a red background, and then resets the background color (keeping the foreground color).
b) A number in the range 0-255 (256-colors). E.g.:
%{196}
c) A # followed by either a three or six digits hexadecimal number. E.g.:
%{#ff0000}
Attribute names can be used in all the three cases. E.g.:
%{bold}%{red}
%{dim}%{196}
%{reverse}%{#ff0000}
A single attribute can also be added via a character prefix followed by a colon (:).
| Prefix | Description |
|---|---|
b |
Bold |
d |
Dim |
i |
Italic |
k |
bacKground |
n |
Normal/reset |
r |
Reverse |
s |
Strike |
u |
Underline |
For example:
%{d:red} # for dimmed red
%{u:#ff0000} # for underlined red
To specify two or more attributes use the standalone attribute names. E.g.:
%{bold}%{u:green}
Or,
%{bold}%{underline}%{green}
To specify a background color (instead of foreground), use the k: prefix. E.g.:
%{u:red}%{k:blue}
will print underlined red on a blue background.
Writing a prefix in uppercase turns off only the corresponding attribute (unlike n, which turns off all attributes). For example:
%{b:red}%{k:blue}text%{B:red}text
will print text twice, first in bold red on a blue background, and then in red (no bold) keeping the blue background.
Note that N sets the foreground color to the default terminal value, while K sets the background color to the default terminal value.
By default, for example, clifm's prompt line is this:
| Code string | Look |
|---|---|
%{reset}\I[\S%{reset}]\l \A \u:\H %{cyan}\w%{reset}\n<\z%{reset}> %{blue}\$%{reset} |
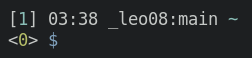 |
A more "classic" prompt can be built as follows:
%{green}\u@\h %{blue}\w%{reset}> Since escape codes are limited and internal to Clifm, prompt modules and command substitution are designed to provide external information to the prompt.
While command substitution work much like in regular shells, invoking shell commands (e.g. $(uname -s)), prompt modules are programs/scripts located in the plugins directory (either local or system wide).
To run a prompt module write ${NAME}. For example, to run the git prompt module: ${m_git_prompt_status}. Clifm will look for this module in the local plugins directory (~/.config/clifm/plugins), and, if not found, in the data directory (usually, /usr/local/share/clifm/plugins).
Note that you can also run a prompt module using command substitution, in which case you need to indicate the path to the module. For example, instead of
${m_git_prompt_status}
you can write
$(/usr/local/share/clifm/plugins/m_git_prompt_status)
By way of example, you can build a classic prompt using command substitution as follows:
$(whoami)@$(hostname) $(pwd)>
If you want to add git status information to this prompt, use the git prompt module:
$(whoami)@$(hostname) $(pwd) (${m_git_prompt_status})>
Besides commands substitution, which allows you to include in the prompt any information you like via shell scripts or simple shell commands, the use of Unicode characters allows you to build colorful and modern prompts.
Inserting Unicode characters in the prompt can be made in two ways:
a) Pasting the character itself using a text editor
b) Entering the octal code corresponding to the character. Use hexdump as follows to get the appropriate code:
echo -ne "[paste the char here]" | hexdump -cThe output will be something along these lines:
00000000  256 234 356                                          |...|
00000003
In this case, the octal code is: 256 234 356. So, to insert this Unicode character in the prompt, add this code as follows:
Prompt="... \256\234\356 ..."Note: Make sure you have installed a font able to display Unicode characters.
A few examples:
| Name | Look |
|---|---|
Arctic particles |
 |
Fireplace |
 |
Stain |
 |
Green beret |
 |
Cold winter |
 |
The code for each of these prompts can be found in the prompts file. To try them out you can use the prompt command, for example, prompt Stain.
Note: Some of these prompts require a patched Nerdfont.
We all want to keep our systems safe. One of the many ways to get a bit of safety is by checking that there is no file in our file system that could somehow compromise our machines. SUID, SGID, executable, and world-writable files are to be count among these dangers.1 This is why it could be useful to build a little files scanner for our prompt using the above mentioned files statistics escape codes. This is the code for our scanner:
%{reset}%{b:red}\U%{reset}:%{b:yellow}\G%{reset}:%{b:green}\O%{reset}:%{b:blue}\X%{reset}By adding this code to our prompt line, we get something like this:
24:2:-:2389
This tells us that in the current directory we have 24 SUID files (printed in bold red), 2 SGID files (bold yellow), no world-writable file, and 2389 executable files.
NOTE: A predefined prompt with this files scanner integrated can be found in the prompts.clifm file.
NOTE 2: Most of the information these escape codes rely on depends on stat(3). Now, since stat(3) is not used when running in light mode (for performance reasons), this information won't be available in light mode either.
1 See our resources page.
By default, clifm prints a few notification marks at the left of the prompt:
| Mark | Default Color | Description |
|---|---|---|
R |
red | Clifm is running as root |
* |
green | There are selected files |
T |
yellow | There are trashed files |
S |
blue | Clifm is running in stealth mode |
E |
red | Error message |
W |
yellow | Warning message |
N |
green | A simple notice |

The suggestions system includes a secondary, warning prompt, used to highlight wrong/invalid/non-existent command names. Once an invalid command is entered, the regular prompt will be switched to the warning prompt and the whole input line will turn dimmed red (though it can be customized to fit your needs).
The wrong command name check is omitted if the input string:
- Is quoted (e.g.:
"string"or'string') - Is bracketed (e.g.:
(string),[string], or{string}) - It starts with a stream redirection character (e.g.:
<stringor>string) - Is a comment (e.g.:
#string) - It starts with one or more spaces
- Is an assignment (e.g.:
foo=var) - It is escaped (e.g.:
\string)
The warning prompt could be customized by means of the same rules used by the regular prompt. To use a custom warning prompt modify the WarningPrompt line in the prompts file.1 It defaults to \[\e[0;2;31m\](!) > : the last line of the regular prompt will become "(!) > ", printed in a dimmed red color, including the input string.
To disable this feature use the --no-warning-prompt command line option or set the WarningPrompt option to false in prompts file.
NOTE: Bear in mind that the warning prompt depends on the suggestions system, so that it won't be available if this system is disabled.
The right prompt is just like the regular prompt, but printed on the right side of the screen. A few caveats:
- Right prompts only work with multiline regular prompts (in the case of a single line regular prompt, the right prompt is not printed).
- Multiple lines are not supported by right prompts (only the first line will be printed).
- If the decoded right prompt exceeds the amount of available terminal columns, the prompt is not printed.
For a concrete usage example see the info prompt in the prompts file.
This is the line dividing the current list of files and the prompt (see the interface section). It can be customized via the DividingLine option in the current color scheme file to fit your prompt design and/or color scheme.
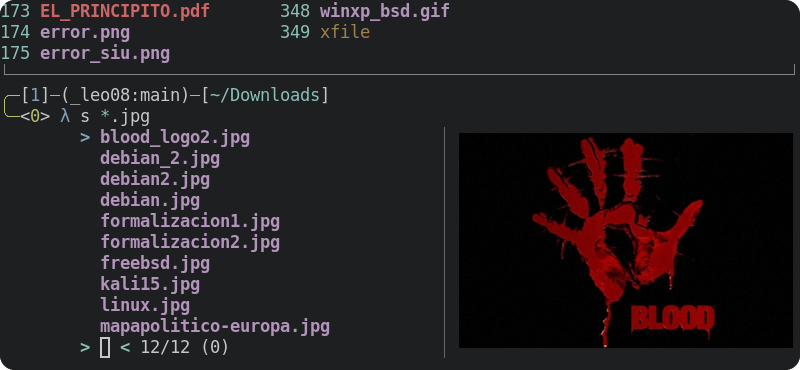
DividingLine accepts one or more ASCII or Unicode characters (in both cases you only need to type/paste here the chosen character(s)).
If only one character is specified (by default, "-"), it will be repeatedly printed to fulfill the current line up to the edge of the screen or terminal window.
If you don't want to cover the whole line, specify two or more characters, in which case only these characters (and no more) will be used as dividing line. For example: "------->", or "💀💀💀💀".
To use an empty line, set DividingLine to "0" (as a character, not as a number).
Finally, if this value is not set (or set to an empty string), a special line drawn with box-drawing characters will be used (bow-drawing characters are not supported by all terminal emulators).
The color of this line is set via the dl color code in the color scheme file. Consult the colors section for more information.
Refer to the TAB completion page.
By default, no Unicode characters are used to build the clifm interface. However, this is not a technical limitation, but a design decision (mainly for portability reasons). Indeed, you can easily get a more sleek and modern interface by tweaking a few values. For example:
To get this look, we have only changed three values in our color scheme file (cs edit or F8):
- Use box drawing characters (not supported by all terminals) instead of an ASCII dash (
-) to construct the dividing line:
DividingLine=""
Note: Unicode characters can also be used, for example, DividingLine="─", or, if you are in a good mood, DividingLine="😎".
- Change the prompt to a Unicode one (in this case
curves). See the prompt section for more information.
Prompt="curves"
- If
FzfPreviewis enabled, remove the--no-unicodeoption fromFfzTabOptions(bottom of the color scheme file) to tell fzf to draw the preview window using Unicode characters.
Note: Here we are using TAB completion in fzf mode with file previews enabled and image preview support.
Note 2: To add icons, please consult the icons section.

Since this is file manager, listing files is one of the most important aspects of clifm. Unlike most terminal file managers out there, clifm does not make use of any menu-based interface (traditionally curses based): it rather lists files as any other files listing utility for the terminal (notably ls(1)) would do, using colors for different file types and ELN's (entry list numbers) for each listed file.
Almost every aspect of the list of files can be customized to make this list look and behave as you want.
| Feature | Default value | Command line option | Config file option | Command | Keybinding |
|---|---|---|---|---|---|
| List mode | Vertical list (ls-like) |
-H, --horizontal-list
|
ListingMode |
||
| Max file names length | unset | MaxFilenameLen |
|||
| Display ELN's | true | --no-eln |
|||
| Columns | enabled | --no-columns |
cl, columns
|
||
| Colors | enabled | --no-colors |
ColorScheme |
cs, colorscheme
|
|
| Count files in directories | enabled | --no-files-counter |
FilesCounter |
fc |
|
| Directories first | true |
-f, --no-dirs-first, and -F, --dirs-first
|
ListDirsFirst |
ff, dirs-first
|
Alt-g |
| Icons | disabled | --icons |
Icons |
icons |
|
| Sorting method | name |
-z, --sort
|
Sort, SortReverse
|
st, sort
|
Alt-z, Alt-x |
| Case (in)sensitive list | Insensitive |
-i, --no-case-sensitive, and -I, --case-sensitive
|
CaseSensitiveList |
||
| Hidden files | Not shown |
-a, --no-hidden, and -A, --show-hidden
|
ShowHiddenFiles |
hh, hidden
|
Alt-i, Alt-. |
| Long/detail view | normal view |
-L, --long-view
|
LongView |
ll |
Alt-l |
| Filter files | No filter | Filter |
ft, filter
|
||
| Max displayed files | No limit | --max-files |
MaxFiles |
mf |
Refer to the following sections for more information about each of these options: Command line options, Configuration file options, Commands, and Keybindings.
| Vertical list (ls-like) | Horizontal list |
|---|---|
 |
 |
Clifm ships these keybindings by default. However, they can be freely modified using the kb edit command (or pressing F9) or editing the keybindings file to your liking. See the files section.
The GNU emacs notation is the main way to setup your keybindings. For example, \C-a for Control-A or \C-\M-x for Control-Alt-X.
When special keys like function or arrow keys are involved, the thing is a bit more tricky. Since clifm does not depend on the curses library, keybindings are set up via ANSI escape codes, for example, \[17~ for F6 key. The two main difficulties with ANSI escape codes are: 1) They are not intuitive at all, and 2) They vary depending on the terminal emulator used. This is why we provide a plugin (kbgen) to more easily configure your keybindings.
The plugin can be found in the plugins directory as a C source file. The first step, therefore, is to compile this source file to produce a binary file. Compile as follows:
gcc -o kbgen kbgen.c -lcursesNote: Depending on your system, you might need to compile against the curses library using lncurses instead of lcurses.
Now, run the plugin entering ./kbgen. Use either octal, hexadecimal codes or symbols. Example: For F12 kbgen will print the following lines:
Hex  | Oct  | Symbol
---- | ---- | ------
\x1b | \033 | ESC (\e)
\x5b | \133 | [
\x32 | \062 | 2
\x34 | \064 | 4
\x7e | \176 | ~
In this case, supposing you want to use F12 to open the configuration file, the keybinding would be any of the following:
open-config:\x1b\x5b\x32\x34\x7e (Hex)
open-config:\033\133\062\064\176 (Oct)
open-config:\e[24~ (Symbol)NOTE: You can also try this program, but it only provides hex codes for the corresponding key presses.
Keybindings provided by readline (e.g. Ctrl-a, to move the cursor to the beginning of the line, or Ctrl-e, to move it to the end) are controlled via a custom configuration file to prevent conflicts with clifm's own keybindings. This file, readline.clifm, is located in the main configuration directory (usually, ~/.config/clifm) and can be customized using the same rules used by readline's inputrc file. See http://tiswww.case.edu/php/chet/readline/readline.html#SEC9.
If this file cannot not be found for any reason, readline falls back to ~/.inputrc, and then to /etc/inputrc.
Clifm provides sixteen customizable keybindings for custom plugins. The procedure for setting a keybinding for a plugin is the following:
1) Copy your plugin to the plugins directory (or use any of the plugins already in there)
2) Link pluginx (where x is the plugin number [1-16]) to your plugin using the actions edit command. For example:
plugin1=myplugin.sh3) Set a keybinding for pluginx using the kb edit command. For example: plugin1:\M-7, that is to say, Alt-7.
For a concrete example take a look at this discussion.
In case of issues, consult the keybindings issues section.
Before running a command, clifm checks first for aliases, then for user defined actions (plugins), then for internal commands, and finally for external commands. This means that you can make use of aliases and plugins to build custom commands, even overriding internal and external commands themselves. Let's, for example, build a custom copy command named c (overriding thereby the internal c command, also used to copy files).
We need two things:
- The actual code for our command (namely a shell script).
- A way to invoke it.
In this example case, we have a simple shell script, but it might be basically whatever you want and written in any language you like.
#/bin/sh

printf "Copying %s to %s\n" "$1" "$2"
cp -- "$1" "$2"
Name this file copy.sh (it could be whatever you want though) and place it in the plugins directory, usually ~/.config/clifm/plugins.
Open the configuration file and, in the aliases section, add this line:
alias c='~/.config/clifm/plugins/copy.sh'
For more information about aliases consult the aliases section.
Run actions edit to open the actions file and add this line:
c=copy.sh
Note the in this case it is not necessary to specify the path to our copy.sh script, since the actions function will automatically look for it in the actions directory.
For more information about plugins, consult the plugins section.
Aliases are another way of customization, though this time we are customizing, not interface, graphical elements, but commands. Much like in traditional shells, clifm allows you to set aliases for any command, be it internal or external.
To list available aliases run alias.
To get information about some specific alias enter alias MY_ALIAS_NAME.
To create a new alias, add it to the configuration file as follows:
-
Open the configuration file, either by entering
editor pressing F10. -
Add a new alias using the POSIX syntax for the
aliasshell command:
alias myalias='command arguments'or, to alias a file or directory name:
alias myalias='/path/to/file'After saving the file (clifm automatically updates aliases and settings), you can run your alias as any other command. For example:
cd myalias` (or just `myalias`)or
myalias some_extra_argumentBear in mind that when adding arguments to an alias they will be appended to the aliased command.
A nice and neat way of using aliases is aliasing those directories or files you use the most, ideally, using a one character alias:
alias a='/my/very/important/directory'Afterwards, access your top directory by entering the corresponding alias, in this case, a
You can also import aliases from the system using the import subcommand as follows:
alias import FILEwhere FILE can be any file containing aliases defined according to the POSIX specification for the alias shell command. You usually want some of the below, depending on your shell:
| Shell | Command |
|---|---|
| Bash | alias import ~/.bashrc |
| ZSH | alias import ~/.zshrc |
| Fish | alias import ~/.config/fish/config.fish |
Note: When creating aliases always make sure they won't conflict with other commands. Since aliases are evaluated before command names as such, aliases has priority over them. If you set an alias named c, for example, you won't be able to use the c command, unless you create another alias for this latter, say cc or whatever alias you prefer.
Clifm allows you to automatically run shell commands in two different ways:
- Via profile commands (in which case commands will be executed at startup, even before listing files):
Open the profile file ($XDG_CONFIG_HOME/clifm/profiles/PROFILE/profile.clifm) and add there whatever shell command you want, for example:
echo "This is a profile command"- Via prompt commands (unlike profile commands, they will executed immediately before each new prompt):
Open the main configuration file (edit or F10) and add your command preceded by the promptcmd keyword. For example:
promptcmd if [ "$PWD" == "/home/user/Downloads" ]; then printf "Welcome to my Downloads directory"; fiA nice example of the usage of prompt commands is provided by the git integration procedure.

What is clifm?
Is it for me?
Main design and goals
Dependencies
Installation
Interface
Getting help
Configuration file
Command line options
Commands
Keybindings
FAQ
ELN (entry list number)
Navigation
Opening files
Sorting files
Filtering files
Basic file operations
Selection
Search
Bookmarks
Trash
Archives
File details/Long view
Basic usage examples
Workspaces
Directory jumper
Resource opener (file launcher)
Actions (plugins)
Autocommands
Profiles
Aliases
The prompt
TAB completion (with fzf integration)
Auto-suggestions
Syntax highlighting
File tags
File names cleaner
Fastback and backdir
Remote file systems management
Light mode
Read-only mode
Stealth mode (incognito)
Disk usage analyzer mode
Desktop notifications
Environment
Files
Security
Tiling WM's and terminal multiplexers
FZF mode for TAB completion
File previews
Bulk operations
Archiving
Virtual directories
cp/mv progress bar
Send files to Android device
Git integration
Wildcards and REGEX
Multiple instances
Icons
Plugins
Customization
CD on quit
Files picker
Files lister (ls-mode)
stat(1) replacement
Subshell notification